


My husband miraculously had most the day off today (he never really gets a full day off, so we take what we can get!), so we're out having fun with the kids while Jessica is running around Disneyland with hers! In the birdies' absence, we have an absolutely darling fabric flower wreath tutorial from our friend Shelley, who coincidentally has an Etsy shop, See Shells Photography, that we think you should check out! She is amazing. Enjoy!
Beautiful Fabric Flower Wreath Tutorial
I've been thinking about this fabric wreath for a while. I just needed some extra inspiration from my friend Mandy over at LittleBirdieSecrets. While at her house, I got to meet Cami. She is amazing. Check her blog out.
Here's the materials list:
oh, BTW, everything I used was recycled from something else. I didn't buy anything.
So the cost was FREE!
So the cost was FREE!
*One Queen size bed sheet you're willing to tear up
*One empty diaper box or other large cardboard box
*Scissors
*Glue Gun
*Sewing machine
*Needle and Thread
*Time
(I know the last one can be a precious commodity)
To start with, Mandy taught me how to do one of these flowers. She's got some great ideas. Then my friend Cami taught me how to do this one. So cute. It reminded me how much I love my glue gun.
Next I made up a few of my own. Here's one:
Tear a few about 2 1/2 inch to 3 inch strips from your sheet. I love the frayed edges.

Tear a few about 2 1/2 inch to 3 inch strips from your sheet. I love the frayed edges.
Next fold it in half and thread your needle with about 2 ft of thread.

On the folded side, knot the thread and do a forward stitch and a backward stitch in the end to start theruffle. The longer your strip, the fuller the flower. Also the wider the strip, the larger the flower. Keep that in mind.

Keep doing a running gathering stitch until you get to the end of the strip. Pull the threads tight to get a tight gather. Get our glue gun out and start rolling the ruffle together, gluing as you go.

The bottom will look like this when you are done.

And this is the finished flower. I made about 5-6 of these.

Next cut a circle from your fabric about a cereal bowl size. This will be the base of the next flower.

Use another strip about the same size as the one for the ruffle flower.Tie a knot in the end and glue to the center of the circle.

Twist the strip of fabric counter clock wise as you coil it also counter clock wise and glue it down on the fabric circle.

To finish it off, tuck the last piece of the strip behind the flower and glue down. I made 5-6 of these in different sizes.

Two down, Two to go.


Make5-6 of these too.
Next was my own creation too. Tear a strip of fabric about 2 inches wide. On your sewing machine, create your own ruffle by folding the fabric forwards and backwards randomly as you sew. Finish all the way to the end of the strip. 
Cut another circle of fabric about 3-4 inchies wide. Start gluing the ruffle down to the circle in a spiral pattern. (I tried sewing it and it was too awkward)

When you get to the last 3 inches of ruffle, to form the center, roll and glue the ruffle back towards the center of the flower. Then put a blob of glue in the center and place the roll of ruffle in the center and press. It will look like this. I made 5-6 of these too.
Next get your box out.
Next get your box out.

Open it flat and measure two circles. I used my quilting yard stick to create the circle. Find the center point and make marks at 1inch and whatever the length you want keeping the center point the same. Twist the yard stick in a circle and keep making marks all the way around.

Do the same for the center circle. Cut one out, then trace it and cut the other one out.
Use packing tape to secure the two circles together. Make sure you rotate the cardboard so the creases are not lined up between the pieces. This will keep it flat.
Do the same for the center circle. Cut one out, then trace it and cut the other one out.
Use packing tape to secure the two circles together. Make sure you rotate the cardboard so the creases are not lined up between the pieces. This will keep it flat.
Cut two fabric circles just about 1/2 to 3/4 inches from the edge of the cardboard circle. Sandwich them together and stitch the center circle. Poke 2 holes in the top of the cardboard and fabric to allow for hanging.

Then put the Cardboard circles inside and stitch the outside edge. Then thread a piece of ribbon or string through the holes to be able to hang the wreath.
Then put the Cardboard circles inside and stitch the outside edge. Then thread a piece of ribbon or string through the holes to be able to hang the wreath.
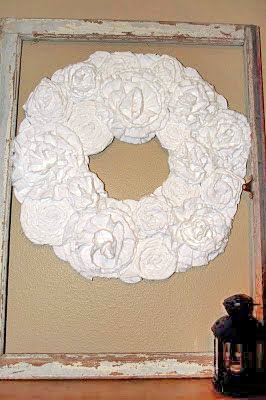
Next place the flowers around the circle. I placed them, then glued down each one.

I love how it turned out!
share this on » |
{Facebook} | {Twitter} | {Pinterest} |


20 Responses to “fabric flower wreath {tutorial}”
I LOVE this!!! Thanks for sharing...I must make one for my bedroom!
I love the dimension you get from using the different methods to form the blooms.
I am definitely gonna give this one a try! You know I love my glue gun!
Beautiful....
I love how it turned out! I want to try this soooo bad. I love you just used recycled things. So awesome:)
The looks so vintage and cute!!! What a creative idea...I love it...
oh that's so pretty! I need a new spring wreath. Great idea!
Your wreath is just gorgeous. Thank you for sharing your technique. Happy creating...
oh my goodness! i love that!! thank you so much for sharing! i know exactly what i'll be doing tomorrow!!! :)
adorable!!!
This looks great, have got to make one and I think I have an old sheet that will prove most useful!
Bee happy x
http://beehappyhome.blogspot.com/
love it very stylish
BEAUTIFUL!!!
I love, love, love this. The simplicity is so charming. Thanks for sharing:)
Thanks for the feature Shelly! This turned out so cute! I love that it was free, and I love that you used all different types of flowers! Your hard work really paid off! It looks stunning. Hopefully I'll see you again tomorrow night for some crafting awesome-ness.
LOVE IT! Giving it a go right now. Thanks for the great idea!
Love the varying types in the same color. And what a great way to reuse sheets!
love this! I have a bunch of little boy tshirts I was just going to chuck. Perfect project!!!
I am totally in love with this wreath! I am going to have to make one!
I really love this.. what a wonderful idea. Thanks for sharing this.Mary WVa
Fabulous idea - love the way you used various flowers - you inspired me to make my own version for Spring!
Blessings~
http://cosmicgirldesigns.com
Post a Comment