Archive for June 2011

Thursday, June 30, 2011

stomp rockets {summer fun deal}

Have you heard of stomp rockets? My mom bought some for my boys a couple of years ago and they loved them! It resulted in hours and hours of fun outside for them.  With summer upon us, I am always looking for things to do with my boys to keep them entertained.  I try not to have them watch too much TV or play too many video games, and that means getting creative with ideas for them to have fun.

Stomp Rocket Ultra sore up to 200 feet! Make sure you do this in a backyard or other large space.  We actually had one sail to the top of our roof before! I love that they are air-powered, with no fuel or batteries needed.  All the kids have to do is stomp on it and the rockets will soar! Simple toys are the best!

Well, since I know you all want to entertain your kids this summer too, we have an exclusive Little Birdie Secrets deal on Stomp Rocket Ultra for you! Go to the site and enter code lilbirdie to get it for $14.99! You better hurry because there is a very limited quantity and this deal with expire July 1st (that's tomorrow!) while supplies last. Have fun stompin'. Let's be real, you know you're going to play with it too!

share this on »
{Facebook} {Twitter} {Pinterest}
2 Comments

Wednesday, June 29, 2011

easy 4th of july centerpieces {tutorial}

Life is beyond crazy at my house house right now, but I'm looking forward to a short break for the fabulous 4th of July holiday. I apologize there haven't been many true tutorials or even crafty ideas here lately (more on that soon), but here's a quick and easy one for your 4th of July festivities in case your life's a little crazy right now, too!

Festive Fourth Flag Centerpieces

Supplies:
*Plastic pop corn containers (these are from the Dollar Tree--yep, only $1 a piece!)
*Small decorative American flags (try the dollar store or a party store, or even Michael's)
*Used newsprint or printer paper
*Kitchen knife
*Crinkle cut shredded paper (like you'd use in gift wrapping--try making your own to save $$)
 

1. Start with your plastic pop corn containers. Don't you love these little cups? Just the right colors and what's more American than pop corn? And only $1! Wad up some newsprint or thin copy paper and stuff in the bottom of the pop corn cup. This will hold your flags. Use a knife to poke three holes in the paper ball for the flags to stick in (way easier than trying to poke the holes with the flags themselves, trust us!).

2. Insert three flags into the holes you made and arrange them so they are well-spaced. 

3. Fill the rest of the pop corn container up with red and blue crinkled paper shreds, letting a few hang over the edges. 

That's it! These make great centerpieces you can use year after year at a super affordable price, plus you can use the pop corn containers for, well, pop corn the rest of the year! Happy birthday, USA!

share this on »
{Facebook} {Twitter} {Pinterest}
9 Comments

Tuesday, June 28, 2011

stop and feel the joy

I've been scouring my photo folders on my computer looking for all our favorites moments of time in Seattle. We leave in less than three weeks, and I'm trying to put together a photo book to help us remember the incredible years we've spent here. Augh, getting teary just thinking about it! But while looking through five years worth of photos, I found this one from a recent trip to Arches National Park in Utah and stopped.


I stopped because of the complete look of joy on this little boy's face. I stopped because of how simple that joy is--the joy in finding the biggest dandelion in the world to blow the petals off of! I stopped because of the joy that I felt myself in remembering this moment. I stopped because I realized our family can find this kind of joy anywhere we go, as long as we're together.
I am so grateful for the simple pleasures in life that my children remind me of every single day. And I'm grateful I sometimes think to stop and capture them with my camera!

We want to hear about your moment of joy! Share your story and upload a photo (optional), and in return Shutterfly will gift you $5 off your next photo book to commemorate life’s joyous moments, and you"ll be entered for a chance to win a $200 Shutterfly Gift card.

This is a sponsored conversation written by me on behalf of Shutterfly. The opinions and text are all mine. Offer valid for $5 off one photo book order and valid for one-time redemption per member. Taxes, shipping and handling will apply. BlogFrog hosted gift card contest live from June 17th to July 14th. A winner will be randomly chosen and announced on July 18th. All participants remain the copyright holder of their photos.

share this on »
{Facebook} {Twitter} {Pinterest}

Monday, June 27, 2011

a kids movie I secretly love to watch

To celebrate summer fun, Redbox is asking moms, "What movie meant for kids do you secretly love to watch?" Plus, they are rewarding 2 lucky people with a chance to win $10,000 as part of the Redbox Summer of Fun & Games Sweepstakes.

So, I know you are all dying to know what that movie is for me. I am a little embarrassed to admit this, but anyone who knows me knows I love me some cheese. I am not just speaking of the kind you eat, but the corny, childish kind you can find in certain movies. I secretly love to watch High School Musical. Is that HSM 1, 2 or 3, you ask? My answer: yes. Although I will say that 3 is my favorite. I realize these movies are super cheesy, and some parts make me giggle at the silliness of it all, but it brings me back to my own High School days. I love all the singing and dancing, however silly it may be for Troy to bust out in song during basketball practice. I will also admit that I own all three of these DVDs, despite the fact that I am the only girl in my house.

Redbox is celebrating summer family time with a great line up of family-friendly titles, awesome savings and two chances to win $10,000 as part of the Redbox Summer of Fun & Games Sweepstakes.*

4 Easy Ways to Enter:
1. Enter your email address at www.redbox.com/summer
2. Rent a movie or game at a redbox kiosk (and provide a valid email address at checkout)
3. Reserve a rental online at redbox.com
4. Text 'SUMMER' to 727272
Enter to win today!

This is a sponsored conversation written by me on behalf of Redbox. The opinions and text are all mine.

*Each item rented earns one entry, regardless of how long it is rented, up to three entries per day. Limit 3 entries per day, regardless of entry method. The sweepstakes begins May 27, 2011 at 12:00 a.m. CT and ends on August 1, 2011 at 11:59 p.m. CT. No purchase necessary. See official rules at www.redbox.com/summer.

share this on »
{Facebook} {Twitter} {Pinterest}

Sunday, June 26, 2011

everyday keepsakes winner

Time to announce the winner of a lovely angel love necklace.  The lucky lady is...

Momma Ward who said,
"There were so many pretty pieces... I think my very favorite might be the Faith Cluster Tag necklace."


Congrats! We know you will love it! We have passed your email address onto the sponsor, so she should be contacting you soon.

share this on »
{Facebook} {Twitter} {Pinterest}
1 Comment

Friday, June 24, 2011

che bella notte pasta

Today's recipe comes from our friend, Jamie (with a picture by our friend, Melynie). It is a great, fresh recipe and it only takes about 30 minutes to make! Delish.


Che Bella Notte Pasta

10 oz pasta (I’ve used farfalle, rotini, ziti, penne, capenelli)
2 tbsp olive oil
2 cloves garlic, minced
1 tsp (or more) capers
1 lb boneless, skinless chicken breast, cut into medallions
1 tsp dried basil
1/8 tsp crushed red pepper
1 C chicken broth
½ C sun-dried tomatoes, julienne
½ C heavy cream
¼ C grated parmesan cheese

--Cook pasta as directed on package. In the meanwhile, heat olive oil over medium-high heat. Add garlic, capers and chicken. Add basil and red pepper. Cook for about 4 minutes to brown (don’t overcook—it will continue cooking in the sauce!) Add broth and tomatoes. Simmer uncovered for 5 minutes. Take off heat and stir in cream and cheese. Pour over pasta and enjoy!

*note: super yummy to add any combination of the following: roasted pine nuts; diced fresh tomato; steamed zucchini, mushrooms, asparagus, yellow squash, spinach, eggplant; and I always sprinkle fresh shredded Parmesan over the top.

*I’ve also tried it with just milk and/or half and half and non-fat half and half to be easy on the arteries. Nothing is as good as the real thing, but if you’re gonna skimp, skimp using the non-fat half and half (and you’ll need to add some salt).

share this on »
{Facebook} {Twitter} {Pinterest}
2 Comments

Wednesday, June 22, 2011

summer crafts for kids

School is officially out for us today, and unfortunately the weather forecast for the rest of the week is not stellar. That means kids inside all day which equals boredom! My kids are pretty creative and can keep themselves busy for a few hours at a time, but inevitably I will hear "I'm bored!" at least once a day. Besides Skip To My Lou's Craft Camp, my secret weapon this summer is Family Fun's Easy Crafts for Kids special issue. We received copies from Family Fun and have already had a ton of fun putting it to use!
No, this kid will not just pose normally for a photo.
One of my favorite things about it is that it gives kids great ideas and all the supplies needed, but then they can make the project what they want. There are also equal boy/girl/neutral projects, so there's something for every kid.

I let my boys go through the magazine and mark the projects they thought would be fun to do. Then I let them know which ones we had supplies on hand for and they went to town!

First they did the Art-Rageous Cars. They selected a Hot Wheels car from their collection and a small plastic toy, and I provided the super glue and glitter glue. I love their creations!

Next they made the Marble Run. With a few toilet paper tubes, duct tape, and marbles, they had their own marble race track! Hours of fun!
  

I also loved the Tissue Paper Blossoms in the book, and I was happy to see how easy they were when Heidi from Sew Craft Create made them. Aren't they gorgeous? Check out Sew Craft Create for the tutorial! Or get your own copy of Family Fun's Easy Crafts for Kids!


share this on »
{Facebook} {Twitter} {Pinterest}
3 Comments

Tuesday, June 21, 2011

temporary tattoos on the silhouette {with a promotion}

Have you ever met a kid who doesn't love temporary tattoos? I sure haven't.  Well, now you can easily make them at home with the Silhouette!

I recently received some temporary tattoo paper in the mail and you should have seen the looks on my boys' faces when I told them we were going to make them some temporary tattoos.


 {note: These pictures are dramatizations. The actual reactions were not captured on camera.}

The Silhouette store has some really great tattoo designs.  These are wonderful for carnivals and parties, and can be cut in any size and applied easily with just a little water. It is also a really simple process. There are great instructions on the Silhouette site here. These will also be found on the back of the temporary tattoo paper packaging.

I selected the images I wanted and fit them onto one sheet so I could make the most out of the tattoo paper. I love the American Flag design they have! I plan on saving this so we can all have one to wear on the 4th of July.
I used the print and cut feature on the Silhouette for these tattoos. First you send it through your regular printer so it will print it in color with markings and then you send it through the Silhouette with the adhesive tattoo paper and it will cut it out! After that we stuck them on and the boys were thrilled!


Right now you can get a sweet deal so you can try out your own temporary tattoos. You can get:

1 Silhouette SD 
AND
2 Packages Temporary Tattoo Paper
for $199 (U.S. only)  (That’s 120 bucks in savings!)


Plus... you can get 25% off all other products in the Silhouette shop (excluding gift cards and download codes)!

See? Told you it was sweet.  Better hurry on over there and enter code LITTLEBIRDIE to score this deal.  The promotion will end on June 29.

share this on »
{Facebook} {Twitter} {Pinterest}
1 Comment

Monday, June 20, 2011

irregular apron sale from flirty aprons {while supplies last!}

Ooh, this only happens once in a blue moon, but you have to jump on it when it does! Flirty Aprons is having one of their irregular aprons sale, which means prices 55% to 68% off! That's cheaper than you could make a nice apron like these! I personally bought two last time this sale happened, and I could not tell at all what was irregular about them. They looked perfect! They're great to have on hand for gifts, too. I bet they don't last longer than a day, so you better go check it out! Here are a few of my favorites. . .


share this on »
{Facebook} {Twitter} {Pinterest}
2 Comments

everyday keepsakes giveaway

We would love to introduce you to an adorable shop called, Everyday Keepsakes...


Hi! I'm Meredith Fenwick, owner and designer here at Everyday Keepsakes. I started making jewelry in September of 2008 and opened my Etsy shop selling handmade jewelry pieces in January of 2009. Originally, I mostly made and sold gemstone and crystal jewelry. As the business grew, I wanted to work more with custom and personalized pieces. Also a graphic designer, I began designing and making my own fine silver charms and selling those through my Etsy shop. Combining two of my favorite things - cool design and sparkly stuff, this was finally the thing that I had been looking for as a business. In October of 2010, I opened my own online shop with Everyday Keepsakes and love making original and unique pieces that are meaningful and heartfelt gifts for yourself or someone you love.

Look at these beautiful pieces...


Ok, now I want a cupcake! But aren't they just fabulous? And this is the short list of her pieces. Amazing.

Today, Everyday Keepsakes is offering one of our readers the chance to win an angel love necklace...
Here is what you need to do to enter:
-Visit Everyday Keepsakes (and her blog!) and find your favorite item. Then come back and tell us what it is!
-Become a fan of Everyday Keepsakes on Facebook.

Good Luck! This giveaway will end Thursday, June 23rd at 11:59 pm PT.

share this on »
{Facebook} {Twitter} {Pinterest}
136 Comments

Sunday, June 19, 2011

how to make a kaleidoscope {craft camp}


We've been working with the fabulous Cindy of Skip To My Lou almost since we started this blog almost three years ago. She is amazing. That's why we're so excited to be a part of Skip To My Lou's Craft Camp again this year! Our kids are still in school another week, but I can already hear that familiar summer refrain, "I'm bored, Mom!" Craft Camp is definitely my go-to list for summer boredom busters. So go check us out plus 29 other great crafts to do with your kids this summer over at Skip To My Lou!

My boys are very curious, so this is a cool craft that can also be a physics lesson (if you're so inclined).

How To Make Your Own Kaleidoscope
 

Supplies:
*Plastic report cover (mine came in a pack of 6, which will make at least 12 kaleidoscopes!)
*Empty paper towel tube (toilet paper rolls are too short!)
*Plastic wrap
*Wax paper
*Shiny objects (transparent are best--beads, plastic confetti, etc.)
*Paper cutter
*1/4" hole punch
*Rubber band
*Pencil, scissors, tape
*Patterned paper or construction paper

1. Cut a piece of report cover 11" x 5". Measure and score a line at 1 3/8". I used my paper cutter to make a perfect score line.

Score another line 1 3/8" from the first line, and another at 1 3/8" from that line. Then cut the end off 1/2" from that line. Your plastic should look like this.

2. Fold your plastic into a triangular shape, using the 1/2" section to overlap. Tape down the flap to secure your triangular tube. 

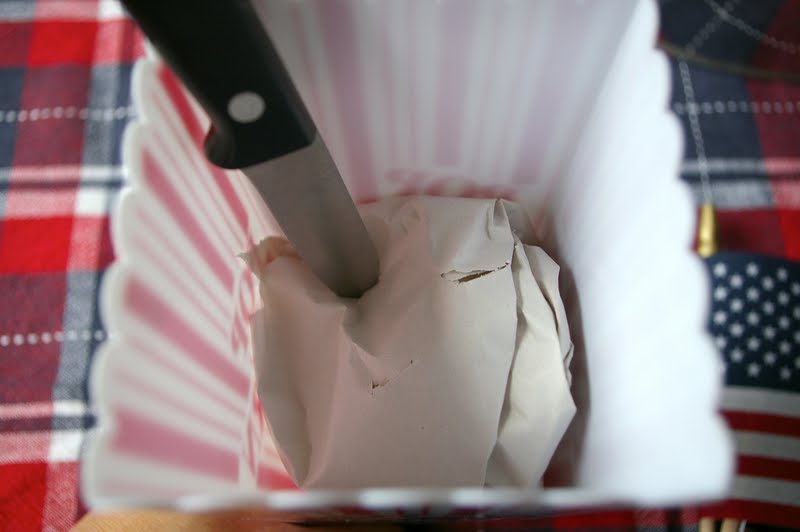
3. Trace one end of your paper towel tube on your patterned paper or card stock. Cut it out. 

Punch a hole in the middle of it.
 

Tape it onto one end of your paper towel roll.

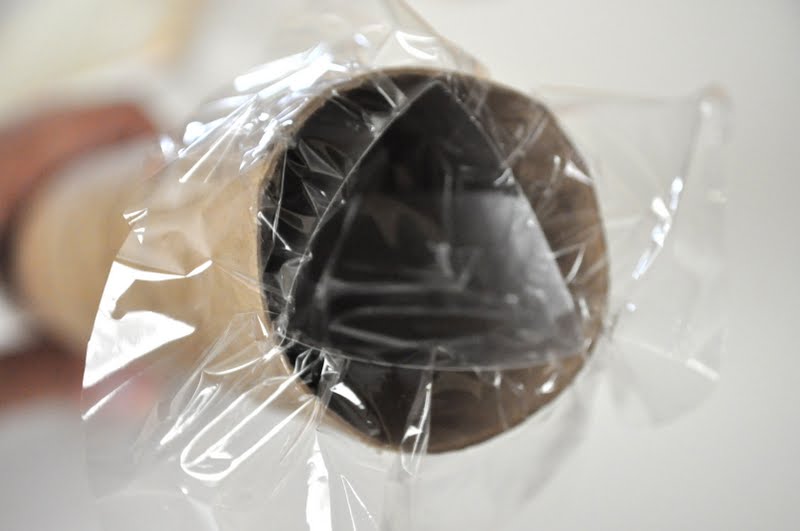
4. Insert your triangle into your paper towel roll. 

5. Cover the other end with a square of plastic wrap. Push the plastic wrap inside the triangle to create a shallow cup.

6. Collect shiny beads, shapes, buttons, etc.  Transparent objects work best.

Fill your cup with shiny objects.

7. Cover the end with a square of wax paper. Secure with a rubber band.

8. Cover the tube with patterned paper or colored construction paper. Secure with tape.

Hold your kaleidoscope up to the light and turn to see different shapes and colors dance before your eyes! Then have a good talk about how light reflects off the sides of the triangle and they'll be learning, too. Enjoy!

share this on »
{Facebook} {Twitter} {Pinterest}
8 Comments
LinkWithin Related Stories Widget for Blogs