Showing posts with label books. Show all posts

Saturday, September 6, 2014

how to cover a book {tutorial}


This summer I was again asked to be the crafts counselor for our church's girls camp. Crafting is my favorite part of camp, so of course I said yes! We wanted to give each girl a small book of scriptures so we could all read together before bed at night, so each girl got to cover a mini Book of Mormon for one of our crafting activities. It took a little preparation on my part, but it was a hit with the girls and the leaders. Here's my tutorial for how to create a fun covered book, complete with a beaded bookmark. These instructions can be used to cover any book or notebook.

How to Cover a Book

The best material to use to cover books is book cloth, which has a special backing that protects it from the glue seeping through and ruining the fabric. You can find it at places like Paper Source and online, but I found that it is expensive and rather plain--mostly solid colors and not many prints. To save money and give the girls more options, I chose to only use real book cloth on the spine and make my own book cloth from fabric, iron-on adhesive, and tissue paper for the covers, as I learned in this tutorial by the talented Amber of Damask Love. If you want to make your own book cloth, be sure to get the iron-on adhesive and tissue paper listed under Supplies.

Supplies:

Chipboard (find it at craft stores, art supply stores, or online)
Book cloth or Fabric (we tried a decorator’s weight fabric and a quilting cotton and both worked great)
Coordinating fabric or book cloth for spine
Heat ‘n Bond Ultrahold iron-on adhesive
White tissue paper
PVA glue (bookbinding glue–find it at Paper Source or other online retailers)
Foam brush
Narrow ribbon for bookmark
Metal charms for bookmark (optional–find these in the jewelry aisle at craft stores)
Metal embellishments for cover (optional–ours are by Tim Holtz)
Needle and coordinating thread
Scissors, Exacto knife, rotary cutter and cutting mat


First, measure your book. You'll need the height, width, and depth. Now it's time to make your book cloth if you choose to create your own.

How to Make Book Cloth

Using your cover measurements, cut two pieces of fabric twice the size of your covers. Iron them if needed. Next, cut a piece of Heat 'n Bond adhesive about the same size and iron onto the back of your fabric pieces, paper-side up, according to the manufacturer's directions. Peel off the paper backing. Iron the tissue paper onto the adhesive--it only takes 1-2 seconds to bond it. Voila! You have made book cloth!

Covers

Use your Exacto knife to cut two pieces of chipboard that are 1/2" longer than the height and 1/4" shorter than the width of your book measurements. 

Cut two pieces of your book cloth 3" longer and 3" wider than your chipboard pieces. Use a rotary cutter and ruler for the most precise cut. 


Bookmark & Spine

Cut a piece of narrow ribbon 3" longer than the length of the spine. If you want to add charms, thread them on the ribbon and tie a knot at the end to hold them on. We used two ribbons for our books.


Using a little PVA glue, attach the top end of the ribbon to the top of the spine, about 1.5" down. Then tuck the ribbon inside the book so it will be out of your way while you finish the covers. 


Cut a piece of book cloth the same height of your spine and twice the width. Spread a thin layer of PVA glue on the book cloth with a foam brush. Center it on the spine and fold it around the cover of the book, smoothing out any wrinkles or bubbles.


Chipboard Covers

If you want to embellish your front cover with a metal accent, follow these directions first. Center a piece of cover chipboard on the back of a piece of your book cloth. Fold each side over to crease it.


Remove the chipboard and, using the needle and thread, sew the metal embellishment to the front of the book cloth. You could also try hot glue, but I wasn't sure it would be a strong enough hold, and I wanted our books to look more professional.


Next spread PVA glue on the cover chipboard and center it on the back of the book cloth using your fold marks as a guide.


Trim the corners of book cloth with scissors in a rounded motion, being careful to leave about 1/8" of fabric at the corner. Otherwise your chipboard will show on the finished covers.


Spread PVA glue on each flap and fold over chipboard, smoothing out any wrinkles. 
 

Repeat for back cover.


Now it's time to attach the covers to your book. Each cover will hang over your book about 1/4" on three sides. This will allow a little of your spine to show. Spread a little PVA glue on the back of the covers, avoiding getting glue on the 1/4" of the three overhanging sides. Press and hold in place until it sticks. And you're done!


Our girls had so much fun making these covered books at girls camp this year. Here are a few more covered book tutorials you might like.  And if you're looking for craft camp ideas, check out my other camp crafts for more inspiration!

Japanese bookbinding tutorial {how to make a book from scratch}


Make Your Own Notepads {from scratch paper and card stock}


LDS girls camp craft
Duct Tape Notebooks {and pens!}


*This tutorial was originally published at Skip To My Lou on July 23, 2014 as a part of their Summer Craft Camp series.

share this on »
{Facebook} {Twitter} {Pinterest}
1 Comment

Monday, February 9, 2009

living a creative life - book reviews

Today we're taking a break from offering you a specific craft and giving you a little direction in creativity with a few of our favorite creative books. We Three Birdies are always looking for new and creative ideas. But some days we're stumped. We hit the creative wall. We get crafter's block. That never happens to any of you, does it?

Well it must, because Jill Badonsky created this wonderful almanac for a creative life, called The Awe-manac: A Daily Does of Wonder. Each day she gives you fodder for creativity by way of inspirational creative prompts, outrageous insights, a little wisdom, and lots of humor. Her own whimsical illustrations are enough to make you pull out a pen and start doodling.


Check out today's page--you can't help but be inspired! (Click on picture to enlarge)


We had an opportunity to interview Jill and find out a little about what makes her tick.

LBS: So, tell us about yourself.
Jill: Hi. I'm a rather quirky, artist-writer person who dropped out of the corporate world when I realized being an individual got squashed in that arena. I invented a business in 1997 called The Muse is IN which specializes in facilitating creativity for joy, prosperity and the occasional miracle through coaching, workshops, teleconferences, and publications. I designed and teach a coaching model called Kaizen-Muse Creativity Coaching which works especially well with the resistant and rebellious artist. My first book was an upgrade of the nine Greek Muses into 10 creative principles, The Nine Modern Day Muses (and a Bodyguard): 10 Guides to Creativity for Artists, Poets, Lovers and Other Mortals Wanting to Live a Dazzling Existence; and my second book which just came out is The Awe-manac: A Daily Dose of Wonder. I also wrote and performed a one-woman play called I Can't Always Handle Reality, But it's Really the Only Place to Get a Good Cup of Coffee. I err on the side of long title.

LBS: What do you want to be when you grow up?
Jill: Eccentric, graceful, spunky and hilarious.

LBS: What would you have been in a past life (if you believed in one)?
Jill: A whippoorwill. I know this because I still sound like the bird I was when I say the name and I enjoy bird seed on my oatmeal.

LBS: What inspires you?
Jill: Asking myself: "Wouldn't it be funny if…", music, walks in nature, colors blending on a page, musical theater, rugged individualists, play, making people laugh.

LBS: What was your "A-Ha!" moment?
Jill: I have them daily… which one? I think, the notion that all we have to do is believe we are creative to be creative was a wonderfully liberating moment that continues to orbit around my memory centers.

LBS: Tell us about the book.
Jill: The Awe-manac is a book designed to make wonder, joy, creativity and laughter easy. It's a take off on the Old Farmer's Almanac so it's a daily guide that has between 3 to 6 creative prompts a day. I illustrated it with over 400 quirky illustrations designed to make you laugh or simply smile. You can read a full description here. Here's my favorite review so far. Also, I have a free monthly Muse Flash that provides creative inspiration to seekers all over the world. Please visit www.themuseisin.com and play with the icons.

This book would make a perfect Valentine's gift for the creative person in your life (even if that's you!)

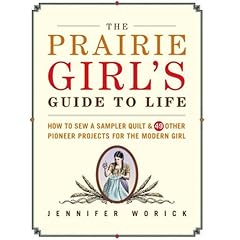
If you're looking for ways to simplify this year, here are two books we loved about just that. The Prairie Girl's Guide to Life: How to Sew a Sampler Quilt & 49 Other Pioneer Projects for the Modern Girl by Jennifer Worick takes you back to pioneer times, and teaches you all the crafts, recipes, and parlor tricks we've forgotten in our modern world. From rhubarb pie to making your own candles, she'll satisfy your need to live the simple life.


Along the same vein is Made from Scratch: Discovering the Pleasures of a Handmade Life. Jenna Woginrich takes you through the steps of creating your own homestead lifestyle and becoming more self-sufficient, even in the middle of a big city. With a recipe for home-churned butter and a chapter on the ins and outs of beekeeping, her personal experiences are priceless and give you confidence to try anything--even keep a few chickens! Most of all, you'll learn about the joy that accompanies learning skills to become independent of a "consumer-driven culture."


Our last book is one for kids and adults alike. An Awesome Book is about dreaming big, and losing the fear to reach for those dreams. Dallas Clayton wrote this book for his young son, but it's a tale for all ages. The illustrations are magical and the message inspirational. We love this book! Check out Dallas's site to read it and experience the artwork.


We got to ask Dallas a few of the same questions.

LBS: What do you want to be when you grow up?
Dallas: I draw things for children to look and and write things to make people happy, which I suppose is a close to being anything/growing up as I might ever come.

LBS: What would you have been in a past life (if you believed in one)?
Dallas: In a past life, judging by how past lives are supposed to work, I was obviously some slightly lesser version of myself so whatever that might be an angry moose, a worried gremlin, an unsettled worm. Take your pick.

LBS: What was your "A-Ha!" moment?
Dallas: My Aha moment? I don't know that I've had that yet. That's where I discover the secret to life, right?

LBS: Tell us about the book.
Dallas: I wrote the book first and foremost for my son, but also for anyone who needs to feel better about their day and was looking for a reason to be happy. About the book, you should know that I am very excited to share it with the entire world. Perhaps one person at a time, perhaps all at once. Perhaps in a giant room, that is nice and warm. Whatever the case, I am looking forward to it.

* * *
Hopefully one or all of these great books will help you live a more creative life. Because creativity=happiness in our book.

share this on »
{Facebook} {Twitter} {Pinterest}
2 Comments

Saturday, February 7, 2009

valentine book cards and a giveaway

Sometimes just a simple card isn't enough to tell your Valentine how much you really love them. Or maybe you just like really elaborate cards like I do. Here are a few ideas for Valentine cards with a little something special to satisfy either need. Each is in book-style, with room for photos or love notes. And read to the very end for a code for a free 8x8 photo book from Shutterfly, and our extra special Valentine book-card giveaway!

The envelope accordion card. Perfect for including "love coupons" for your sweet. We made ours using a tutorial we found at Paper Source. The only difference is that we didn't cut a slit for the ribbon--we just tied one around the finished accordion. We also decorated ours by adding paper to the front flap and a little stamping action.


Another easy book-style card is made from brown paper sacks. You can make as many or as few pages as you want, then include pictures and notes--even special pull-out pages for secret love notes! Check out this easy tutorial over at Scrapbook-Crazy. The only difference in our version is the pages are bound by two jumbo brads instead of by ribbon ties.


Altered board books make great Valentines for spouses or kids! I made this one a few years, ago, so I didn't have pictures for a tutorial. (But we're putting together an altered board book tutorial in the near future!) Basically I altered a childrens board book to tell my husband a few of the reasons I love him. I included pictures of myself and the kids, as well as special love poems. The digital artwork is not mine--I got this kit free from Two Peas in a Bucket. Click here to download yours for free!


Our last idea is this easy 2-Minute Memories card book by Simple Scrapbooks. It's a "Ten Things I Love About You" theme, and there are ten numbered pages with room for you to write in your top ten, plus a space for a picture for each reason. Just write your reasons and slap in a photo--how easy is that?

We're making it even easier by giving away one of these free. Just leave us a comment stating one thing you love about your Valentine by Monday, February 9 at 11:59pm PST. We'll pick our winner and send it out Tuesday so you'll have it in time for Love Day!

*UPDATE*: To those of you who saw the code earlier for a free photo book, we're sorry to say that the code does not work, so we have removed it from the post. Please forgive us!

share this on »
{Facebook} {Twitter} {Pinterest}
111 Comments

Saturday, December 13, 2008

stockings to hang by the chimney with care


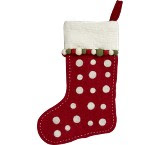
For those of you who are major procrastinators like me, this post is for you. I really need new stockings. I made mine about 9 years ago, before I had kids, and they are just not kid stockings! I've been so inspired by the felt stockings I've seen in the Crate & Barrel and Company Store catalogs (see above!). They really would not be hard to make, especially if you're using felt. That means no lining required! Plus you can hand stitch whatever you like on them.

I may still be looking for time to make new stockings for my kids, but Stacy found it. Check out these darling stockings--such cute, fresh fabric! They're all lined with soft flannel, too. She found the pattern in this cute book, New Noel by Linda Lum DeBono. Don't you love all the applique and ruffles? She did it on her machine, so it really wasn't that time consuming, but it adds a lot.


Okay I lied. I did find time to make one stocking. This mini felt stocking is from a pattern in my imagination (really, it's not hard to draw a stocking--you can do it!). I cut two pieces from red felt for the sock, two pieces from white felt for the top, then a toe and heel from the white. I traced a few circles of paper I punched with my circle punch on green felt, then stitched them all on with embroidery floss before sewing the two sock pieces right sides together. This is the perfect size to stuff with a small present or gift card!

Or, make a few and use them as silverware holders!


Santa won't be here for another 12 days, so you really do have time to make new stockings! And if you do it, will you make a few for me, too?

share this on »
{Facebook} {Twitter} {Pinterest}
5 Comments
LinkWithin Related Stories Widget for Blogs