Showing posts with label cooking. Show all posts

Friday, January 27, 2012

chinese scallion pancakes

Did you do anything to celebrate the Chinese New Year this week? Monday was Chinese New Year and kicked off the Year of the Dragon. Ever since meeting my dear friend, Stacy who is half Chinese, I have loved cooking Chinese dishes and celebrating Chinese New Year. Yesterday we celebrated with a delicious lunch and everyone brought a Chinese dish to share. I made Stacy's fabulous lettuce wraps. Remember them? We also ate dumplings, beef and broccoli, a couple kinds of noodles, and cookies! One of my friends brought scallion pancakes and they were a huge hit!  She followed a recipe from Appetite for China, which is a great blog with many Chinese, as well as other culturally inspired, dishes.

(photo credit: Diana Kuan, Appetite for China)

These Chinese Scallion Pancakes were absolutely delicious. My friend served them warm with some Yoshida's sauce on the side, but they were equally delicious without any sauce. The recipe is as follows, but you will want to visit the original posting over at Appetite for China because she offers step by step photos, which is a huge help in following the recipe.  Enjoy them!

Chinese Scallion Pancake
From: Appetite for China


1 1/2 cups all-purpose flour (cake flour also works, but lacks elasticity)
1 teaspoon yeast dissolved in 1/2 cup warm water + 1 teaspoon sugar to activate yeast
2 teaspoons salt
3 tablespoons vegetable oil
1 cup finely chopped scallions

Sift flour into 2 equal portions into separate bowls. In the first bowl, slowly add the yeast-water, mixing with a spatula, until a dough forms.

In the second bowl, sprinkle 1 teaspoon of the salt into the flour. Slowly pour in 1/2 cup of the boiling hot water while vigorously stirring (this “cooks” the dough.) Add more water and keep stirring until a rough dough forms. (If you accidentally add too much water and the dough is too soft, add a little more flour.) Mix in 2 tablespoons vegetable oil. Roll the doughs out on a lightly floured surface and knead them together. Cover with a damp towel and let rise for 30 to 40 minutes.

On the same floured surface, roll out the risen dough. Form into a 1-inch thick log, and slice into Ping Pong-ball sized segments. With a rolling pin, roll each segment out to 4″ or 5″ circles.

Lightly brush the top of each circle with vegetable oil. Sprinkle over with chopped scallions and the remaining salt.

Roll up the circle, semi-tightly, making sure the scallions stay in place.

Now, roll it again lengthwise until it forms a coiled ball.

Turn the spiral side face-up, then flatten again into a circle with the rolling pin. Place on a plate and repeat with the remaining dough until you have a stack of scallion-studded spiral patties. (Whatever you don’t cook immediately can be frozen for future use.)

Heat a flat-bottom skillet on medium high heat and add remaining 1 tablespoon cooking oil. Working in batches, pan-fry the pancakes until golden brown, about 2 to 3 minutes on each side. Serve warm.

share this on »
{Facebook} {Twitter} {Pinterest}
6 Comments

Friday, January 6, 2012

my love affair {with tofu}


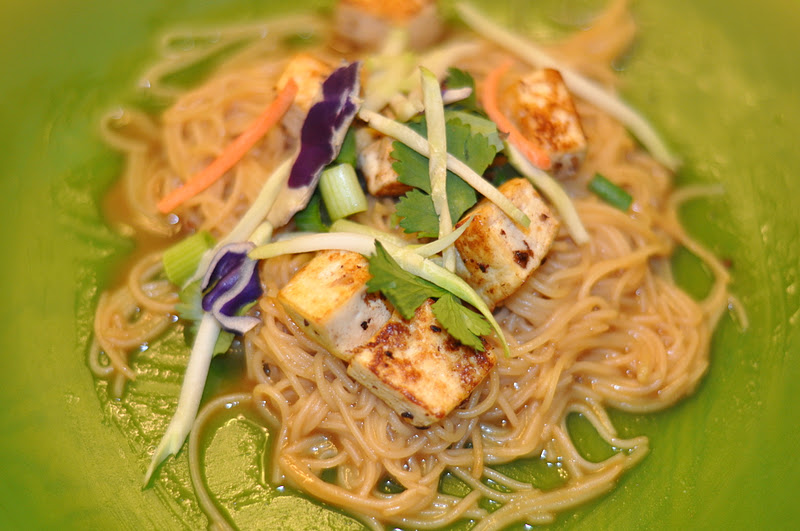
Tofu? Yep. You read that right. My mouth (er, I mean typing fingers) really said I have a love affair with tofu. My sister was surprised when I told her on the phone the other night too. I heard something like, "Jess who ARE you?"

It all started a few months ago on a weekend trip to Portland. I had an amazing rice bowl from a food stand there and it had garlic-fried tofu in it. I.Loved.It. I was shocked. I have always thought of tofu as this weird, eery, rubbery substance that nobody really enjoyed. Until I ate it. And enjoyed it.

Then came my trip to Trader Joes to buy some tofu to cook with at home. I made a delicious dinner that we all enjoyed. My boys even ate the tofu. They didn't say they loved it, but they ate it!


I bought firm (you can also do extra firm) because I read that it holds it shape if you want to pan fry it. And that's what I did. I cut the tofu into squares and I put a little olive oil in a pan with some minced garlic and fried the tofu until the sides got brown and crisped.


Then I cooked some noodles. I used capellini because I wanted a thin noodle, but you could use spaghetti or a rice noodle, or anything you want. Then I made a peanut sauce using Yoshida's sauce mixed with peanut butter, but you could also use one of my favorite peanut sauce recipes, found HERE.

Then I mixed it all together and topped it with broccoli slaw, green onions, and cilantro. You could add anything you want and make it your own!


It was delish, and I will be making it again! Next on my list of tofu recipes to try is this...

A dairy free chocolate pie made with silken tofu! I can really get on board for that! This is an Alton Brown recipe and it packs some serious nutritional punch with all the protein!

Alton Brown's Dairy-Free Chocolate Pie
(From www.doctoroz.com)

Ingredients
Makes 8 servings
13 oz semisweet chocolate chips 
1/3 cup coffee liqueur (you can use other flavors if you prefer)
1 tsp vanilla extract   
1 lb silken tofu 
1 tbsp honey    
1 (9-in) prepared chocolate wafer crust (store-bought is fine)

Directions
Place enough water in the bottom of a 4-quart saucepan to come 1 inch up the sides. Bring to a simmer over medium heat.
Place the chocolate chips and liqueur in a medium metal mixing bowl, set over the simmering water, and stir with a rubber or silicone spatula until melted. Remove from the heat and stir in the vanilla extract.
Combine the tofu, chocolate mixture, and honey in a blender or food processor and spin until smooth (about 1 minute).
 Pour the filling into the crust and refrigerate for 2 hours, or until the filling sets firm.


Yum! So, tell me...what are your thoughts? Have you ever tried tofu? Do you like it or hate it? Maybe you want to try it again now that you have some recipes?

share this on »
{Facebook} {Twitter} {Pinterest}
19 Comments

Friday, December 30, 2011

cinnamon streusel dessert pizza

I found THIS scrumptious recipe on Pinterest a few weeks ago and knew I had to try it! A pizza? And it's dessert? Perfect. We shared it with some friends and it was gone in no time! Hurry and make it before you have to start on your New Year's resolution!


Cinnamon Streusel Dessert Pizza
(from: Rumbly In My Tumbly)

Pizza dough (You can make your own, I just bought some refrigerated dough at the grocery store)
1 TBSP butter, melted
Cinnamon

Streusel:
1/2 cup plus 1/3 cups all purpose flour
1/3 cup white sugar
1/4 cup brown sugar
2 TBSP vegetable shortening
2 TBSP oil

Icing:
1 cup powdered sugar
1 TBSP milk
1/2 tsp. vanilla

DIRECTIONS:
Mix together streusel ingredients with a fork, or your clean hands, then side aside.

To make pizza, pat dough into a 12 inch pizza pan that has been sprayed with oil.  Perforate pizza dough with a fork (this keeps bubbles from forming), then brush with 1 TBSP melted butter. Sprinkle cinnamon all around buttered crust. Top pizza crust with streusel mix.

Bake at 460 F for 8 to 9 minutes depending on the thickness of the pizza.  Mix icing ingredients until it is of a drizzle consistency. If it is too thick, then thin with a small amount of milk until you have reached your desired thinness.

When finished baking, top with icing in a circular pinwheel pattern. Cut up and enjoy!

share this on »
{Facebook} {Twitter} {Pinterest}
9 Comments

Wednesday, December 28, 2011

petticoat skirt tutorial

We have a great tutorial that our sweet friend, Shelley was kind enough to share with us today. I love this skirt! So adorable that I wish one for myself! Take it away, Shelley...

So it's time for family pictures again and I wanted something super cute for my daughter to wear. I've been looking for a while and still didn't find anything. I decided I needed to make the skirt I wanted for her and it only took less than an hour and a half. Here's how.


I used a twin size bedsheet in tan. Trim the seamed edges off. I used 3 strips lengthwise. Cut a little at the end and tear the rest of the way. So quick and easy. Each strip was about 4 inches wide.

I tore another strip about 3 inches wide for the flower. Fold the 3 inch strip in half and gather. I love my gathering foot for my sewing machine!

It's not one continuous strip but you could sew it that way if you wanted.

Make a simple A-line skirt to fit your little girl. Sew the sides of the front and back together.

Next I pinned the ruffles in place. One goes all the way around the back and makes kind of a V in front.  I added a small piece of ruffle under the V.  Stitch the ruffles down.

After you have added all the ruffle, I used a cereal bowl to loosely mark a large circle to use as a guide for the flower.

Here's the flower loosely placed to make sure I had enough ruffle for the space.

 After the flower is sewn down, cut a casing for the waistband.


Cut a piece of elastic to fit and pin the four corners.

Pin the elastic in place and serge or zig-zag.

Fold over the casing and stitch down.  And Done!


What a fabulous, inexpensive, skirt!


share this on »
{Facebook} {Twitter} {Pinterest}
17 Comments

Friday, October 14, 2011

yogurt-marinated grilled chicken

Now that you have tried the chicken tikka masala that I posted last month, you are sure to have garam masala spice on hand. So here is another recipe to make with it. We made this chicken a few weeks ago and it was delicious! So tender, juicy, and flavorful. What more can you ask for? Oh, well it's easy too. Enjoy!


Yogurt-Marinated Grilled Chicken (from Bon Appetit)

8 skinless, boneless chicken breasts (about 3 pounds)
2 cups plain whole-milk yogurt (I used lowfat and it worked great)
1 cup coarsely chopped fresh cilantro leaves and stems
1/2 large onion, coarsely chopped
1/3 cup olive oil plus more for brushing
6 garlic cloves, coarsely chopped
1 tablespoon fresh lime juice
1 tablespoon garam masala
2 teaspoons kosher salt plus more for seasoning
1 teaspoon freshly ground black pepper
1 2"piece fresh ginger, peeled and chopped


Working with one chicken breast at a time, put chicken between 2 sheets of waxed paper and pound to 1/2" thickness. Transfer chicken breasts to a resealable plastic bag.

Combine the remaining ingredients in a food processor and blend until smooth. Pour yogurt mixture over chicken, seal bag, and turn to coat. Marinate chicken in the refrigerator for at least 3 hours or overnight.

Build a medium fire in a charcoal grill, or heat a gas grill to medium-high. Brush grill grates with oil. Scrape excess marinade off chicken; season with salt. Grill chicken, turning once, until browned and cooked through, 3-4 minutes per side.

share this on »
{Facebook} {Twitter} {Pinterest}
1 Comment

Friday, August 26, 2011

chicken burrito pizza

I saw this recipe in Shape Magazine and my mouth started watering. We tried it recently for dinner and loved it! I love a spin on classic pizza and this is the perfect combination of flavors. It is quick to make too, especially if you use some store-bought ingredients and prepare some steps ahead of time.


Chicken Burrito Pizza

2 T. salsa (more if desired)
Pizza Crust (use your favorite recipe, or store-bought)
1 cup low fat mozzarella cheese, shredded
1 chicken breast, grilled and diced
4 T. black beans
1/2 red onion, thinly sliced

For the Pico De Gallo
1 large tomato, diced
1 small green chili, diced
1 T. chopped fresh cilantro
1/2 red onion, diced
Salt

For the Guacamole
1 large avocado
1 T. chopped fresh cilantro
1/2 red onion, diced
juice of 1 lime
salt and pepper to taste

*note: to save on time you can buy prepared pico de gallo and guacamole at the store and use that instead.

Preheat oven to 450 degrees. Spread salsa over the prepared dough. Sprinkle with cheese. Top with the chicken, black beans and onions. Bake for 7 to 10 minutes, or until the edges of the crust are golden brown. Meanwhile, combine tomato, chili, cilantro and onion in small bowl. Season with salt. Set aside. Halve an avocado, remove the pit, and scoop out the flesh into small bowl. Using a fork, mash the avocado. Mix in cilantro, onion, and lime juice. Season with salt and pepper.


Slice pizza and top each slice with a spoonful of guacamole and pico de gallo. Enjoy!!

share this on »
{Facebook} {Twitter} {Pinterest}
10 Comments

Friday, June 24, 2011

che bella notte pasta

Today's recipe comes from our friend, Jamie (with a picture by our friend, Melynie). It is a great, fresh recipe and it only takes about 30 minutes to make! Delish.


Che Bella Notte Pasta

10 oz pasta (I’ve used farfalle, rotini, ziti, penne, capenelli)
2 tbsp olive oil
2 cloves garlic, minced
1 tsp (or more) capers
1 lb boneless, skinless chicken breast, cut into medallions
1 tsp dried basil
1/8 tsp crushed red pepper
1 C chicken broth
½ C sun-dried tomatoes, julienne
½ C heavy cream
¼ C grated parmesan cheese

--Cook pasta as directed on package. In the meanwhile, heat olive oil over medium-high heat. Add garlic, capers and chicken. Add basil and red pepper. Cook for about 4 minutes to brown (don’t overcook—it will continue cooking in the sauce!) Add broth and tomatoes. Simmer uncovered for 5 minutes. Take off heat and stir in cream and cheese. Pour over pasta and enjoy!

*note: super yummy to add any combination of the following: roasted pine nuts; diced fresh tomato; steamed zucchini, mushrooms, asparagus, yellow squash, spinach, eggplant; and I always sprinkle fresh shredded Parmesan over the top.

*I’ve also tried it with just milk and/or half and half and non-fat half and half to be easy on the arteries. Nothing is as good as the real thing, but if you’re gonna skimp, skimp using the non-fat half and half (and you’ll need to add some salt).

share this on »
{Facebook} {Twitter} {Pinterest}
2 Comments

Tuesday, June 14, 2011

easy recipe card holder {see us on make and takes!}

As you might know, we are regular contributors at one of our favorite blogs, Make and Takes. If you're looking for an inexpensive yet thoughtful bridal shower gift, today we're showing one that costs only about $1 and takes less than 30 minutes to make! Check out Make and Takes to learn how to make this darling recipe card holder, perfect for bridal shower season!

share this on »
{Facebook} {Twitter} {Pinterest}
4 Comments

Friday, May 27, 2011

buffalo chicken and blue cheese wraps

When I got my Woman's Day magazine and saw this recipe, I was pumped.  I love anything having to do with buffalo chicken. It's a simple recipe and you can make the chicken ahead of time or buy a rotisserie chicken to save time.  It's a great grab 'n go lunch. Enjoy!


Buffalo Chicken and Blue Cheese Wraps
  • Kosher salt and pepper
  • 2 6-oz boneless, skinless chicken breasts
  • 2 Tbsp lowfat Greek or plain yogurt
  • 1 Tbsp white wine vinegar
  • 3 stalks celery, thinly sliced on a diagonal
  • 2 scallions, thinly sliced
  • 2 oz blue cheese
  • 1/4 cup ketchup
  • 3 Tbsp buffalo wing sauce
  • 4 medium flour tortillas or wraps

Recipe Preparation

1. Fill a medium saucepan halfway with water; bring to a boil and add 1 tsp salt. Add the chicken, reduce heat and gently simmer until cooked through, 10 to 12 minutes. Transfer to a plate and, when cool enough to handle, shred into pieces.

2. Meanwhile, in a medium bowl, whisk together the yogurt, vinegar, and ¼ tsp each salt and pepper. Add the celery and scallions and toss to coat; fold in the blue cheese.

3. In a second bowl, whisk together the ketchup and wing sauce. Add the shredded chicken and toss to coat. Wrap up the chicken and celery salad in the tortillas.

share this on »
{Facebook} {Twitter} {Pinterest}
2 Comments

Friday, April 29, 2011

orzo salad with spicy buttermilk dressing

My friend recently mentioned to me that she has been disappointed not to see as many of my regular recipe posts. So Megan, this one's for you! I have been trying to find some yummy, light recipes to make for my family. When I got my Cooking Light magazine in the mail this month, I knew I had to try the Orzo Salad with Spicy Buttermilk Dressing. It was a big hit and I will definitely be making it again. I hope you enjoy it too!


Orzo Salad with Spicy Buttermilk Dressing

  • 1 cup uncooked orzo
  • 1 cup frozen whole-kernel corn, thawed and drained
  • 12 cherry tomatoes, quartered
  • 3 green onions, sliced
  • 1 (15-ounce) can black beans, rinsed and drained
  • 1/4 cup low-fat buttermilk
  • 3 tablespoons chopped fresh cilantro, divided
  • 3 tablespoons fresh lime juice
  • 2 tablespoons light sour cream
  • 2 tablespoons canola mayonnaise
  • 1 teaspoon chili powder
  • 1/2 teaspoon kosher salt
  • 1/4 teaspoon black pepper
  • 1/4 teaspoon ground red pepper
  • 2 garlic cloves, crushed
  • 1 peeled avocado, cut into 8 wedges
  • 1 tablespoon chopped fresh parsley

Preparation:
  • 1. Cook orzo according to package directions, omitting salt and fat. Drain and rinse; drain well. Place orzo, corn, and next 3 ingredients (through beans) in a large bowl; toss.
  • 2. Combine buttermilk, 2 tablespoons cilantro, and next 8 ingredients (through garlic) in a small bowl, stirring well with a whisk. Drizzle over orzo mixture; toss. Top with avocado; garnish with remaining cilantro and parsley.

share this on »
{Facebook} {Twitter} {Pinterest}
9 Comments

Thursday, March 31, 2011

peanut wraps


My dear friend, Erin recently shared this recipe with me and I was immediately in love. Here is what she says about the recipe, "I got this recipe from my mother-in-law about a year ago and it quickly became one of our favorites. We make it on a fairly regular basis and it has never failed us. Ever. It has the perfect amount of crunch, is delicious served hot or cold, and the peanut sauce always leaves me licking my plate like the lady I am. It's that good." See, now you know why I love the recipe (and her).

Peanut Wraps

Ingredients:
1/2 tsp garlic salt
1/2 tsp pepper
3 boneless skinless chicken breasts, cut into strips
1 tbs cooking oil (I use peanut oil)
4 cups broccoli slaw (I use one bag and it works fine)
1 medium red onion (I skip this if we don't have it or use a white onion and it's still delish)
1 tsp grated fresh ginger
Tortillas

Peanut Sauce:
1/4 cup sugar
1/4 cup peanut butter (creamy or crunchy work, I kind of like crunchy for the added crunch)
3 tbs soy sauce
5 tbs water
3 tbs cooking oil
1 or 2 cloves freshly pressed garlic cloves (sometimes I just use garlic powder)

Directions:
Season chicken strips with garlic salt and pepper. In a large skillet cook chicken in hot oil on medium-high until no pink left. Put aside and keep warm.
In same skillet add broccoli mix, onion, and ginger. Cook until crisp but tender.

Make peanut sauce while veggies cook. In a small saucepan combine sauce ingredients, heat and stir until dissolved.

Serve by layering the veggies, chicken, and sauce in a tortilla. Wrap it up. Eat it up. Lick your plate.
Makes 6-8 wraps. (Makes a great salad too!)

share this on »
{Facebook} {Twitter} {Pinterest}
8 Comments

Saturday, February 5, 2011

last minute game-day recipes

If you are like me, you will definitely be tuning into the Super Bowl tomorrow. If you are like me, you have put off your snack planning until today and are now hurrying to get all the grocery items and menu plans you need. Well, don't worry. I have some great ideas to share with you. I recently fell in love with a food site, BlogChef.net that has been posting tons of great game-day recipes. My favorite one is How to Make Boneless Buffalo Wings. I love Buffalo wings but have always been a bit nervous to try making them at home. This recipe makes it seem so simple and I love that there are so many different flavors you can try!

Boneless Buffalo Wings
The first thing you are going to want to do is bread the chicken pieces and fry them. This is a universal breading that will work perfectly for all of the sauces in this post. The sauces can be prepared in advance or while the chicken tenders are frying.

Ingredients:
3 boneless skinless chicken breasts (cut into 1” chunks)
Oil (for deep frying)
1 cup all purpose flour
2 teaspoons salt
½ teaspoon ground black pepper
½ teaspoon cayenne pepper
¼ teaspoon garlic powder
½ teaspoon paprika
1 egg
1 cup milk

Step 1: Heat oil in a deep-fryer to 375 degrees. In a large bowl combine flour, salt, black pepper, cayenne pepper, garlic powder, and paprika. In a small bowl whisk together egg and milk. Dip each piece of chicken in the egg mixture, and then roll in the flour mixture. Repeat so that each piece of chicken is double coated. Refrigerate the breaded chicken for 20 minutes.
Step 2: Fry chicken in the hot oil in batches until the outside is nicely browned and the juices run clear (about 5 minutes per batch). Drain on paper towels. Repeat until all of the chicken is gone.
Step 3: Mix fried chicken bits with your favorite wing sauce (sauce recipes found below).

Now, here are the sauces. The sauces can be prepared in advance or while the chicken bits are frying. I have recipes for 5 different types of delicious wing sauces. Most of these sauces will make a lot, so they will be able to cover large batches of boneless wings.

Buffalo Wing Sauce Ingredients:
¼ cup hot pepper sauce
1 tablespoon butter

Step 1: Combine hot sauce and butter in a small bowl. Microwave on high until the butter has melted (about 20 to 30 seconds). Mix well. This recipe can easily be double if you are making a large amount of wings.


Honey BBQ Wing Sauce
Ingredients:
1 ¼ cups ketchup
1/3 cup white vinegar
¼ cup molasses
¼ cup honey
1 teaspoon liquid smoke flavoring
½ teaspoon salt
¼ teaspoon onion powder
¼ teaspoon chili powder

Step 1:
In a small saucepan over medium heat combine all of the ingredients. Stir until well combined and bring to a boil. Reduce heat and simmer uncovered for 15 to 20 minutes.


Parmesan Garlic Wing Sauce Ingredients:
4 garlic cloves (peeled)
1 teaspoon olive oil
½ cup mayonnaise
2 tablespoons light corn syrup
5 teaspoons grated parmesan cheese
1 tablespoon white vinegar
1 teaspoon lemon juice
½ teaspoon salt
½ teaspoon crushed red pepper flakes
¼ teaspoon dried basil
¼ teaspoon dried marjoram
¼ teaspoon dried oregano
¼ teaspoon dried thyme
1/8 teaspoon ground black pepper

Step 1:
Pre-heat the oven to 350 degrees. Toss garlic cloves with olive oil in a small oven safe dish. Bake in the oven for 20 minutes or until the garlic cloves began to turn light brown. Remove from the oven, cool garlic, and finely mince with a sharp knife.
Step 2: Combine garlic and the remaining ingredients in a small bowl. Stir well, cover and chill for several hours before using.


Asian Wing Sauce
Ingredients:
2 teaspoons cornstarch
4 teaspoons rice wine vinegar
½ cup corn syrup
1/3 cup sugar
¼ cup chili-garlic sauce
1 teaspoon soy sauce
1 teaspoon lemon juice
¼ teaspoon ground ginger
¼ teaspoon salt
¼ teaspoon garlic (minced)

Step 1: In a small bowl mix cornstarch with rice vinegar. Set aside. In a small sauce pan combine remaining ingredients. Add the cornstarch and rice vinegar mixture and mix well.
Step 2: Bring the mixture to a boil, reduce heat the simmer until it becomes thick. Remove from heat, allow it to cool then cover and chill it until ready to use (you can also use it right away if the chicken is ready).


Caribbean Jerk Wing Sauce
Ingredients:
3 tablespoons butter
2 tablespoons green onion (minced)
1 cup water
¾ cup ketchup
½ cup dark brown sugar
¼ cup apple cider vinegar
2 tablespoons hot sauce
2 teaspoons Worcestershire sauce
2 teaspoons lemon juice
1 ½ teaspoons cayenne pepper
1 teaspoon cornstarch
½ teaspoon salt
½ teaspoon garlic powder
½ teaspoon onion powder
1/8 teaspoon ground cloves
1/8 teaspoons nutmeg
1/8 teaspoon allspice
1/8 teaspoon sage
1/8 teaspoon thyme

Step 1: In a small saucepan sauté onion in butter over medium heat. Whisk in the remaining ingredients and bring to a boil. Reduce heat and simmer for 45 minutes.

Ok, now that your mouth is watering you are going to want to head on over to BlogChef.net for many more game-day recipes. There is Jalapeno Poppers, Reuben Dip, Chili Con Queso and MUCH more! Enjoy your snacks tomorrow!

share this on »
{Facebook} {Twitter} {Pinterest}
14 Comments

Saturday, January 1, 2011

vintage pillowcase apron you can really use {sewing tutorial}

Happy New Year!! Hope you all had a safe and happy end to 2010. I was folding laundry and listening to a book on my iPod when the new year hit (while everyone else in my house slept), but hey, that's my life right now and I'm happy with it! The best part was waking up to Anne of Green Gables on PBS--my husband turned it on to wake me up. I did wake up, but his plan was foiled when I stayed in bed to watch it all morning. 2011 is bound to be a good year with that start! (I know, I'm a nerd, but I'm not afraid to admit it!)

I'm so excited to start the year off with a fabulous and quite ingenious tutorial from the fabulous and ingenious Jennifer. It's a pillowcase apron with an inventive addition. You're going to want to run right out and make it. Good thing it's a holiday weekend!

Pillowcase Apron with Towel Tutorial


When my mother was downsizing her house last spring, she gave me a whole stack of old embroidered pillowcases. I really loved them, but I knew that I wouldn’t be using them for pillows. I already have a whole stack of them that I was given when I got married that I’ve never used. Last spring I saw a friend wear an apron to work that was made from an embroidered pillowcase. I loved it and knew right away what I was going to be doing with that stack of pillowcases. I made this apron for my newly married daughter, who is living in Germany. She loves blue and I knew that she would really like to have one of her grandmother’s pillowcases.


I used this tutorial by Crafty Dame to make the apron. It was really fast and pretty easy, although if I make another one I am going to make the waistband (not the ties) a little bigger and have less gathering in the skirt. It took just about an hour to make it.


My husband teases me that my life is always form over function (he’s an engineer). While it is true that I tend to make things more pretty than functional, it’s not always the case. I knew while I was making this apron that it would be hard to use in the kitchen because I wouldn’t want to get it dirty. I also know that I am always looking for a kitchen towel to wipe my hands or wipe up messes, so I decided to add a kitchen towel to this apron.

I sewed buttons to the waist band of the apron. I tried to make them match the embroidery. I didn’t worry too much about the size because I wanted them to be a decorative element if you didn’t have the towel attached.


I used a bar mop which I folded over about 5 or 6 inches and sewed button holes into it.


The bar mop just buttons on and off over the apron and is perfect for wiping hands, cleaning up messes, protecting the apron from grease and can even be used as a hot pad in a pinch. When it gets dirty just unbutton it and throw it in the washer. The bar mop is not anywhere near as pretty as the apron, but I thought it made the apron a lot more functional.


Flirty Aprons

share this on »
{Facebook} {Twitter} {Pinterest}
7 Comments

Wednesday, November 24, 2010

king arthur flour demo = perfect pie crust this year


We recently had the opportunity to attend one of King Arthur Flour's traveling baking demos. It was fabulous! They showed us how to make the perfect pie crust and offered many wonderful baking ideas and tips. Besides being a fun girls day out with friends, we really learned a lot.


One of my favorite ideas was using little cookie cutters to cut shapes out of pie crust to add a little decoration to your pies. You can line the edge of your crust with cut-outs or do the whole top crust as a blanket of cut-outs. What a festive touch!


Take a peak at our festive pumpkin pie...


Here is the wonderful recipe for pie crust from King Arthur Flour.

Basic Pie Crust
makes one 9-inch double pie crust
2 1/2 or 3 cups all purpose flour, pastry flour or combination of both
1 tsp. salt
1 cup butter
1/4 to 1/2 cup ice water

Mix dry ingredients together with whisk. Cut in half of the butter, combining thoroughly. Cut or pinch the remaining butter into small bits. Toss these bits of butter into the mixture you already combined, mixing just enough to coat with flour. You want these pieces in larger bits. Add the water a tablespoon at a time and toss with a fork to moisten the dough evenly. To test for the right amount of liquid, use your hands to squeeze a chunk of it together. If it sticks together easily, it is moist enough. If it falls apart, add a bit more water. Divide the dough in half and wrap both halves in plastic wrap. Refrigerate for at least 30 minutes. Roll out dough onto lightly floured surface and use a spatula to help you transfer the crust to pie plate. Follow further directions for baking based on what recipe of pie you are making.

*TIP-One great tip we learned at the demo was to use a spray bottle on the dough. If you just need to add a little bit of water as you roll it out or form dough, you can lightly spray all over without getting it too moist in only one section.

We tried out another delicious from the demo and it was delicious!
The Easiest 100% Whole Wheat Bread Ever
1 1/4 cups lukewarm water
1/4 cup orange juice
3 Tablespoons molasses
3 cups whole wheat flour
1/4 cup nonfat dry milk
1 1/4 tsp. salt
2 tsp. instant yeast

Grease an 8 1/2 inch by 4 1/2 inch loaf pan. Combine all ingredients into a large bowl. Beat vigorously for about 3 minutes. An electric mixer on medium-high speed works well here. Scoop the batter into the prepared pan. Cover the pan with lightly greased plastic wrap and let the dough rise for 1 hr. It won't fill the pan. It also won't dome as it rises, but will remain flat across the top. While the batter is rising, preheat oven to 350 degrees. Uncover and bake for about 45 minutes, tenting it with foil after about 20 minutes. The bread is done when it is golden brown on top and an instant read thermometer inserted in center registers 190 degrees F. Remove from oven. After 5 minutes use a knife to loosen edges then turn out onto a rack. Brush with melted butter if desired. This will keep the crust soft. Cool for 30 minutes before slicing.


We hope these recipes can be a great addition to your holiday meal! Happy Thanksgiving!

share this on »
{Facebook} {Twitter} {Pinterest}
8 Comments

Wednesday, November 10, 2010

casserole dish carrier tutorial - guest post

For YEARS I have been meaning to make a casserole carrier for transporting hot dishes to and from parties, holiday dinners, etc. But put it on my 2-mile-long list of crafty things to do, and it's easily forgotten each year. That's why I am so excited about today's guest post, just in time for Thanksgiving! Not that I'm actually going to get it done by then, but at least when I do get around to it I can just do it and not have to bother with coming up with the pattern! Please welcome our fabulous guest post today from Christina of 2 Little Hooligans. Thanks so much for sharing, Christina!


Casserole Carrier Tutorial
I am really excited to share this with all of you. This is unlike any other casserole carrier you have ever seen. I love that the handles are made of fabric and are not wooden dowels. I think it gives the carrier more stability. I also like that it is lined with Insul-Bright to keep your casserole dishes warm or cold while transporting. With that said, I do not recommend taking dishes directly from the oven and placing into carrier. It may work, but I'm not going to try that one. Just let the dish cool a bit first. The carrier is made of all machine washable fabrics, so wash away. I suggest line drying instead of placing into the dryer. (Please forgive me on the pictures. I hope you are all able to see my stitches. I used the darkest fabric I had and used white thread. But I was taking these pictures in the middle of the night and the lighting was not so good.)

Don't let all the steps scare you. I tried to make this tutorial as easy as possible for everyone to follow along. It really is easy. Your just taking two pieces of fabric and making a cross with them and attaching some handles. I hate to think that my ideas are basic, but they are!
Let's get started!

Materials Needed:

*Insul-Bright (1 yard)
*medium or light weight cotton fabric (2 yards of fabric)
*2" wide Velcro ( 24" of 2" wide Velcro)


Cut one piece of Insul-Bright to the following sizes:

30" X 15" and

37" X 12"

Cut two pieces of fabric slightly larger then the 30" X 15" and two pieces of fabric slightly larger than 37" X 12".
Take the 30" X 15" piece of insul-bright and the two pieces of fabric and pin together. Make sure right sides are facing and the insul-bright is on top.


Sew all around using the edge of insul-bright as your guide. Leave a 3" opening for turning right side out.

**note: I changed the foot on my machine to H. It is one of the plastic feet. This made a huge difference.**
Trim excess fabric and square off corners. Pull fabric out through opening.

Iron and top stitch all around the top.

Repeat for the other pieces.


You should have two pieces that look like this now.


Lay the pieces out on top of each other making a cross.

Make sure the 37" X 12" one is on top.

Make sure you line them up straight. The right side of my thinner piece stuck out about 10".

Mark where the fabrics meet on all sides like the picture. This doesn't mean anything now, but it will help later.


Now place a casserole dish in the center of the two pieces and fold closed. Fold the longer piece over first and the wider piece on top of that one. Feel for the top of the casserole dish and make a mark on the fabric where the top of the dish is. This mark will tell you where to stop sewing when attaching the handles.


See my little mark? Take a ruler and extend the mark for the length of the dish. Repeat on the opposite side.

Set aside for now.


To make the handles: Cut four pieces of fabric 44" X 2 1/2". Cut two pieces of flannel or batting the same size.

Layer with the flannel on the bottom and the two pieces of fabric right sides facing on top of the flannel. Sew together the entire length of the sides.
Flip right side out, iron and top stitch.


Attaching the handles: You will be attaching the handles to the 30" X 15" piece.

This is where those marks you just made from the top of the casserole dish come in handy. See them?

Line up the handles like so. Make sure they are evenly spaced, about 3" in from the edge. The middle of the handles should be in the middle of the piece of fabric.


Sew on the handles. Use the top stitch that you did on the handles as a guide and stitch right on top of those stitches again. Do not sew past the marker marks on the fabric. You want to make sure you sew straight lines. These will be seen on the bottom of the carrier.

Pieces should look like this now.

Attaching the two pieces together:
Line the pieces up again where you drew the lines before. Pin in place. Remember the 37" X 12" fabric is on top and the fabric with the handles is on the bottom.

Do not sew on the lines. Sew in a little. See where I made my stitches? Again, I wanted to make them line up with the stitches on the under piece. It will make it look neater from the bottom of the carrier.


This is what the bottom of the carrier looks like now.

See how nicely the stitches line up on the bottom?


Attaching the Velcro: Lay carrier flat, place casserole dish inside and pin Velcro in place where you want it.
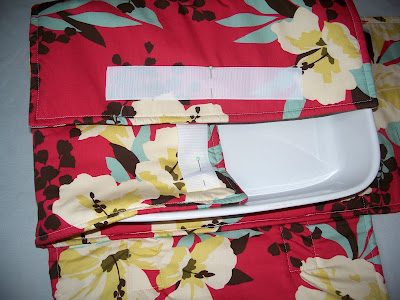

Play with the pieces and see where you would like them most. Here is where I placed mine. I used a 2" wide Velcro so that I can use this carrier for two sized pans.


Finishing off the handles: I like to make little padded sections to attach the handles together.

Cut four pieces of fabric and flannel (or batting) 6 1/2" X 3" .

Layer them like so, with 1 piece of flannel, 2 pieces of fabric right sides facing, and the last piece of flannel on top.

Sew sides together, leaving ends open.

Turn right right side out and iron.

Fold ends in about 1/2" and iron again.
Slide ends of handles into the middle of padded handle.

Pin and sew in place on the ends.

Make sure the handles are at matching lengths and the padded handles are in the center of the handle.

The fabrics are pretty thick at this point and I had a hard time sewing through all the layers until I switched needles. You may want to do so as well.


To make the spoon holder:
Cut two pieces of fabric 5"X 2" .

Sew together the two pieces of fabric, right sides facing. Leave a 1 1/2" opening for turning right side out.

Turn right side out through opening, iron and top stitch.

Sew the Velcro on. Make sure the Velcro is sewn on opposite sides and ends like in the picture.

Fold spoon holder in half. Mark where the center is. Now measure 1/2" away from the center on the right and left sides. These marks will be where you sew the spoon holder onto the carrier. It will give the spoon from wobbling too much.
Sew spoon holder onto carrier in desired position. I like to put mine on the top flap.


Carrier will hold a 8X12 or 9X13 inch rectangular pan.


**This tutorial is for personal use only! If you are going to link up and use my pictures, please link back to this post and don't forget to give credit where credit is due! **


I hope you will find some time to sew one up. I would say it takes about 3-4 hours from start to finish to make one of these. You will have a little extra fabric and Insul-Bright left over, so sew up some matching hot pads or oven mitts to go along with the carrier. If you make one using this tutorial, please email me a picture, I would love to see it.


Click here to see my other casserole carrier.


share this on »
{Facebook} {Twitter} {Pinterest}
12 Comments
LinkWithin Related Stories Widget for Blogs