


I have been a flower-making fool this summer. Yes, I've been teasing you with them. I've been promising tutorials for months, but honestly, I've been too busy taking special orders for them to actually get something posted! Now that the kids are back in school, I've finally found some time to make good on my word. Over the next few days I'll share tutorials for rosette bracelets, clips, headbands, pin-less corsages, and even a mini class on the very popular bib necklaces using vintage-inspired chains. There I go teasing you again. Today, we start with the basics: How to make a fabric rosette. Warning--you are going to be addicted!
Fabric Rosette Flower Tutorial

Supplies:
*Fabric - I like anything from the special occasion section at the fabric store, but you can also use an old t-shirt, quilting cotton, etc.
*Scissors
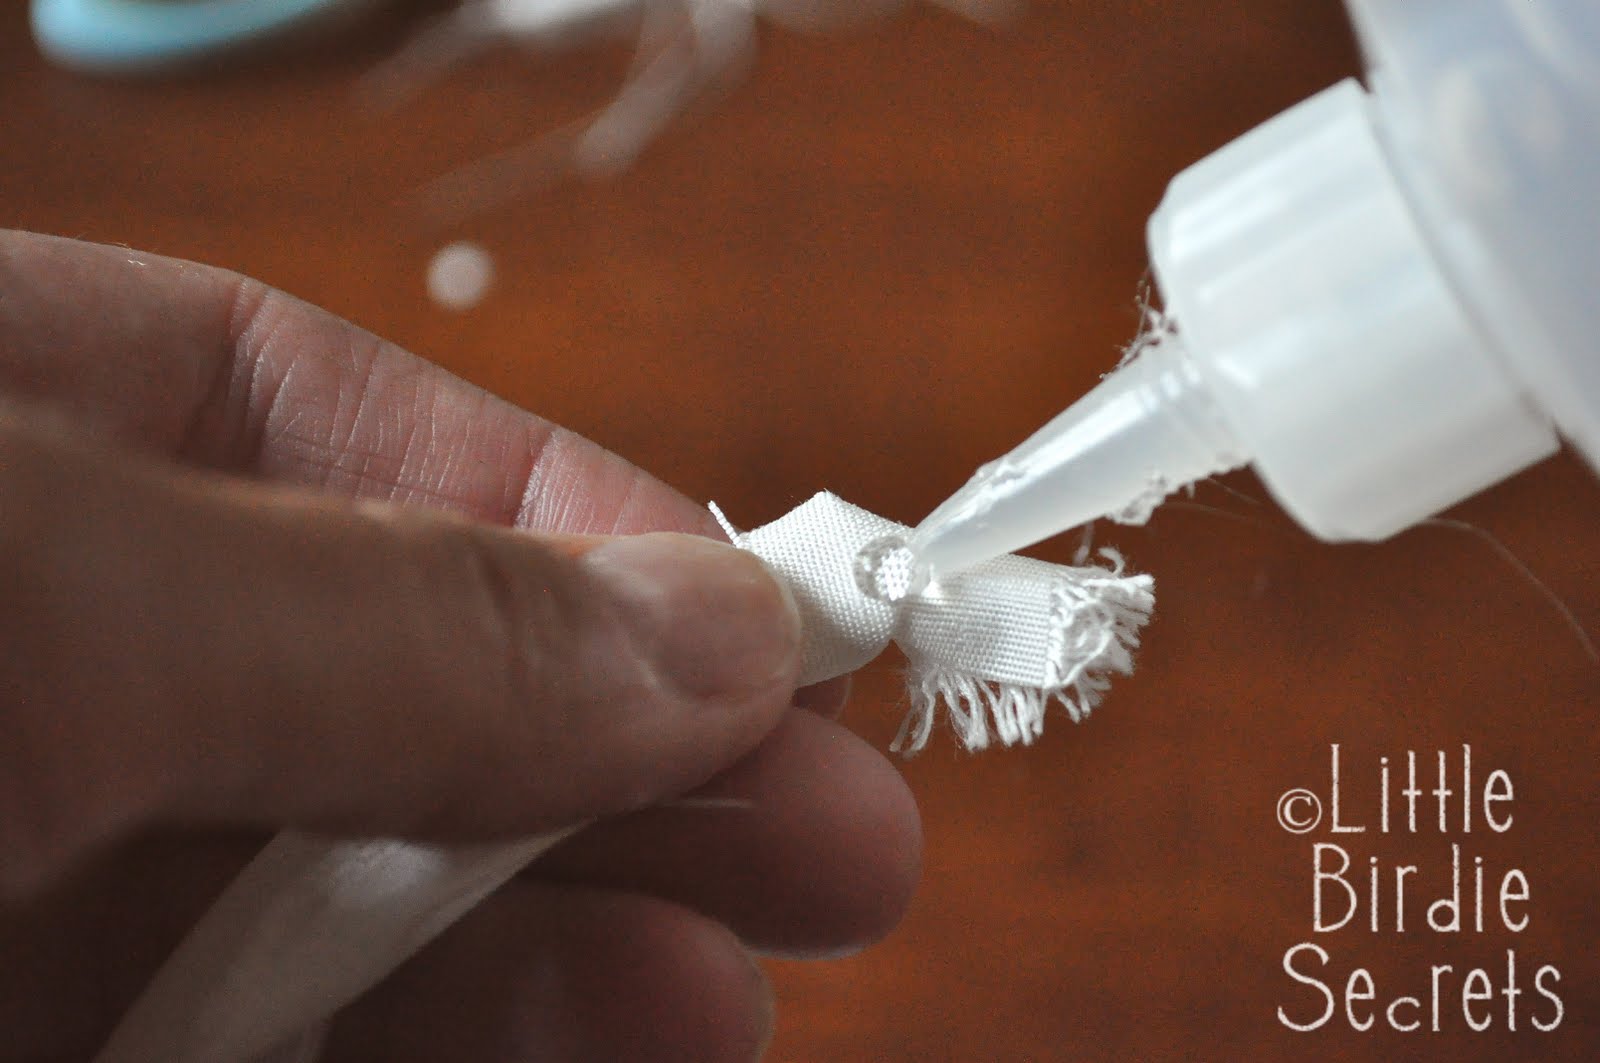
*Fabric glue - my fave is Fabri-Tac by Beacon Adhesives. You can find it at JoAnn and other craft/fabric stores
*Optional - beads or buttons, plus needle and thread
1. Cut or tear a strip of fabric 1" wide (tear it for a shabby look). The length of your strip will determine how large or small your flower is. I use about 22" long for smaller flowers, 44" inches (width of fabric) for large, and about 60" for extra large. How loosely or tightly you wrap your fabric will also determine the size.


2. For the center of your rosette, tie a knot in one end of your strip.

3. Dab a little fabric glue on the knot. A little goes a long way.
4. Hold the knot with one hand and twist the strip with the other. As you twist, turn the knot, wrapping the fabric around it. Every 1/4 to 1/2 turn, dab a little more fabric glue to hold it together. (If you're not quite getting the twisting and turning thing, check out my video tutorial of a similar flower here.)


5. Continue twisting, turning, and gluing. Play around with how tightly or loosely you wrap to see what you like best.

6. When you get to the end, leave a short tail.

7. Cover the bottom of the rosette with more fabric glue, then press the tail down on it. This will ensure your rose really stays together.

8. Optional: Using a needle and clear (transparent) thread, sew beads or buttons in the middle.

Okay, raise your hand if you love these! Good. Me too. Now come back the next few days for lots of ways to use these little beauties, like in this gorgeous jewelry below. . .


share this on » |
{Facebook} | {Twitter} | {Pinterest} |


75 Responses to “fabric rosette tutorial extravaganza!”
Perfect timing! My mum's birthday is in 2 weeks and this was one of the things I planned on doing for her. She just loves fabric flowers. Will definitely give it a go!!! xx
thanks for sharing - I LOVE how these turned out! And much simpler than others I've seen.
I posted a link: http://ificould-ificould.blogspot.com/2010/09/fabric-rosettes-take-2.html
Thanks for sharing! They look great
absolutely beautiful. Can't wait to TRY and make one of these gorgeous flowers.
These are so beautiful! I'm looking forward to making some.
Being a "Fabric Flower fool" myself I love it. Please do check out my blog http://jewelsofsayuri.blogspot.com/
for some of my experiments with fabric and jewelry.
Cheers n Thanks
Divya N
I love the bead and button accents - great idea! Thanks!
sooo adorable!!! thanks for the tutorial :)
Thanks for posting this! I never knew to make a knot for the middle, that would explain why mine never look quite right!
This is soo cool! I love fabric flowers and have been collecting tutes about it for sometimes. Thanks so much :)
Thanks for sharing, I have been wanting to make some of these but didn't know where or how to begin!
Kelli
xoxo
loveoursimplelife.blogspot.com
I am so greatful that you posted this!! Thanks. You guys are the bomb dot com.
Great tutorial! Thanks for sharing that ;D
Thank you so much, I have been trying to figure out how to make these and your instructions are so user friendly!
Thank you!! I love these things and now that I have the how-to, I can make them! I'm featuring this tutorial on my blog this month. :) little-inspirations.blogspot.com
Love it! I saw some of these the other day...Today is the day I was going to figure them out:) They look like so much fun to make!
love,love,love these...
Deby
Can I do a blog post on this and send my followers over to you ?
THANK YOU so much for this tutorial!
Phew, you saved me for super saturday! THANKS a million. AND hot glue guns work great too.
Thank you, thank you! I have been looking for a great tutorial on these fun little tid-bits. This one is wonderful!!
Very pretty. These have been so popular! I have to try my hand at it one of these days.
Taylor
www.maryjanesandgaloshes.com
Deby--yes! Feel free to link to us! Thanks for asking!
Wow- these are adorable! I've been crocheting little hats for my daughter and I think they just might need a fabric rosette to mix things up:)
Wahoo! Great tutorial! I've already made 6 today! Now I just need to figure out where they will be attaching to.. :)
Thx for the tut! I´ve been in love with thouse flowers for ages!
Your so sweet to show me how to make them!
Your site it awesome! There aren't many site that make me break out what little fabric I have! ha. I cant wait to discover more posts and try more projects!! You are awesome. You inspire me.
Tacky Glue doesn't dry fast enough -- use the glue specified! Learned that the hard way. I might try the glue gun method.
I'm very excited you posted this. I was wondering how I was even going to began making these.
Yea! This tutorial rocks! Thanks for sharing--just finished adding them to my little girl's clothes--pics can be seen here:
http://roadtheory.blogspot.com/2010/09/fabric-flowers-applied.html
Thanks for the tutorial - I make these but never with a knot so I'm definitely gonna try it this way! Can't wait to see how you make a bib necklace - I have a chain that is dying to be used :)
One word....LOVELY!! You must be the rosette goddess. Gotta question for you. Have you ever made these rosettes with grosgrain ribbon? Would you do it the same way as the fabric? I'd love to know. Thanks!
jenkied333@yahoo.com
Brilliant. You girls are so clever, this has so many uses. but let's start on a dress, or t-shirt for my daughter. Thanks for sharing, luv it.
Where'd my comment go. Oh wells, this is brilliant. You girls are so clever! I will be adding to a cardigan, my daughters t-shirts and dresses, the possibilities are endless!!!!
I want to make these but can I tack it in the spots where you would put glue, with a needle and thread instead?
this is so cute :) im going to have to apply it to one of my designs [eventually!]
i love your blog :) please follow mine :)
http://ohsandylove.blogspot.com/
Thanks for the tutorial! Just wanted to share with you my finished flower.. and now I can't stop making them. :)
http://embeshop.com/2010/09/fabric-rosettes-my-long-lost-love/
Muchas gracias por el tutorial!!!
starting with a knot is brilliant! i linked back to your tutorial on my post today after using it to make rings, clips, and headbands- thank you!!
http://vievesscrapbooking.blogspot.com/2010/12/fabric-rosettes.html
I loved checking out all your rosette tutorials - thank you! I saw the one about the headbands, but I'm wondering what you would use for the jewelry when using to many rosettes together? Do you just glue them to felt and then cut around so they are one solid piece?
Thanks for this fantastic tutorial. It made it so simple. I posted a link to it as well as the main page of your blog on my blog, Ninth Street Notions.
I have boxes of material I just got from my Gma. I dont sew, I dont craft, I take pictures! I cant do much with all this super old material in my photography!
Rosettes I can handle! Just made one out of a leg from an old pair of purple cords. LOVE IT! Off to the store to get pearls!
I was VERY inspired by your flowers!! So inspired that I created my own blog...and my first post is a rosette headband I made for my daughter. I would LOVE it if you would stop by. THANK YOU for the tutorial!! http://jpslittleblog.blogspot.com/
LOVE these flowers, and such a clear, easy to follow tutorial! I blogged your tute, with full credits of course, so that I can share it with my followers :)
http://artfulfancies.blogspot.com/2011/02/fabric-flower-tutorial-by-little-birdie.html
I love these! I made a bunch for my hair, and I also made a cupcake stand with these as decorations. I sent my bloggers here to find out how to do it. Thanks a ton! http://onecutecupcake.blogspot.com/2011/03/cupcake-tray-anyone.html is my cake tray with your rosettes. You are an inspiration! Thank you!!
Thank you so much for the tutorial! I used it as inspiration for decorating a spring wreath and linked back to you. I'd love for you to check it out at http://moliorfamiliae.blogspot.com/
Great tutorial - I used it to make a little rosette for a onesie dress :) Thanks for the inspiration!
http://happyallenfamily.blogspot.com/2011/04/super-quick-sewing-project-or-i-didnt.html
I did it! Thank you so much for the inspiration!
I made some bookmarks for gifts!
http://misscascio.blogspot.com/2011/04/made-by-me-initial-bookmarks.html
I love this tutorial, it is super easy. I used it to embellish a belt for my maternity dress that I made today :)
Thank you so much for your tutorial on this. I linked it to one of my posts if that is ok. I figure no use in recreatiing the wheel. Thanks for a great site!!!
Thanks so much for sharing this awesome tutorial!! I've been wanting to make some of these and wasn't sure how to! Thanks again and have a great day!
You did such a good job on this. Whenever Im asked how to make rosettes instead of me explaining it I just send em your way!Your instructions are perfectly narrated along with the photos. Pat yourself on the back!
Featured this on FB!!! Thanks for the fab tutorial!!
Thank you SO SO much for sharing the rosette tutorial. I have been wanting to make them so badly. I finally found your page and made my niece two rosettes on alligator clips and she LOVES them. They are so precious and now I can do them for my photography business as well!
Thanks again,
Heather
heatherdmullin@gmail.com
hi there!
first of all, i just want to say THANK YOU for all the informative and user friendly tutorials. my craftiness level has definitely gone up a degree or two in the last month that i found your blog :)
and these fabric rosettes are the next item on my list to master. but i was also wondering if you could tell me about the headband in the bottom right picture. is there directions or a tutorial on that one that i am missing? i'd really like to make it!!
thanks again!
HI! Thanks for your great tutes :) SUPER CUTE blog you have. I've used your rosette tute for a couple of projects and always link up your tute to my posts. :)
http://happyallenfamily.blogspot.com/2011/07/rosette-hairbands.html
I Looove your stuff! You guys are so creative! Thanks for sharing the how-tos, they help me so much!
I tried making a flower, using a different tutorial, and it was so-so. But then I found your tutorial (thanks to Pinterest!), and I LOVE how they turned out! I posted about them on my blog. The blue one and the white one are the ones I made using your tutorial. Thanks for making this easy-peasy!!
http://mamabeargetschatty.blogspot.com/2011/08/learning-to-make-fabric-flowers.html
Hey I used your tutorial on my blog :)
Thanks for the tutorial!!!
http://amyscraftbucket.blogspot.com/2011/09/fabric-flowers-2-more-styles-tangled.html
Excellent tutorial. I just found you via pinterest and have already made a gorgeous flower for my hair! Thank you :)
I made a headband with some rosettes made from a recycled t shirt. I linked my post to your tutorial. Check it out if you'd like. :)
http://tanya-alittlebitofeverything.blogspot.com/2011/09/t-shirt-fabric-rosette-headband.html
Thanks for the tutorial!!! It was super fun and easy. I decided to add a link to your site on my blog. Check it out and let me know what you think! dwellinthebliss.blogspot.com
Ahhh I love making those too!!! The ones you have look all the sweeter with the bits and pieces of fray sticking out of it!! I normally try to get mine all smooth and straight, but I think au naturel might be the way to go for some of these :D
Whoo! Can't wait to try it!
Just found your blog from a link in a JosieJones & Co. post. Great tutorial on fabric rosettes. I'm your newest follower.
Just made about 50 of these. Love love love! The headbands are adorable.
Thanks for the tutorial!! I needed a flower to finish off a purse/bag I made and this was perfect. I actually sewed the two coordinating fabrics from the bag wrong sides together so every twist and turn of the flower would alternate the colors...turned out cute. Thanks for the help!!
That looks like a very easy and relaxing craft. I think i finally I will try it with my girls, since they have be asking about it for many weeks now...Thank you so much for this super easy-breezy tutorial :)
These are really pretty and well done! {sigh...}
They look just fabulous. Will they survive in the washing machine (glue)? I would like to sew them on my daughters sweater.
These are adorable! I included your tutorial link in my list of fabric flowers here (http://twotendesigns.blogspot.com/2012/06/make-it-monday-summer-wreath.html#). Thanks for sharing your how-to!
-Kim @ Two Ten
LEGAL,BONITO E FACIL DE FAZER :)).BEIJO.VALÉRIA.(BRASIL).
These look amazing! I'm so happy I found this tutorial - I can't wait to make them!
Astrid
Thanks for the great tutorial! They look super easy to make!
Jenn
www.quiltedthimblecottage.com
hi! I am Brazilian and I am passionate about ribbons. This glue you use, to fabrics tores , is instantaneous? Because the glue stick in here only 24 and are practically liquid!. What you use, seems glue E.V.A. or Styrofoam, but they are sticky. And I imagine the hot glue becomes too hard. What do you recommend?
Thanks for the how to on making fabric flowers. I love these for head bands and photography props.
Post a Comment