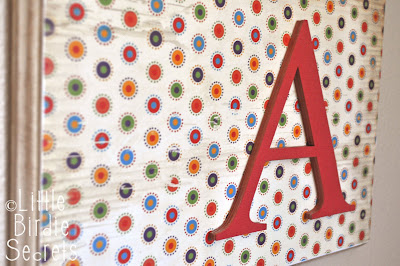
So it looks like you're all liking the possibility of winning a Silhouette digital cutter, huh? Yeah, I thought so. I'm going to show you a few projects I've done with it so you can really see what it can do. Here is the first project I did when I received mine. I've been wanting to do a little plaque with my boys' initials on them, but I haven't been able to find wood letters in a size/font I like. I know you can order custom wood letters online, but I wanted to do this really cheap. So I made my own. Out of paper. Hey, it started as wood, so close enough, right? Okay, here's the tutorial.
Faux Wood Letter Plaque Tutorial
Supplies:
*Card stock (I used 5 sheets of 8.5x11)
*Digital design cutter (like the Silhouette) or die cut machine
*Liquid glue (I like Tombow's Mono Adhesive)
*Pre-cut wood plaque (find them in the wood section of craft stores--I found mine at WalMart)
*Paper to cover wood
*Mod Podge and foam brush
*Sanding block or file
*Acrylic paint
*Pencil
*Scissors
1. Start by cutting multiples of the same size letter with your digital cutter or die cut machine. I used the Silhouette to cut 15 letter As.
What's nice about the Silhouette software is that you can position your designs in a way that will be the best use of paper, as seen below.
2. Cut enough copies to make your faux wood letter the thickness you want. I used 15 letters. I also used a card stock color that I had extra of, even though it wasn't the exact color I wanted. Then I cut one more letter on my nice textured paper in the color I wanted (I only had one sheet on hand). It's close enough to the color of the others that it's not noticeable.
3. Use a little liquid glue to glue each letter on top of the next, being careful to line them up exactly with each addition.
I put a heavy book on mine overnight just to make sure it was really going to stick together.
4. If you're making the plaque, paint the edges to go with your decor. I decided on an antique white paint with a little walnut gel stain to distress it. You really only need to do the sides and edges since you'll be covering the rest of it with paper.
5. On the back of your paper, trace the front of your wood plaque. Cut it out.
6. Cover the plaque with a thin coat of Mod Podge. I used the Hard Coat Mod Podge, but any decoupage medium would work well.
7. Place your paper on top and smooth out any air bubbles. Make sure the paper adheres well on the edges.
8. I like to sand the edges lightly to make the paper become one with the wood.
9. If you want, cover the top of the paper with Mod Podge as well. Then glue your letter in place using your liquid glue. That's it!
Here's the "J" version for my other son.
I added some picture hanging hardware to the back of my plaque and hung them together in my boys' room.
Think of all the images you could create in 3-D! You're definitely not limited to letters. If you haven't entered our Silhouette giveaway yet, check it out now! Entries are due by July 14, 2010.
share this on » |
{Facebook} | {Twitter} | {Pinterest} |


20 Responses to “faux wood letter tutorial (using the silhouette)”
Cool idea! Keep them coming, please.
Hey there, I've been following for about a month, and I love your projects. This is an awesome machine - I don't have any sort of die cutter, but have always wanted one for card making. I would make lace-like cards of ghosts, jack-o-lanterns, and Victorian houses for Halloween with this machine. Thanks for the review too - it really does look like tons of fun!
Oh wow. That is awesome.
Very cool! Always amazed by the things you come up with!!
You did an AWESOME job with the faux wood letters!! WTG!! You must have real patience!
Wow! Super cool tutorial! Now I need to win the Silhouette!
This is such a great idea! I too have a hard time finding letters the right font or size- now I am inspired. Thanks for posting this!
That is TOTALLY AWESOME!!!
You're right about the possibilities, and the two you made for your boys look super.
:) Laura
Those are super! I would love to make my girl's initials out of "faux wood" - MVP :)
Those are awesome!
So, so clever! And you did such a great job with it. I'm going to have to try that with the Silhouette I win... (*big smile*)
Really nice tutorial and idea for the cutter.
Debbie
Great tutorial. Love your insights. I can think of oodles of applications for this that I want to make ASAP. Yumm.
SewCalGal
www.sewcalgal.blogspot.com
What a great idea. This is cool.
~Makalani
Makaz Home
What a great idea! I love the final products. The letters look great and putting them off center adds interest.
This is utterly fantastic!!! great idea for sure!! :)
Super cute! Love these!
What I great idea!! I'm definately going to keep this one in mind for when I upgrade my children's baby rooms to "big" kid rooms!
~Prairie Story ...care of Alison Zulyniak
brilliant one!!!!!! you are so creative babe!!!
Genius! I like that I can make this with any font I want. Now I just have to make a decision..
Post a Comment