Archive for March 2012

Friday, March 30, 2012

homemade graham crackers

Recently, my dear friend Erin posted a recipe on her Lovesome site that I just had to share! These homemade graham crackers are delicious, simple, and healthy, so you can feel great about feeding them to your little ones!


Homemade Graham Crackers
ingredients:

2 cups whole wheat flour
1 tsp cinnamon
1/2 tsp baking powder
1/2 tsp baking soda
1/2 cup butter, melted
1/2 cup honey
directions:
1. mix dry ingredients together and set aside.
2. in a separate bowl mix together the melted butter and the honey. 
3. add honey/butter mixture to dry ingredients, stir until combined.
4. drop mixture onto cookie sheet and roll out, making sure the edges reach the sides of the cookie sheet.
5. bake for 8-10 minutes at 400 degrees, cut quickly once out of the oven.
Tips: I used a glass to roll the mixture once it was on the cookie sheet. my cookie sheet was 10.5x15.5 inches, though i probably could have used a larger sheet and rolled them thinner since they puff up in the oven. It really just depends on what you want though. I poked holes with a fork just for looks, you don't have to do that. :)
 
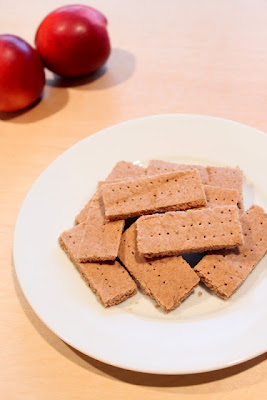
Here's a picture so you can see they are quite a bit thicker than store bought graham crackers. They are a lot more filling, too, which is great.

This post was sponsored by:

share this on »
{Facebook} {Twitter} {Pinterest}
9 Comments

Thursday, March 29, 2012

spring & easter decoupage bunny decor {tutorial}

READ THE REST OF THIS POST -->>>» |


Since I started transforming my Valentine's mantel into an Easter / spring mantel, I've been looking at Easter decor items all over, but I haven't seen anything I love (at least not in my price range). After all, it's just going to be displayed for a few weeks! When I found this ceramic bunny at Target for $2.50, I thought, I can transform this little guy into the $20 bunny I saw last week. Easy.
Decoupage Bunny Tutorial

Supplies:
*Ceramic figurine (I used a rabbit, but this would also be darling on a spring chick!)
*Mod Podge or other decoupage medium (I used the matte finish)
*Foam brush
*Paper (I used book pages, but any lightweight patterned paper would work)

share this on »
{Facebook} {Twitter} {Pinterest}
10 Comments

Wednesday, March 28, 2012

clean kitchen, happy mom


With three boys in my house (and a fourth if you count my husband) my kitchen and other spaces constantly need to be cleaned. The kitchen is probably the worst though. I could sweep and wipe the table 50 times a day! I don't of course...but it is definitely a constant battle to keep it clean. With all those little hands in "helping" me in the kitchen, I worry that germs are constantly being spread. I was really excited when I heard about the Lysol No-Touch Kitchen System because it is a great way to solve that problem.

The Lysol No-Touch Kitchen System is an automatic, hands free dispenser that offers one solution for a clean kitchen and healthy hands. What's great is that is works perfectly for dishes, surfaces, and hands. So all you need is this one dispenser and you can feel great knowing the kitchen is cleaned and since you didn't have to touch everything to use it, you can feel great about not spreading germs! I love it and it sure looks a lot nicer next to my sink that that big bottle of soap with drips down the sides. A clean kitchen makes me a happy mom.

Want a chance to win a Kitchen Upgrade from Lysol? Take the Undercover Kitchen System Challenge and share your score. I got a 7/8!

For a chance to win a No Touch Kitchen System with a year supply of soap complete these two steps:
  • Share theUndercover Challenge with your friends below
  • Tell us that you did AND tell us your kitchen cleaning challenge below
This is a sponsored conversation written by me on behalf of Lysol. The opinions and text are all mine. Official Sweepstakes Rules

share this on »
{Facebook} {Twitter} {Pinterest}

Monday, March 26, 2012

can organizer giveaway

If you have a kitchen, pantry, or any sort of food storage then you will love Can Organizer.com. An affordable new way to organize your canned food! You can easily store, organize and rotate your canned food by using this simple and effective design that will maximize your cupboard space. Many different Organizers have been created to easily fit in your standard cupboard, pantry and food storage shelving.

The 11" deep Cupboard Organizer is perfect for smaller spaces like your cupboard where you need to maximize space. This is ideal where a pantry or extra storage may not be available. You can simply use one Organizer or many depending on your needs. Fill up your cupboard so you can easily find what you're looking for!
The 16" deep Shelf Organizer is deeper so you can store even more cans! Designed to fit nicely on your standard shelf so it is perfect for storage areas like your garage or storage room.
And finally the 22.5" deep Pantry Organizer is the deepest of the bunch. This system is optimal for those deep pantries or storage racks where you have plenty of space. You will be amazed how many you can fit in the Organizer and well organized your food storage will be. Now you can hit those canned good sales and stock up for your family, saving money and having food on hand for whenever you need it.
Of course if your cupboards are crammed with different odds and ends and you don't have space to fit several organizers in a row, customize what you need for the space that you have. Aren't you ready to be organized and clean up those cupboards? Be better prepared and save now by visiting CanOrganizer.com and selecting the perfect size for your home.


Watch how easy they are to assemble


And yes, CanOrganizer has offered a fantastic giveaway to one of you readers. They are offering one 4 pack of can organizers, of any size! So whatever suits you best, the winner will be able to choose.

Just visit CanOrganizer.com pick the size you would like to win and leave a comment with your name and size. It's as easy as that!

And if you aren't feeling lucky, or end up not winning the giveaway, CanOrganizer is offering a 10% discount off any purchase! Just put in the code 'bird' at checkout (expires at the end of the month). This giveaway will end on March 31, 2012 at 11:59pm PT.

share this on »
{Facebook} {Twitter} {Pinterest}
81 Comments

Thursday, March 22, 2012

make a spring moss wreath {tutorial}

I've been wanting to make a mossy wreath for ages, like the ones you see in expensive catalogs like Ballard Design, but I thought would be way too difficult and time-consuming to glue on all those tiny chunks of moss. I didn't realize the moss is actually in a big sheet--I was expecting tiny pieces that would take forever to glue on. So while J was napping, I grabbed some glue and went to town! Here's how to make an Easter moss wreath for just a few bucks.

Spring or Easter Moss Wreath Tutorial


Supplies:
*Wreath form (I used a 12" Styrofoam wreath that I got 50% off at JoAnn)
*1 package floral moss
*Craft glue (like Tacky glue or Martha Stewart's Glitter Glue)
*Decorative Easter eggs (foam works best)
*Floral wire
*Ribbon for hanging

1. Unwrap the moss sheet. It's okay if it breaks up a little--you're going to tear it into smaller sections anyway. You should probably cover your work surface or do this outside--it's a little messy.

 2. Cover a small section of your wreath with glue. My Glittering Glue by Martha Stewart has a built-in brush, but you could use a foam brush and Tacky Glue. (I left the very back of the wreath with nothing on it.) 
  

3. Break off a piece of moss about the same size as the area you covered with glue. Press it down and hold for a moment until it sticks.

Continue around the wreath until covered. Fill in any holes if necessary.

4. If you're attaching eggs, cut three-3" pieces of floral wire and push one into the bottom of each egg.
 

 5. Push the ends of the wire into the wreath to secure eggs.

 6. Hang with a ribbon tied in a cute bow. 
 

I hung mine as part of my Easter mantel (still a work in progress). You're not getting sick of my picture frame with sheet music background, are you? I can't believe how well it's worked for Christmas, Valentine's, and now Easter! Okay, call me lazy, but it's working for me!

Who knew it would be so easy to make a fancy moss wreath? I'm in love with it. I think after Easter I'll pull out the eggs and leave the wreath up a little longer.

share this on »
{Facebook} {Twitter} {Pinterest}
5 Comments

Wednesday, March 21, 2012

recycling in the garden {guest post}

 We are so excited to have Stacy from Stacy Grows guest blogging for us today! She is a super talented gardener and writer! She also wrote a fabulous book, called Project Garden: A Month-by-Month Guide to Planting, Growing and Enjoying ALL Your Backyard Has to Offer. Right now, Stacy is having a giveaway of her new book. Visit her site to enter! Now, here are some great ideas about recycling in the garden from Stacy...

 I love recycling in the garden. Rain boots as containers, old baskets as bird feeders—these are all great ways to add life to the garden without spending any money! Kids love it, too. In my new book, Project Garden, I have several ideas for recycling in the garden. Here are a few ideas from my book (and a few new ones, too), all using golf items.
Balls
I like making caterpillars out of old golf balls. For these here, I painted them first, glued them together on a cork mat and then added some eyes, faces and antennas. You can also use golf balls for plant markers (see the tees idea below).
Tees
Golf tees are begging to be plant markers! They’re already made to stick into the ground, so you just have to add something on top to write the name. Here, we glued on miniature flowerpots and golf balls. We can’t wait to put them into the ground in spring.
Clubs
You can pick up old golf clubs at just about any rummage sale or thrift shop in the country. Take one and use it as a flagpole. For this one, we suspended it in a tree using string. Another use for golf clubs is to put 2-3 together to use as a trellis or plant stake.
Bag
Old golf balls are great for storing all your garden tools. Use the pockets to hold seed packets and small items. Then store long-handled items like rakes, hoes and shovels in the main compartment.


share this on »
{Facebook} {Twitter} {Pinterest}
1 Comment

Tuesday, March 20, 2012

spring coffee filter flowers {tutorial}

I think I enjoyed those first couple of months of new baby time--where you don't feel like you have to commit to anything because everyone understands you're still adjusting to having a new little one--way too much. It was so nice. He'll be three months on Saturday. I think I'm officially back in the game, whether I want to be or not! Appointments, social engagements, service projects are slowly creeping back into my schedule (yeah, I had to get back on one). Back to being busy, back to getting up early and staying up late to get it all done. Case in point: the centerpiece assignment.


I love the chance I have to serve in my church helping plan meaningful activities for the women in our congregation, and the assignment I have right now is right up my alley. This month our women's group, which is called the Relief Society, held a celebration part for the organization's 170th birthday. One major part I had (in addition to helping with invitations) was the centerpieces. Of course I could've gotten away with doing next-to-nothing, but that's not who I am! I had to go overboard as usual. And I loved every minute of it. But finding the time to make it happen was harder than I thought it would be! Luckily I had help, and luckily these coffee filter flowers were super easy to create. Don't believe me? Read on.
 

Here's how to make and dye coffee filter flowers that look a lot like beautiful peonies (or carnations depending on how many filters you use)! You can custom dye them to match any theme or decor. These are perfect for wedding centerpieces or just to brighten up a room.


Coffee Filter Flower Tutorial

 Supplies:
*Coffee filters (about 8 per flower for peony-like flowers)
*Floral wire
*Green floral tape
*Wooden skewers
*Wire cutters
*Spray bottle and food coloring
*Paper piercer and mouse pad (optional)
 

1. Count out about 8 coffee filters for each flower and stack together. To make things easier, I poked three holes in the center of the stack with a paper piercer. Use a mouse pad underneath to protect your work surface.

2. Thread a piece of floral wire up through one hole and back down through another, leaving a 3 inch tail on each side.

 3. Next insert the wooden skewer through the third hole about half an inch. Wrap the wire tails around the skewer.

4. Wrap the entire stick, including the wire, with green floral tape.

5. Starting with the innermost layer, bring the sides of the filter up to the center, squishing it together. Move to the next layer, scrunching it around the previous layer, until all layers are scrunched up. Don't be afraid to really scrunch them together.


 6. Starting in the center again, carefully push the "petals" out until it looks the way you want it to.


Use flowers as-is (white), or continue on for custom colors!

7. To dye your coffee filter flowers, you'll need a spray bottle with water in it and a few drops of food coloring. I just added a little red for these pink flowers. You can make them as dark or light as you want, depending on how much food coloring you use and how much you spray them. Cover your work surface and spray flowers lightly until desired color is achieved. I tried not to spray them all pink--leaving some white makes them look more realistic.

8. If you sprayed your flowers, you will need to dry them so they keep their shape. You could leave them to air dry, or you could speed things up by sticking them in the oven! Lay your flowers on a cookie sheet. Place in a 200-degree oven for 5-20 minutes (until dry). The floral tape may become a little more transparent, but it shouldn't burn. It will be hot and sticky, so be sure to wait for them to cool before removing from cookie sheet.
Now they're ready to be gathered in a vase.
 

We put three in a small vase and included a couple of picture frames on each table with a dress cut-out in each (more info coming soon!).
You can wrap the vases with a doily, tiying on with some hemp and finishing with a button for more interest. Or not.

Love this spring-y look!

share this on »
{Facebook} {Twitter} {Pinterest}
20 Comments

Monday, March 19, 2012

what is your earliest oreo memory?

I love OREO cookies. I could not believe it when I heard they were celebrating 100 years this month! I mean, I knew they had been around as long as I can remember, but 100 years is a long time!
I can still remember the first time I had an OREO cookie. It was when I first discovered the art of dunking an OREO cookie into a glass of milk.


My family taught me how to dunk one. It was such a novel idea to me. Dunking a cookie in milk. It sounded fun and delicious though. I remember getting a glass of milk and as I held the cookie in the glass, my fingers got so cold! I wasn't about to pull them out though. I wanted to be sure the cookie was well dunked. Apparently I did well because after a little bit, my whole cookie got so soft that it fell into the milk! I had to start all over again. It was worth it though. The taste of an OREO cookie laden with milk is still delicious to me. It is so nostalgic and brings so many childhood memories to my mind.
Now we have taught the art of dunking OREO cookies to my three boys. They love it and it is fun to watch them enjoy the experience as much as I did when I was a kid. Now I want to hear what your earliest OREO memory is!

OREO is celebrating its 100th Birthday by encouraging all of us to take a moment to slow down, and celebrate the kid inside. Celebrate with us for a chance to win $200! Simply follow these two steps to enter:
1. Add your photo or video to the OREO Moments Gallery
2. Come back & reply below describing your photo or video, and tell us about your earliest OREO memory

This is a sponsored conversation written by me on behalf of OREO. The opinions and text are all mine. Official Sweepstakes Rules.

share this on »
{Facebook} {Twitter} {Pinterest}
LinkWithin Related Stories Widget for Blogs