Wednesday, December 10, 2008

peppermint marshmallow recipe

I'm not a huge marshmallow fan, but I find it hard not to stuff my face with this homemade peppermint variety. Seriously, so yummy. And really, not hard to make! You don't even need a candy thermometer (any recipe that requires a candy thermometer does not get made in my house). As promised, here's our favorite peppermint marshmallow recipe, a perfect companion to the hot chocolate mix for your friends, neighbors, and co-workers.

Peppermint Marshmallow Recipe

1/2 c. powdered sugar
1/3 c. cornstarch
2 envelopes unflavored gelatin
1 1/3 c. sugar
2/3 c. light corn syrup
1/2 c. crushed peppermint candy canes (about 6)
1/8 tsp. salt

*Tip: to crush your candy canes, break them up in large pieces, then seal them in a Zip Loc bag. Put your bag on a sturdy cutting board and use a hammer to smash them into a powder. The finer the powder, the better.

1. Into a small bowl, sift together powdered sugar and cornstarch. Line a 9x13" pan with foil and spray with non-stick cooking spray.

2. Sift 2 Tbsp. of the powdered sugar mixture into pan and tilt to coat all sides. Leave excess in pan.

3. Place 2/3 c. water in a large bowl and sprinkle with gelatin. Let soften 5 minutes.

4. In medium, heavy-bottom saucepan, heat sugar, corn syrup, candy cane, and salt over medium heat until completely dissolved (about 7 minutes).

5. Pour into bowl with gelatin mixture and beat on high speed with electric mixer until light and fluffy (10-15 minutes).

6. Spread evenly into prepared pan. Smooth top and dush with powdered sugar mixture. Let sit at room temperature for 2 hours.

7. Lift from pan with foil. With a small, wet cookie cutter, cut shapes and dip sides in sugar mixture. Cut up remaining marshmallows into small, irregular pieces (these are the ones I let my kids and husband eat!). Or, using a wet knife, cut into 6 large squares and dip sides into powdered sugar mixture. Then cut each of those squares into 9 pieces and dip in sugar mixture.

8. Store at room temp, loosely covered.

Put three in a cello bag, tie with a ribbon, and gift them along with a jar of hot chocolate mix. These are perfect with regular, dark chocolate, or chocolate mint hot cocoa. I love the way my star cookie cutter makes them just the right size to fill up my mug! But I find it hard to make them last long enough for more than one cup of cocoa. I can't stop eating them straight out of the bowl!
P.S. Thanks to my dearest Checketts for this recipe--you changed my life when you gave me a bowl of these so many years ago! Miss you!

share this on »
{Facebook} {Twitter} {Pinterest}
50 Comments

Tuesday, December 9, 2008

seasonal word blocks

Do you have Ben Franklin crafts where you live? I believe they're independently operated, so one could be totally different from the next, but we love the one near us in Monroe, WA. Great selection and great project ideas. We picked up a flyer for these seasonal word blocks and put them together, just in time for "winter." The best part? You get sixteen different decor options out of one project! Sixteen! That's out-of-control cool.

We started with seven pre-cut blocks from Ben Franklin (you can probably find these at most craft/hobby stores, or cut your own). We sanded and painted them, then cut vinyl letters to place on each side of each block. If you don't have access to a vinyl cutter, you could stencil them on with paint or use chipboard letters. You could also try decoupaging (Mod Podge) patterned paper onto the blocks instead of painting them. Get creative!

Are you curious to know which sixteen seasonal words some genius came up with using these seven blocks? Check this out:

Harvest
Welcome
Faith
Family
Spooky
Friends
Winter
Freedom
Blessed
Snow
Home
Hope
Monster
Mother
Dream
Easter

Are you convinced you have to make these? Good. These are the letters you'll need to place on each block:

Block One: H Y E D
Block Two: A C R S
Block Three: R P E T
Block Four: V N L O
Block Five: E O M D
Block Six: S M K I
Block Seven: T F B W

Not enough room in your life (or living room) for 16 seasonal decor options? These would make a great gift!

share this on »
{Facebook} {Twitter} {Pinterest}
35 Comments

Monday, December 8, 2008

little birdies everywhere--fun bird ornaments

The Three Birdies went bird watching this weekend to bring you a bird ornament roundup. You know, so you can complete your totally cute, handmade ornament collection with all that free time you have before Christmas. And because we really, really love birds. Really.

We loved this little birdie pattern since we found this last summer. Originally made for a cool mobile, they're making their debut on our site as Christmas tree ornaments! Check out Spool Sewing for this and other great free patterns.


Tricia Rennea Art and Illustrations is offering a free pattern for another stuffed bird ornament. You could even string them together for little birdie garland! Check out the Maddie Bird Pattern, and don't forget to post a pic in our Flickr pool if you end up making these!

Lil' Fish Studios made these darling felted bird ornaments, but they may have been from last Christmas, because I don't see them in her Etsy shop. Darn! You might just have to make your own. But check out here blog--she makes amazing stuff. Think little felted acorns. Adorable!

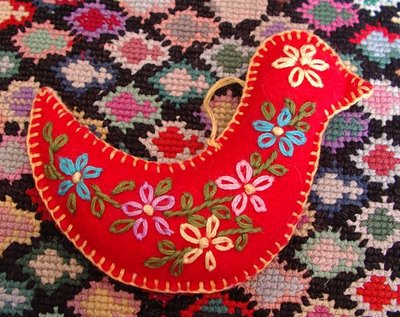
Sunshine's Creations has a tutorial for fun Christmas and winter embroidered felt ornaments. We love these!

And Martha revives that old childhood tradition--the cinnamon applesauce ornament. They smell delicious, but don't be tempted--they're not edible! We love the "upgrade" she gave them by using colorful glitter and beads. Way cuter than the ones I made in preschool.

Whether your tree is decorated or not, there's still time to make a few little birdies to hang around for the holidays!

share this on »
{Facebook} {Twitter} {Pinterest}
9 Comments

Sunday, December 7, 2008

santa's got another giveaway for you!

Because of all of you and your fabulous response to our last giveaway, Heather of Cutie Patootie Boutique is offering you another giveaway! She must really be in the Christmas spirit. So here are the details:

Our winner will receive their choice of either a pillowcase dress of their choice in a custom size from 6 months up to 3T OR two tubs of Dough Doh Heads Playdough in the scents of their choice!

To enter, leave us a comment on this post naming which prize you'd choose. Check out the Cutie Patootie Web site to see all the fabulous options! We'll pick our winner in one week, so your comment must be left by Saturday, December 13 at 11:50 PST.

Can't wait that long to get your hands on some of Heather's adorable creations? Use the coupon code "Little Birdies" in your e-mail order and you can take advantage of two fabulous discounts:

*Buy TWO tubs of Dough Doh Heads Playdough, receive ONE free!
*FREE shipping on all Chalk and Dough on the Go Playmats!

Thank you for supporting Heather, and thanks for buying handmade!

On that note, you may have noticed that after months and months of talk, I have finally listed a few items in my Etsy store. Check it out! I've got to get this stuff out of my closet! :) Oh, one more thing--if you haven't already, don't forget to enter our Klutz books holiday giveaway. It ends this Friday, Dec. 12 at 11:59pm PST!

Etsy
Buy Handmade
msybrowsky

share this on »
{Facebook} {Twitter} {Pinterest}
195 Comments

Friday, December 5, 2008

hot chocolate mix in a jar--a really cute jar

This simple hot cocoa mix is another great neighbor/co-worker gift that you can put together super fast. It's also our weekly recipe, so don't forget to make some for yourself!

We used these mini "quilted" jars, mostly because they're just so little and cute, and because for one person, it provides several cups of cocoa. (One jar holds one cup of mix.) If you wanted to make some for a couple or family, try using a pint or quart jar. Just add more mix!

Hot Cocoa Mix Recipe

10 cups dry milk powder
4 3/4 cups sifted confectioners' sugar
1 3/4 cups unsweetened cocoa powder
1 3/4 cups powdered non-dairy creamer

Mix all ingredients in a bowl. Store in a jar or airtight container. Yields 15 cups (enough for 15 of the small jars pictured here). To make the cocoa, stir 3 heaping Tablespoons into 3/4 c. hot water or milk. I always advise topping it off with whipped cream as well, but that's just me (and my sweet tooth).

Cheater version: Buy the bulk size Swiss Miss hot cocoa mix at Costco or WalMart and add 3 teaspoons of flavored non-dairy creamer per serving to make a gourmet flavor (see below) . Try the Swiss Miss Dark Chocolate mix plus a few teaspoons of Ghiradelli Sweetened Cocoa for a dark chocolate flavor. Go ahead--cut corners. It'll be our little secret.
If you really want to make an impression, why not make gourmet hot chocolate flavors? Or add layers of sweet treats for a cool presentation. Here are a few more ideas for truly gourmet hot cocoa:

*Substitute the non-dairy creamer with a flavored non-dairy creamer, like hazelnut, amaretto, vanilla, or cinnamon for gourmet flavors.

*Peppermint cocoa can be made by crushing candy canes and mixing them with the cocoa mix in your food processor (this makes the pieces even smaller so they blend well with the cocoa). Add a layer of crushed candy canes in the middle or on top of your mix to show off the flavor in the jar!

*Add a few teaspoons of instant coffee crystals per serving for mocha cocoa.

*Layer fun dry toppings with the cocoa mix in your jar. Try mini chocolate chips, mini marshmallows, red and green jimmies (sprinkles), or crushed candy canes.

*Melt chocolate chips in a microwave-safe bowl in the microwave and dip the head of a plastic spoon in it. When it dries, wrap the chocolate-covered head in a plastic or cello bag and tie with a ribbon. Attach it to your jar of hot chocolate to be used with the first cup. The chocolate will melt when they stir, adding a little extra creaminess!

Now for the jar. All supplies are Stampin' Up! We traced the inside of the ring lid on the back of patterned paper, cut it out, and glued it to the top of the lid. Then we layered a strip of coordinating patterned paper on a piece of card stock and wrapped it around the jar, securing it with adhesive. We stamped tag stamp, layered it on card stock, and adhered it to the front. Then we tied a matching ribbon around the top and tied on a little tag with the instructions for mixing the cocoa (see above). Another classic idea is to put a square of Christmas fabric between the lid and the ring for an old-fashioned look.

To add a little to this little gift, check out this electric milk frother we found at IKEA for $2.00! Just pour a small amount of hot milk in a glass and blend until thick and frothy. Pour on top of your cocoa for a coffee house feel--that's a lot fewer calories than whipped cream!

share this on »
{Facebook} {Twitter} {Pinterest}
25 Comments

Thursday, December 4, 2008

holiday potpourri

Bubbling quietly on the stove, this homemade holiday potpourri is a simple combination of citrus and spice that fills the house with the scent of Christmas. It's one of my favorite things to have brewing this time of year. I love to give it as a neighbor gift because it feels like a treat, but it doesn't add to the waistline. And it's so easy to make!
Ingredients:
*1 whole apple
*1 whole lemon
*1 whole orange
*3 whole cinnamon sticks
*6 whole cloves
*6 whole allspice berries
*2" piece fresh ginger root (optional)

I bought a bottle of whole cloves and a bottle of whole allspice (found in the spice section at the grocery store) and just sprinkled some of each with the other ingredients (i.e. I didn't count out six of each). I placed all the ingredients on a square of cellophane wrap, pulled the corners up together, and tied it up with a ribbon. Then I added a sprig of fresh greenery (which I cut from my yard), and a stem of fake berries. Then I added a tag I printed with the instructions and stamped with a few holly berries.

Instructions to include with your potpourri:

Holiday Potpourri
1. Cut fruit into 1/2-inch thick slices.
2. Place all ingredients in a medium saucepan and cover with water.
3. Bring to a boil, then reduce heat and allow to simmer uncovered, adding water throughout the day as needed.

I use the same potpourri several days in a row (until it loses its scent), turning off the stove at night and starting it up again in the morning. You can also add apple cider to the ingredients rather than water, and it makes a cozy hot cider. Enjoy!

share this on »
{Facebook} {Twitter} {Pinterest}
20 Comments

Wednesday, December 3, 2008

tie one on

Who said Dad is the only one that should get a tie for Christmas? If you have a hard time getting your little guy to wear a tie to church or formal functions, give him something he can't argue with. Seriously, what kid wouldn't want to wear one of these? Ditch preppy for skater dude. He'll still look cleaned up, but he'll keep a sense of his own style. Or, try matching ties for Dad and son, or a Christmas tie for your family Christmas card photo. These were made with McCall's pattern M2447. Super simple, and the pattern offers two lengths. We've had requests for gifts for guys, and this one was a favorite, especially since it works for Dads and kids. So get going--only 22 days left!

share this on »
{Facebook} {Twitter} {Pinterest}
5 Comments

Tuesday, December 2, 2008

how to make a napkin card (and be the hit of your own party)

Here's a Christmas card or party invitation that gives you a big bang for your buck. Did you know you could adhere paper party napkins to card stock for an instant card? Think of all the cute napkins out there for holiday parties, baby showers, wedding showers, and birthday parties. This awesome technique makes it easy (and super cheap!) to coordinate your party invitations with your party decorations! Or send a coordinated thank-you card to your guests using leftover unused napkins. Now what domestic diva could pass that up?

One napkin can yield 2-4 cards each, depending on the design and size of your card. Paper napkins, even cute ones, are pretty cheap, from $.50 on clearance to a few dollars, and there are usually 25 napkins per package. You could easily get 50 or more cards from one package of napkins. That's a whole lot cheaper than printed decorative paper. And the texture is almost like fabric once it's adhered to the card stock. No one will guess it's a napkin! Many napkin designs even include a border, so you may not need to add any additional embellishments for a gorgeous card. Here's our easy tutorial to make your own napkin cards, just in time for your holiday party.

Napkin Card Tutorial


What you'll need:
*Decorative paper napkin
*Pre-cut card stock (cut to the size you want your card to be)
*Pad of paper
*Iron, heated to the Wool setting (medium high)
*Plastic wrap
Okay, let's get started!

1. Your napkin will probably be 2-ply or 4-ply. You want only one ply--the decorative one. Separate the layers. It can be tricky to get it started, so you may have to rip a tiny bit of the corner off to do it. Pull completely apart and discard the other layers.

2. Lay your pre-cut card on top of the open pad of paper, face up. Cover with a piece of plastic wrap a little larger than your card, so it hangs over the edges.
3. Position the napkin over your card in your desired position. Make sure the part of the napkin you want on the card is where it should be.

4. Cover the napkin with a sheet or two of the paper pad. Using the "no steam" setting, press the card with firm pressure, holding it for 15-20 seconds on each part of the card. Allow to cool about 1 minute.
5. Carefully pull back the paper and inspect the corners of the card to ensure the napkin has adhered to the card. If not, put the paper back over it and iron again.


6. Cut off the excess portion of the napkin, trimming it to the card size.
7. Leave as is or embellish further. That's it!


Here are a few other napkins we "re-styled" into fun cards.


Looking for more holiday card ideas? Check out Anne Beale Yancey's blog, Mukibug, for video tutorials of gorgeous techniques to make beautiful Christmas cards. Just click on "video" at the top of the screen. They even feature Christmas music so you can get in the holiday spirit while you get inspired!

share this on »
{Facebook} {Twitter} {Pinterest}
33 Comments

Monday, December 1, 2008

on the first day of christmas. . .

. . my true love gave to me, the winner of our Stinks Good Playdough set giveaway! Whoo hoo! Congratulations to:

Katherine of handmade-oholic!

Heather at Cutie Patootie Boutique was so impressed by our readers' response that she's offering you all another giveaway! We're putting the details together, so stay tuned for our announcement soon. Think pillowcase dress of your choice, or maybe a whole Chalk and Dough on the Go combo set. You'll just have to come back soon and find out!
Thank you to everyone who commented and visited Heather's site!

share this on »
{Facebook} {Twitter} {Pinterest}
7 Comments
LinkWithin Related Stories Widget for Blogs