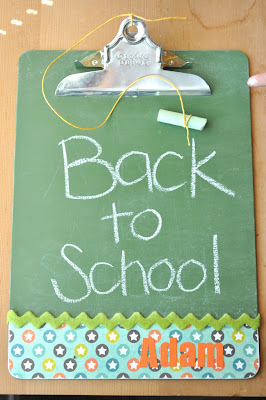
It's almost time for my kids to go back to school! Such a bittersweet feeling. Summer has been too short, but it will be nice not to have to come up with activities for the boys 24-7. So in the spirit of back to school AND looking for a fun summer activity, we came up with these fun clipboard chalkboards. You can also clip some paper to them to make drawing on-the-go easier. They're perfect for road trips or church, or for practicing those ABCs!
Clipboard Chalkboard Tutorial

Supplies:
*Wood clipboard, any size
*Chalkboard Paint (we like Plaid's Chalkboard Paint that comes in lots of colors)
*Foam brush
*Embellishments (optional) - patterned paper, ribbon, buttons, letters, etc.)
*Mod Podge and foam brush
*Exacto knife and cutting mat
*File or sanding block
1. Paint the entire wood area of the clipboard with chalkboard paint, following the manufacturers instructions. Lift up the metal clip to get underneath. If paint gets on the metal parts, simply wipe off with a paper towel while still wet.
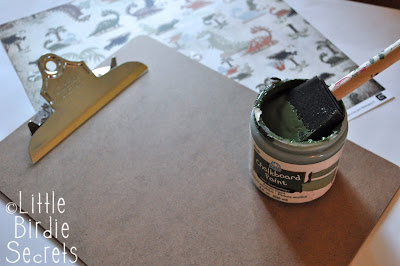
The Plaid chalkboard paint says to paint a layer in one direction and allow to dry for one hour.

Then paint a layer in the opposite direction and allow to dry for 24 hours.

2. Once your paint has cured, you can embellish your chalkboard with paper, ribbon, buttons, etc.

I laid my chalkboard on top of my patterned paper, on top of my cutting mat, and cut around it. You could also trace it and cut around, but that's just one more step!

3. Apply a thin layer of Mod Podge on the back of the paper and glue it in place. Smooth out any wrinkles with the side of your hand.

4. Lay your chalkboard face down (you'll have to let the top edge with the clip hang over the side of the table to do this). Using your craft knife and cutting mat, trim any excess paper from the edges.

5. Turn your board back over and sand the edges with a paper file or sanding block.

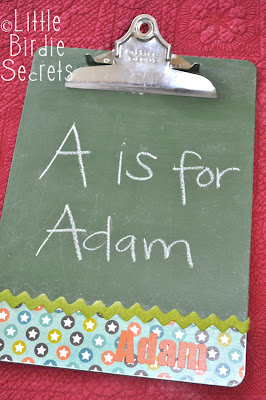
6. Next I cut my boys' names out of card stock using my Silhouette. I love this font from Creating Keepsakes called CK Racer because almost all the letters are attached--you don't have to glue on individual letters! (Man, I sound laz-y, don't I?)
First I Mod Podged them on,

then I put a thin layer of Mod Podge over the entire paper section to seal the letters and the paper.

7. After the Mod Podge dried, I hot glued a piece of coordinating ribbon to cover the seam between the paper and the chalkboard.


8. Before you use your chalkboard, you must season it. To do this, cover the entire chalkboard surface with chalk, then erase.


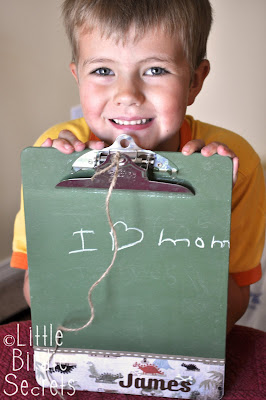
Later we also tied a piece of chalk to piece of jute and tied it on the clipboard so it's always handy (see cute pic below). I've found the colored chalks work a lot better on these than white for some reason. I think they're softer.
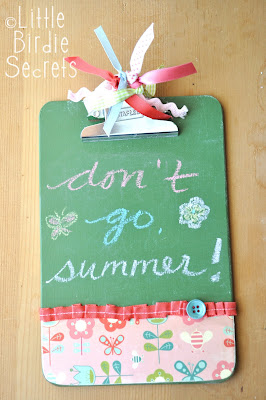
I couldn't help but get a little crazy with the girl version I made. I pulled out my Scrap Box ribbon organizer and cut 4" pieces in several colors.

Then I tied them in the hole in the center of the clip. For some reason the boys didn't want any ribbons on theirs. Go figure.

I also used my favorite ruffled ribbon technique to make the ruffle on the girly chalkboard.

That's it! Get those little ones ready for back to school with a little chalkboard fun!
share this on » |
{Facebook} | {Twitter} | {Pinterest} |


30 Responses to “travel clipboard chalkboard tutorial”
Those are adorable, I just recently started playing with chalk board paint and I love it. I may have to give these a try.
great idea!
Thanks for the tutorial! I have had some mini ones that have been needing something done. I think I may do something similar. I already have the supplies :D Thanks for sharing!!
Oh, I love it! I love that chalkboard green color too!
Cute! I love that the chalkboard paint comes in so many colors! Where did you get your clipboards?
I LOVE this project! Can't wait to do it with my kiddos.
Heather at WhipperBerry.com
I loved this and then when I got to the end I got so excited because you GIRLED IT UP! Awesome. And so simple too. I would not be ashamed to own a ribbon embellished clipboard. Not at all. :)
Maybe a dumb question, but do you get chalkboard paint at a craft store or at a regular hardware store?
Simply amazing!!!Oh I love it!!!
(and it's a wonderful xmas gift too!!! WOW WOW WOW!!!)
These are beyond cute...do you have a good source for the clipboards? I've seen them at Office Depot, but I'm looking for more of a bargain than that. Also, I've used chalkboard spray paint. Do you find the brush-on paint better?
What a great idea! Thanks for sharing!
these are brilliant! thanks for sharing :)
Cute! I didn't realize there was such things as chalkboard paint. Love it!
how adorable!
This is an adorable idea! I wish I had a need for a chalkboard clipboard! :)
Yeah school is starting! Hate to see summer go but yes to routines!
OMG! I love this! I so want to make them for my nieces and nephews!
The clipboards are so cute!
To answer the questions. . .
I have only tried the brush on chalkboard paint, so I can't compare it to the spray paint. But you can find it at craft store (I saw it at JoAnn today) and it comes in lots of colors (black, green, pink, orange, etc.).
For the clipboards, I bought mine in a pack at Staples. They weren't as cheap as I'd hoped, but they weren't more than about $2 a piece. You could also try WalMart!
I love this idea. Could I steal a photo so I can point to your post from my blog?
i am going to be making one of these. they would be perfect for road trips.
I'm so making one !
Perfect for Back to School! Especially for making a list of "to do" for kids to do after/before school each day! Plus kids LOVE chalk boards! Great idea.
Thanks for sharing!
Jennifer from Saunders
www.twitter.com/saundersmfg
www.facebook.com/saundersmfg
So cute! Love your version with the green paint. I posted mine last April, but linked to it in my teacher appreciation round up this year, but I've seen a ton of cute variations, I think chalkboard paint is just such a great tool, and I like the way you put the names. :O)
What a great idea!! congrats!! :)
soooo I am toying with the idea of using a spraypaint - leftover from another project- a light green gloss. My thinking is we can use dry erase markers on it. And I was thinking of just using a paint pen to write the name- that way I can avoid the modpodge.
Whadaya think? How is your clipboard(s) holding up? Have you tried other things with them?
I ADORE this. I found this post because I just wrote a clipboard post today. Excellent idea! I am now a follower of your blog!
Victoria
love4thgrade.blogspot.com
Loved this idea so much, my mom and I have made 3 so far. Thank you for sharing. Is there a place where I can email you a picture of the ones we have made?
I love your idea, in fact I recreated it in my own way and I am featuring it on the Pins to Creation blog where we turn out pins into projects. Please come see your project and mine on Wed. Dec. 26th at http://pinstocreations.blogspot.com/
Thanks for the inspiration,
Scrap Queen
http://scrapqueen141.blogspot.com/
It would also be cute to turn that little strip of paper at the bottom into a little chalk storage pocket. Just use some fabric, add a little elastic inside the top to help the chalk stay in, and then you could (hot) glue the fabric around the back/sides. That way there is always chalk handy!
Post a Comment