Archive for September 2008

Tuesday, September 30, 2008

personalized bibs


Photos copyright Holly Keller
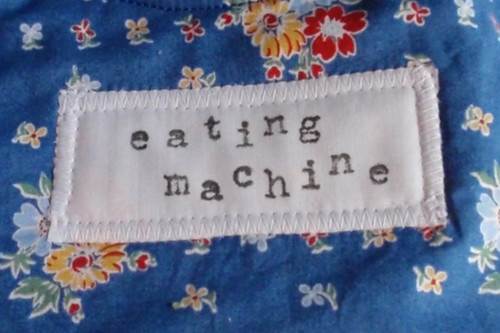
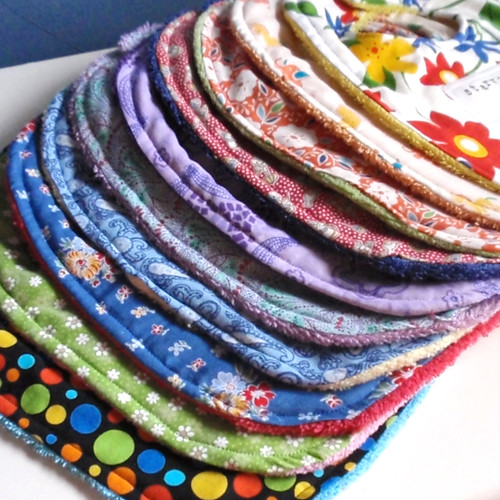
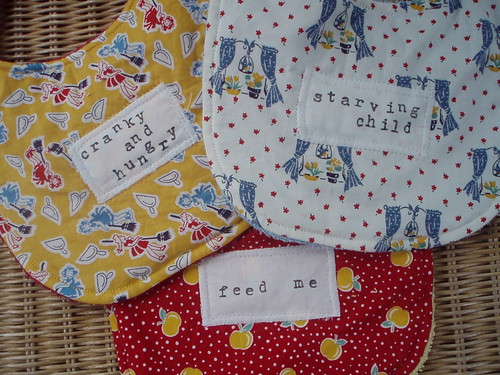
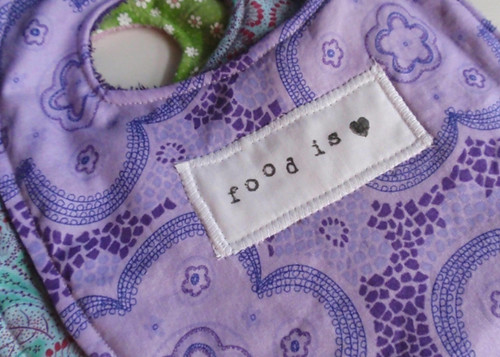
We loved these adorable bibs with stamped sayings made by Holly Keller of Chez Beeper Bebe. We found them on her Flickr with her own explanation of their cuteness:

"Made these in an evening for a friend's baby shower. The front is made with Robert Kaufman Kitchen Kitsch line of fabrics and the back is made from reclaimed bath towels. The words were a last-minute thought, stamped on muslin with permanent fabric ink. I made these using a pattern from Amy Karol's delightful book, Bend the Rules Sewing."


Photos copyright Holly Keller

Photos copyright Holly Keller

Photos copyright Holly Keller

Permanent fabric ink can be stamped with any stamp image and then washed. A great choice is VersaCraft brand pads (formerly Fabrico) by Tsukineko, a very respectable stamping ink company.


Photos copyright Holly Keller

Photos copyright Holly Keller

I am dying over all her fabric choices! This woman is one of those gifted people who can create things straight out of her imagination. Besides making bibs for her friends in her spare time, she sells the most adorable plushies made completely from reclaimed materials. They each have their own little personalities. Check them out in her Beeper Bebe Etsy store!

Thanks for sharing with us, Holly!

share this on »
{Facebook} {Twitter} {Pinterest}
9 Comments

Monday, September 29, 2008

easy ribbon belts

READ THE REST OF THIS POST -->>>» |


So this is arguably the easiest sewing project we've ever posted. Eee! I'm so excited about how quick and fun these ribbon belts are! I especially love them for little girls. That's what the pink polka-dotted one is. But you can make them in any size you like!

Ribbon Belt Tutorial

What you'll need:


*Two pieces of ribbon long enough to go around your hips and leave a tail
*"D"-rings about the same width of your ribbon (if they're too big the belt won't stay on!)
*Sewing machine and matching thread


1. Take your two lengths of ribbon and match them up end-to-end.


2. With right sides together (if your ribbon has right/wrong sides--ours didn't), sew across one end with a 1/4" seam allowance.


3. Turn the ribbon wrong sides together so the seam is on the inside.


4. Match up the rest of the ribbon and pin.


share this on »
{Facebook} {Twitter} {Pinterest}
5 Comments

Sunday, September 28, 2008

glass engraving

We love personalized gifts. So when we found the "Engrave It" at Target for about $6, we saw a golden opportunity for simple, affordable, personalized gifts.


We bought the vase and votive holder at WalMart. The votive was 57 cents and the vase came in a set of three for less than $2. Then we just engraved a word on the glass. Press medium-hard and keep moving for the best results. The votive holder says "friend" and the vase says "Thanks."


This bud vase is perfect for all the little flowers my boys bring me and want me to keep forever. I engraved "sweet" on it to remind me how sweet and tender those little gestures are.


It does take a little practice and a steady hand, but we figure imperfections are what make personalized gifts really personal!

share this on »
{Facebook} {Twitter} {Pinterest}
5 Comments

Saturday, September 27, 2008

fabric wall applique


Vinyl wall lettering and designs are everywhere these days. One reason they're such a hit is that they're removable. If you like removable (i.e. change your mind a lot), here is another very easy way to decorate a room wall. We’ve been wanting to try this since seeing it here.

Using liquid starch and fabric you can temporarily cover a wall without damaging it. You can wallpaper the whole wall like Michael Miller did (can you say pricey?) or you can "appliqué" small pictures like we did. We used Sta-Flo liquid starch, but you can also make your own starch. There are so many laundry starch recipes on the internet to choose from, like this one. Avoid recipes that use sugar so you don’t attract bugs (yuck!).

We used a lamb appliqué pattern from the book Warm Up to Wool: Projects to Hook and Stitch.

Using freezer paper, we made a template, cut out the fabric, then painted the back of the fabric with liquid starch. We made sure it was nice and wet. Then we stuck it to the wall and let it dry. Be sure to use a brayer or the side of your hand to smooth out the air bubbles!

Ideas for baby/kid rooms could include bugs and dinosaurs for boys and maybe princess crowns, flowers, or hearts for girls. For a more sophisticated room, try spots or swirls, or wallpaper the entire wall in your favorite Amy Butler fabric. With all the amazing fabrics out there, the options are limitless!

share this on »
{Facebook} {Twitter} {Pinterest}
4 Comments

Friday, September 26, 2008

world card making day card swap


Did you know Saturday, October 4th is World Card Making Day? I know, there's a "day" for everything, but this is one we can really get excited about! I'm addicted to card making. I got Jessica addicted, too. Her husband actually said he was glad she picked up this hobby because of all the money they'd save on cards they'd be buying anyway. Ha! Don't let him talk to my husband. He'll tell him about the million dollars in "money-saving" supplies hiding in our office closet. But hey, whatever you've got to tell yourself for the love of papercrafting. . .

We know there are a few of you out there who love to make cards, too. So, in honor of World Card Making Day, we're hosting a virtual card swap! Participating in a swap is a great way to get a bunch of different handmade cards and only have to come up with one idea. In the real world, you would design one card and make one for each person participating. Then the group would swap with each other so they so everyone ended up with one of everyone else's cards. But the best thing about our virtual swap? You only have to make one card!

Send us a photo or scan of your handmade card by Wednesday, October 1st to littlebirdiesecrets@gmail.com, and we'll post them here on October 4th. Please include your name and any supplies you used (include the manufacturer if you know it, but don't stress if you don't).

We can't wait to see what you come up with!


share this on »
{Facebook} {Twitter} {Pinterest}
5 Comments

Thursday, September 25, 2008

milk paint


Milk paint is a color wash made with, well, milk. It's often used to give vintage (or wanna-be vintage) furniture an antique or shabby-chic look. There's a soft, translucent sheen, and you can make it in any color you can imagine. It's totally organic, too, so it's a great way to go green! Stacy tried it on a simple board just to see what it was like. She thinks perhaps she didn't drain her curds enough, which made the paint a little runny. But it was a fun experiment! Check out the tutorial from MarthaStewart.com.

This is what the milk looks like when it is separated into curds and whey before you strain them (looks like what I found in a sippy cup today after it fell behind the couch last week!).


This is how it looks when you add the pigment to it. Add as much or as little as you like until you get the desired hue.


Paint your item within a few hours before it spoils (wait, isn't it already spoiled?). Don't worry, the smell will disappear once the paint dries.


Stacy applied vinyl lettering to the board once the paint was dry. So pretty!


Try a milk paint wash on a cheap thrift-store piece to liven up a room, or on a smaller item like this board for a sweet, soft look.

share this on »
{Facebook} {Twitter} {Pinterest}
6 Comments

Wednesday, September 24, 2008

embroidery hoop art

We love SouleMama. She is amazing. Stacy was inspired by her cool embroidery hoop art and made her own. We love the way she grouped several together on a wall. Pretty simple, but if you don't like hand stitching, check out the beautiful pieces SouleMama has in her shop!
Usually you take the art out of the hoop and frame it or use it on a pillow. But how about leaving it in that little "frame" and hanging it directly on your wall? An embroidery hoop, embroidery floss, and a little imagination make an adorable wall hanging.


Stacy made the birdie art from her own doodles. Just draw or trace the shape on the back of the fabric, cut it out, and stitch around it with embroidery floss.

The owl pattern came from the book Sublime Stitching: Hundreds of Hip Embroidery Patterns and How-To. Stacy added the tree branch and leaves. If you need help coming up with an idea to stitch, try this book: Doodle Stitching: Fresh & Fun Embroidery for Beginners. It has cute illustrations and fresh ideas for embroidery projects of all kinds. Both these books have patterns you can trace or iron onto your fabric to make it easier. Also, check out this cool Web site with free vintage embroidery patterns!

Try adding buttons, scraps of fabric, and other texture to make your wall hanging unique. The best thing is that you can make any pattern in any colors to match your decor. This is a fun project to try with older kids, too!

share this on »
{Facebook} {Twitter} {Pinterest}
6 Comments

Tuesday, September 23, 2008

flea market find transformation - elegant message board

Remember this open-backed frame we found at the antiques flea market? We told you we'd show you some fun transformations for our finds, and Stacy found a gorgeous way to put this frame to use.


She took this backless wooden frame, which had been painted black, cork-on-a-roll, fabric, and foam core and made this beautiful message board.


First she hot-glued the fabric to a piece of cork (from a large roll) just a little larger than the frame. She then sandwiched the fabric-covered cork between the frame and a piece of foam core (that thick poster board stuff kids use for their science fair projects). The foam core and cork are secured in the back of the frame with metal brackets. She also added picture-hanging hardware so she can display it for her family to leave messages and tack up important reminders. Like, "Dinner at Chuck E. Cheese's tonight!" At least that's the kind of important message you'd find at my house.

With a beautiful piece of fabric, this message board can be made in any size with any flea market or thrift store frame find. Don't forget--spray paint is your friend! And try our custom thumbtacks to complete your board!

share this on »
{Facebook} {Twitter} {Pinterest}
6 Comments

Monday, September 22, 2008

homemade children's lacing cards


Lacing boards are a great way for children to develop basic motor skills, and keep them quiet for a little while! I'm thinking these would be a perfect activity for my little guy while his big brother is in school. They can be pretty expensive, so we decided to make our own (of course!).

Children's Lacing Cards Tutorial

Here's what you'll need:


*Craft foam
*Scissors
*Pen
*Shape to trace
*1/4" hole punch
*Shoelace for lacing

1. We started with one piece of foam sheet from a local craft store. It was only 99 cents and large enough to make four or five lacing shapes.

2. Trace a shape on the foam with a pen. Try using some cute clip art. We used a cute Japanese coaster as our pattern. Cut it out. We used a smaller hole punch on this hedgehog to give him an eye.


3. Use hole punch to punch holes around the edge of the shape. You may choose to mark the holes evenly with a ruler before starting, but it's not necessary.


4. Add your favorite shoelace--that's it!


share this on »
{Facebook} {Twitter} {Pinterest}
19 Comments

Saturday, September 20, 2008

Girls--They Wanna Have Fun


Last week, the three Little Birdies had a fun night out. Photographer Erik Christensen needed models for his Seattle Photography Associates photo shoot, so after much arm twisting (ha) we volunteered. We thought it would be fun to be in on the creative aspect of photography. Photography is a fun hobby that requires quite the creative eye, so it counts as being somewhat crafty, right?


The other models were quite intimidated by our fabulous good looks! Thanks to When for opening up her great studio. It was fun playing with the wind machine, bubble machine and lights. Wow, did we feel like rock stars.

If any local photographers need a photo shoot studio or a fashion photographer please contact When. Click here for more info:

This link also includes a link to the model section of the group, so if you are not interested in photography, but want to model, you can check it out.

share this on »
{Facebook} {Twitter} {Pinterest}
3 Comments

Friday, September 19, 2008

little birdie secrets classes


Enjoy Local Seattle Eastside Craft Classes

While Your Kids Play!

I'm so excited about our new secret! A little birdie told me the three crafty creators of the Little Birdie Secrets blog are coming to Tot Spot Cafe in Woodinville, WA to offer moms chic craft classes! We'll take the guess work out of trying a new craft, providing all the supplies, tools, and instructions to make some of the hottest handmade trends. Plus, you can work uninterrupted while your child plays in Tot Spot’s monitored play area. October classes include crafts that make perfect Christmas gifts. Get creative, meet new friends--sign up for a Little Birdie Secrets craft class today!


Ballerina Princess Class

Friday, October 10th

10:30am

Playing dress-up is an integral part of a child’s development. In this class we’ll make a darling ballerina tutu in your choice of pink or purple tulle to spark your little one’s imagination. A matching star-garland crown with flowing ribbons will make her daydream complete. Please specify pink or purple for your tutu when registering.


Scrabble Tile Pendant Class

Friday, October 17th

10:30am

Come create a hip, elegant, or sweet necklace pendant from a simple Scrabble® letter tile! Using beautiful paper, tiles, and a resin-like glaze, we’ll create three pendants to wear on organdy ribbon necklaces or your own chains. All supplies will be provided, but feel free to bring your own paper or small drawing to use if you like. These make amazing gifts!


Aromatherapy Bath Bombs Class

Friday, October 24th

10:30am

The latest in bath luxuries are fizzy bath bombs. Break off a piece and drop it in your bath to release a refreshing or relaxing scent and skin-smoothing almond oil. They’re more fun than a bubble bath! Come learn how to make your own bath bombs and leave with three large bombs of your color/scent choice, beautiful wrapping and tags (so you can give them as gifts), plus the recipe and a mold so you can go home and make more for yourself!


Class Policies:

Classes are $32 per person and include child care (up to three children), all supplies, and instruction from our experienced teachers. There is a $10 cancellation fee for all classes. Classes are limited to 15 students per session.


Class projects can be seen on display at Tot Spot Café, or here at littlebirdiesecrets.blogspot.com. Sign up at Tot Spot or by e-mailing us at littlebirdiesecrets@gmail.com. Please include your name, e-mail address, phone number (in case of class changes or cancellation), and which class you’ll attend. We will confirm your registration by sending a PayPal invoice that must be paid within two days of receipt to hold your spot.


We look forward to sharing a little creativity with you soon!

share this on »
{Facebook} {Twitter} {Pinterest}
4 Comments

Wednesday, September 17, 2008

simple machine applique tutorial

Wendy of The Shabby Nest requested a simple applique tutorial after seeing Barbara's cute birthday shirts on our last post. What a coincidence! I had just read a quilting article about applique and had started to put a tutorial together. We must be in sync this week, Wendy!

It looks as if Barbara's numbers are hand-stitched in place. This is our humble attempt at a very simple tutorial for machine applique. For more detailed instructions for more difficult shapes, try this one.

Simple Machine Applique Tutorial

What you'll need:


*Fabric to cut shape out of
*Heat n' Bond Lite or similar stabilizing material (found at any fabric store)
*Scissors (if you have a more intricate design, you'll need small, sharp scissors)
*Iron and ironing board
*Something to applique on--I'm using a onesie

Okay, let's get started!

1. Heat your iron on the "wool" setting. Iron a piece of Heat n' Bond (big enough to accomodate your shape) to the back of a piece of fabric for about 2 seconds per area until it adheres completely.


2. Cut the shape out. You can easily trace lots of cute shapes, but I'm just using a simple square. Peel the paper off the back of the Heat n' Bond.

3. Place the shape on the item where you want it.


4. Position your sewing machine needle somewhere on the shape. I'm starting at one corner of the square. I like my applique to just barely go over the edge of the fabric to prevent fraying.


5. Select zig-zag stitch and set your stitch length and width. Play around with it until you find the length and width you like. I like Length=1 and Width=4. If your shape requires a sharp turn like this square, stitch to the end of side and end with your needle on the right side (see below). Then turn and stitch the next side. If you're making a curve, like on the top of heart, mark a couple of spots around the curve where it turns. When you get to these marks, stop with the needle down and lift the foot. Turn the fabric slightly, put your foot back down, and start stitching again.


6. Continue around entire shape, backstitching a couple of times when you get to the end. Voila!


Check out this adorable bag that Kayleen posted on our Flickr pool. She traced the letters of her daughter's name and appliqued them and a butterfly on the front of this cute tote she made. Love it! Thanks, Kayleen! (Note: if you are tracing on the back of your fabric, be sure to trace them backwards!)


Thanks again to Wendy for posting a request for a tutorial. If you ever want to see us try something (so you don't have to), just leave us a comment and we'll do our best!
share this on »
{Facebook} {Twitter} {Pinterest}
14 Comments
LinkWithin Related Stories Widget for Blogs