Tuesday, December 23, 2008

artful wrapping and free gift tags


I'm in a wrapping frenzy! I started leaving wrapping to the last minute when my oldest was a toddler. It's just not worth re-wrapping everything that the little ones unwrap! Or maybe you're just a procrastinator (also like me). Here are a few simple wrapping ideas to make your packages really special this season.

Using plain white wrapping paper, I made these small gifts bright and cheery with little effort. Try adding a sprig of berries and a sparkly bow for a huge visual impact.


This polka-dot paper isn't necessarily just for Christmas, but I added a fancy satin ribbon to dress it up and make it seem a little more Christmas-y.


Add a jingle bell or simple ornament to a small gift to add some flair.


We took plain tins and dressed them up with just a piece of patterned paper (cut out and glued to the top) and some ribbon to give away these cute bottlecap magnets.


A cute tag can totally dress up simple packaging. Here are links to some of our favorite FREE gift tags on the Web. Just download and print! Don't forget to thank these amazing women for their generosity!

lollychops


modmom


sewmamasew


marthastewart


bucklette


grandrevivaldesign


everydayfoodstorage

share this on »
{Facebook} {Twitter} {Pinterest}
4 Comments

Monday, December 22, 2008

last minute neighbor gifts

Here are a couple more quick and easy neighbor/co-worker/hostess gifts you can put together fast, just in case you're still searching for a little something.

These "root deer" would be a great gift to put together with the kids. Just decorate each bottle in a six pack of root beer with pipe cleaner, pom-poms, googly eyes, and felt. We even added a tiny jingle bell collar.


If you're even shorter on time, try wrapping up a fun holiday-scented item like this Winter Candy Apple hand soap from Bath & Body Works. This would make a fabulous hostess gift.


Or, wrap up a bottle of sparkling apple cider or your favorite wine for a simple but very welcome holiday gift. We found this lovely photo on Divine Caroline, and they share a few other "last-minute gifts that don't seem so. . ."


Happy gifting!

share this on »
{Facebook} {Twitter} {Pinterest}
7 Comments

Expressing You giveaway winner

The winner of a fabulous Christmas present from Expressing You is...


Erin K of erinkcreations.blogspot.com!


Congratulations, Erin! Please email us at littlebirdiesecrets@gmail.com so we can put you in touch with Jessyka and you can start choosing your vinyl design!

Merry Chrismas!

share this on »
{Facebook} {Twitter} {Pinterest}
3 Comments

Saturday, December 20, 2008

easy wreaths for last minute decor

I know, Christmas is almost here, so most of us are enjoying our family and holiday traditions, not crafting. But if you're looking for one more little thing to complete your Christmas decor, here are a couple of really fast wreaths you can make in about half an hour!

The Long Thread posted this simple ribbon wreath tutorial using gray ribbon for a cool Halloween decoration. We just changed it to red ribbon for a stunning holiday wreath. And it only took about 30 minutes to make!


We saw this idea in a Better Homes and Gardens publications and couldn't believe how cheap and easy it was to make! Use it to display Christmas cards (all the cards I've received so far have been the extra-large variety, so they didn't fit very well on my wreath--but you get the idea), or just hang it plain.


Christmas Card Display Wreath

What you'll need:

*Wreath form
*About 5 yards upholstery webbing (I found this at JoAnn and Walmart for about $.70 a yard)
*Straight pins
*Small clips

1. Pin the webbing onto the wreath form. Wrap it around until it covers the entire wreath.


2. When you get back to the beginning, pin the end of the webbing to secure it.


3. Cut the webbing and use the extra to tie a large bow, also pinning it into place. Then use the remainder to hold the wreath so it can be hung.


4. If you have a variety of smaller cards, clip them to the wreath with small clips from the office supply store. Voila!


This one is my all-time favorite. Eddie Ross has a simple tutorial for this amazing wreath made from Christmas tree ornaments! We're going to hit the after-Christmas sales to get great deals on ornaments for this beauty to hang next year.

share this on »
{Facebook} {Twitter} {Pinterest}
9 Comments

Friday, December 19, 2008

almond flavor = holidays

Maybe it's just me, but something about almond flavoring always reminds me of the holiday season. It's probably because I love the flavor, and many of my favorite holiday recipes call for it! With only 6 days left to prepare and bake for your holiday feast, we thought we better share some delicious almond flavored recipes.

The first recipe comes from one of our favorites, myrecipes.com. When I got an email with this recipe inside, it went straight to the top of my "must try recipes" list. These cookies look divine!

Amaretto Butter Cookies

Ingredients:
  • About 1 cup (1/2 lb.) butter or margarine at room temperature
  • 1 cup sugar
  • 1 large egg, separated
  • 3 tablespoons almond-flavored liqueur, such as amaretto, or 1 tablespoon almond extract
  • 2 teaspoons grated orange peel
  • About 2 cups all-purpose flour
  • 1/2 teaspoon baking powder
  • 1/4 teaspoon salt
  • 1 1/4 cups sliced almonds

Preparation:

1. In a large bowl, with a mixer on medium speed, beat 1 cup butter and sugar until smooth. Add egg yolk, liqueur, and orange peel and beat until well blended.

2. In another bowl, mix 2 cups flour, baking powder, and salt. Add to butter mixture; stir to mix, then beat until well blended. Gather dough into a ball, divide in half, and flatten each portion into a disk; wrap each tightly in plastic wrap and freeze until firm enough to roll without sticking, about 30 minutes.

3. Unwrap dough. On a lightly floured surface, with a floured rolling pin, roll one disk at a time to about 1/4 inch thick. With a floured, 2-inch round cutter, cut out cookies. Place about 2 inches apart on buttered 12- by 15-inch baking sheets. Gather excess dough into a ball, reroll, and cut out remaining cookies.

4. In a small bowl, beat egg white with 1 teaspoon water to blend. Brush cookies with mixture and sprinkle or arrange about 1/2 teaspoon sliced almonds on each.

5. Bake cookies in a 325ยบ regular or convection oven until lightly browned, about 15 minutes; if baking two sheets at once in one oven, switch their positions halfway through cooking. Let cookies cool on sheets for 5 minutes, then use a wide spatula to transfer to racks to cool completely.


The next recipe first came to my attention when I had it at fellow birdie Mandy's house. I was raving over it and once she told me how simple it was...it went on my "must try recipes" list. Since I haven't started in on my holiday treats yet, I have no pictures to offer for these last 2 recipes. You will just have to make them yourself to see how wonderful they look, and more importantly, taste!


Swedish Almond Cake

Combine, mixing as little as possible:
1 c. sugar
1 c. flour
2 beaten eggs
1 cube of butter, melted
1 tsp. almond extract
Pour into greased and floured pie plate. Sprinkle sliced almonds on top to nicely cover (it's still delicious without these if you don't like nuts!). Bake at 350° for 25-30 minutes. Cool completely. Can be refrigerated or frozen.


This last recipe is a special tradition in my family. My mom made this cake every Christmas. We were too excited about our new presents to eat a major breakfast, so we ate a slice of this cake washed down with some hot chocolate. My mom knew she could get us to at least eat that! I have continued the tradition with my own little family and we all love it.


Swedish Coffee Cake

Cream together:
1 c. butter
1 1/4 c. sugar
2 eggs
1 tsp. almond extract

Stir in:
2 c. flour
1 c. sour cream
1 tsp. baking powder
1/2 tsp. baking soda

Streusel:
2 T. sugar
1 1/2 tsp. cinnamon
1 1/2 c. chopped pecans

Layer into a greased and floured bundt pan in this order: cake batter, sugar mixture, cake batter, sugar mixture, cake batter. Bake at 350 degrees for 50 minutes to 1 hour. Cool in pan on wire rack 10 min. Flip cake out onto platter. Frost with: 1 tsp. almond, 1 T. milk and 1 1/4 cup powdered sugar. If you're like me, and prefer a thicker frosting, you can increase powdered sugar until desired thickness. This cake can also be made in large loaf pans if desired.

We hope you enjoy these holiday recipes as much as we do. Happy Baking!

share this on »
{Facebook} {Twitter} {Pinterest}
7 Comments

Thursday, December 18, 2008

santa's workin' late


We couldn't resist one more giveaway before Christmas. Aren't these rooms totally stunning? Jessyka of Expressing You designed these hip wall vinyl designs, and she wants one of our lucky readers to put one in their home. Are you jumping up and down yet? We've got a $25 gift certificate for a vinyl decal of your choice to give away, but you better hurry--Santa's coming soon! Leave us a comment with your favorite design from the Expressing You Etsy shop by Sunday, December 21 at 11:59pm PST. We'll post our winner Monday. This would make a great gift for someone special, like yourself! I know I would keep it if I won. Just being honest (in case Santa's reading!).

Don't forget to stop by Expressingyou.etsy.com and tell us your favorite design!

share this on »
{Facebook} {Twitter} {Pinterest}
245 Comments

Wednesday, December 17, 2008

apron gift set

Here's another pretty quick and easy last-minute gift idea for all you procrastinators. We love the idea of a matching apron and oven mitt for the chef in your life. We made these up without a pattern, but we've included a list of free apron patterns below for those of you who aren't quite as confident in your sewing skills as our Stacy.


We don't have a full tutorial for these cute things, but here's a quick synopsis for those of you who are "sew" savvy:

You need about a yard of fabric for each apron. Cut two four-inch wide strips the length of the fabric. Sew them together to make one long tie. Then, using the remaining fabric as the body of the apron, hem three of the sides, leaving the top edge raw. Gather or pleat this side and sew it to the apron tie, right sides together. Fold the apron tie over, iron the fold, and sew it closed. Embellish by making a ruffle out of strips of fabric with the sides serged (or overcast stitched). I love this little ruffle look. You can also use ric rac or ribbon. So many possibilities. The tie is long enough to wrap around the back and tie in the front in a cute bow.

So, if that was all gibberish to you, here are links to over 50 free apron patterns. An apron and matching oven mitt has got to fit the bill of someone on your list. And there are still 7 days left to craft--you can do it!

http://tipnut.com/56-free-apron-patterns-you-can-make/
http://lululollylegs.blogspot.com/2007/07/lined-apron-tutorial.html
http://morganmoore.typepad.com/one_more_moore/2007/02/valentine_tree__1.html

share this on »
{Facebook} {Twitter} {Pinterest}
8 Comments

Tuesday, December 16, 2008

simple scarves for a chic gift


It's crunch time! Only 8 days until Christmas, and you're still looking for a great gift for your sister, friend, babysitter, child's teacher, or all of the above. Here's a quick and easy answer. Scarves are not only functional, but super stylish. If you don't have time (or inclination) to knit or crochet one, cut one instead. Seriously--it's that easy. Find a rayon/cotton knit or jersey knit--something that is soft and has a little stretch. Mine came in 60" width, so I could get four single-layer scarves out of one 2-yard piece. I folded it a couple of times length-wise so it would fit my cutting mat, then used my quilting ruler and rotary cutter to cut it in four equal pieces. The raw edges curl slightly, which gives it a finished look. WOW--I just made four fabulous gifts in about 3 minutes--no sewing required!


For a little thicker version, cut your 2-yard length of knit fabric in half lengthwise. Then take each piece, fold it in half lengthwise, and sew it in a big rectangle, leaving a small opening to turn inside-out. You can quickly hand sew the opening closed. I then got my scarf wet and twisted it, securing it with rubber bands and leaving it twisted until it dried. This just gives it a wrinkled texture, which relaxes the jersey knit fabric nicely (and covers up your not-so-straight sewing!).


We took this project one step further and embroidered a simple bird to give it some more interest. C'est tres chic!


Check back for more quick and easy gift ideas coming up this week--because we know we can't be the only procrastinators out there!

share this on »
{Facebook} {Twitter} {Pinterest}
15 Comments

Monday, December 15, 2008

cuff link contest winners!

Wow, what creative people you are out there in blogger land! We loved all the ideas you suggested for our first contest. Here are our top three choices for cool cuff links, and each one is getting a pair to make their idea into a great gift. You'll all have to send us pictures to post for our readers when they're done!


Emily said she's like to use her grandfather's commemorative pins from his time in the railroad union to adorn her cuff links. What a special gift this would make to one of his posterity! You're getting a pair of cuff links, Emily!

Southern Gal
had a similar idea, using her husband's engineer pins from the National Guard. We bet that would mean a lot to him. You're getting a pair, too!

Melissa would love to capture her husband's catch phrase in a pair of cuff links. "If I only had a nickel. . ." he likes to say. She'd attach nickels from significant years, like the year they were married. So sweet! A pair of cuff links are on their way to you!

Ladies, please contact us at littlebirdiesecrets@gmail.com with your name and address so we can send you your cuff links!

We loved all the ideas you shared, and especially those that held some sentimental meaning. Check out our comments section on the original post for more great ideas! And thanks to DeeDee for sharing pics of cuff links she's made in the past. So creative!

If you want to purchase your own cuff links, we found ours on eBay.

share this on »
{Facebook} {Twitter} {Pinterest}
2 Comments

Sunday, December 14, 2008

giveaway winners!

Santa has delivered (a little early!). Here are the winners of our Cutie Patootie and Klutz giveaways, just in time for the holidays! Congratulations, ladies!

The winner of a Cutie Patootie Boutique pillcase dress or two tubs of playdough is:

Natalie White of dayswiththewhites.blogspot.com! Yea for you!


The winner of the Klutz books gift pack is

Heather P. of throwingthings.blogspot.com! Lucky girl!


If our winners will please contact us at littlebirdiesecrets@gmail.com, we'll happily put you in touch with your generous benefactors. Merry Christmas!

share this on »
{Facebook} {Twitter} {Pinterest}
2 Comments

Saturday, December 13, 2008

stockings to hang by the chimney with care


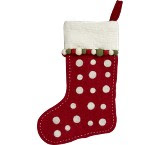
For those of you who are major procrastinators like me, this post is for you. I really need new stockings. I made mine about 9 years ago, before I had kids, and they are just not kid stockings! I've been so inspired by the felt stockings I've seen in the Crate & Barrel and Company Store catalogs (see above!). They really would not be hard to make, especially if you're using felt. That means no lining required! Plus you can hand stitch whatever you like on them.

I may still be looking for time to make new stockings for my kids, but Stacy found it. Check out these darling stockings--such cute, fresh fabric! They're all lined with soft flannel, too. She found the pattern in this cute book, New Noel by Linda Lum DeBono. Don't you love all the applique and ruffles? She did it on her machine, so it really wasn't that time consuming, but it adds a lot.


Okay I lied. I did find time to make one stocking. This mini felt stocking is from a pattern in my imagination (really, it's not hard to draw a stocking--you can do it!). I cut two pieces from red felt for the sock, two pieces from white felt for the top, then a toe and heel from the white. I traced a few circles of paper I punched with my circle punch on green felt, then stitched them all on with embroidery floss before sewing the two sock pieces right sides together. This is the perfect size to stuff with a small present or gift card!

Or, make a few and use them as silverware holders!


Santa won't be here for another 12 days, so you really do have time to make new stockings! And if you do it, will you make a few for me, too?

share this on »
{Facebook} {Twitter} {Pinterest}
5 Comments

Friday, December 12, 2008

holiday cookies

One of my favorite things about the holiday season is baking festive goodies to share with friends and family. It is such a great time to find and try out new recipes. I found these two wonderful cookie recipes that I just had to share! Both of the cookies are as cute as can be, and of course, they wouldn't be on our blog if they weren't simple as well!

The first recipe comes from myrecipes.com.


Reindeer Gingersnaps

Ingredients:

  • 1 (14.5-oz.) package gingerbread mix

  • 1 teaspoon meringue powder

  • 1/2 teaspoon hot water

  • 1 (12-oz.) container ready-to-spread fluffy white frosting

  • Decorations: 32 miniature candy canes, 32 licorice candies, 16 sour cherry candies


Preparation:

1. Prepare gingerbread dough according to package instructions for gingersnap cookies.

2. Roll dough out on a lightly floured surface, and cut into 3 1/2-inch ovals, using an egg-shaped or oval cookie cutter. Place 2 inches apart on parchment paper-lined baking sheets.

3. Bake at 375° for 8 to 10 minutes or until edges are lightly browned. Remove to wire racks, and let cool 30 minutes.

4. Stir together meringue powder and 1/2 tsp. hot water until combined; stir in frosting. Spoon frosting mixture into a zip-top plastic freezer bag; snip 1 corner of bag to make a small hole. Pipe 1 dot of frosting mixture at top of 1 cookie; press straight ends of 2 candy canes into piped dot to form antlers. Pipe 2 dots in center of cookie; press 1 licorice candy in each dot to form eyes. Pipe 1 dot at bottom of cookie; press 1 cherry candy in dot to form a nose. Repeat procedure with remaining cookies, frosting mixture, and candies. Let stand 24 hours to dry, if desired.

The next recipe comes from Betty Crocker, so you know it has to be good! With only 4 ingredients and some candies, you can't get much easier than this cookie.


Jolly Snowman Faces

Ingredients:
  • 1 pouch Betty Crocker Sugar Cookie Mix

  • 1/2 cup butter or margarine, softened

  • 1 egg

  • 1 container (12 oz) Betty Crocker whipped fluffy white frosting

  • Red string licorice

  • Assorted candies

Preparation:

1. Heat oven to 375. In medium bowl, stir cookie mix, butter, and egg until soft dough forms. On ungreased cookie sheets, drop dough by rounded tablespoonfuls 2 inches apart.

2. Bake 11-14 minutes or until light golden brown. Cool 1 minute; remove from cookie sheets to cooling racks. Cool completely; about 15 minutes.

3. Frost and decorate 1 cookie at a time. After spreading frosting on cookie, add licorice for band of earmuffs and candies for ear "covers" and snowman face.

Enjoy the holiday season...and your cookies!

share this on »
{Facebook} {Twitter} {Pinterest}
6 Comments

Thursday, December 11, 2008

cuff link contest & giveaway

We've had quite a few requests for more manly homemade gift ideas, and we agree--guys are difficult to craft for! I just don't think my husband appreciates a handmade gift the way my mom or girlfriends do. But we found these plain cuff links and thought this might be something lots guys would be able to use. So, we're hosting our first Little Birdie Secrets contest.

We want to see what you would do to dress up a pair of plain cuff links for the snappy dresser in your life. Leave us a comment with your idea, and we'll pick our 3 favorites and send them each a pair of these cuff links to decorate!

Here are a couple of ideas to get your creative juices flowing:


We glued a couple of Monopoly cars to the top with E6000 for these fun cuff links.


This picture isn't great, but we printed the faces of Daddy's little guys in the size of the cuff link end, glued them on, and covered them with a clear gloss (try Crystal Effects by Stampin' Up!, or Diamond Glaze by Judikins).

So, what's your idea? Leave us a comment and enter now! All comments must be received by Sunday, December 14 at 11:59pm PST to be considered.

And don't forget, our Klutz and Cutie Patootie Boutique giveaways both end Friday, December 12 at 11:59pm PST! Only one more day to enter!

share this on »
{Facebook} {Twitter} {Pinterest}
17 Comments
LinkWithin Related Stories Widget for Blogs