


Yes, I'm still busy making up ornaments, neighbor gifts, and last minute tags for Christmas! I've always been a Last-Minute Lucy. I suspect a few of you are, too, so the next few days are for you. Sometimes procrastination pays off! Or if you're a planner, put the next few posts in your file for next year!
This simple wreath is made up of bits of leftover ribbon--the tiny scraps I can hardly bear to throw away (see my ribbon jars in this post). Here's a great way to use them up.
Scrappy Ribbon Wreath Ornament Tutorial
Supplies:
*Small scraps of ribbon or fabric strips
*Craft wire and wire cutters
1. Form your wire into a circle shape in the size you want your wreath to be. I bent mine around a glass that happened to be sitting on the table by me. Cut wire and wrap the ends together to secure.
2. Start tying your ribbon on. I tied some of mine with a double knot, and some with just one knot. This helps the ribbon ends go different directions, which I think looks better. But play around with it and see what you like best.
Keep scrunching the ribbons together and adding more until it's full. Then I cut my ribbon ends in a "V" to tidy them up.
4. Tie a longer piece around and tie in a knot to create a loop for hanging. These are darling on the Christmas tree, on top of a gift, or, if you made it larger, on a door or wall.
We also loved this fabric version of the scrappy wreath by Living the Swell Life (which is an adorable blog--if you don't know it you must spend a few hours there).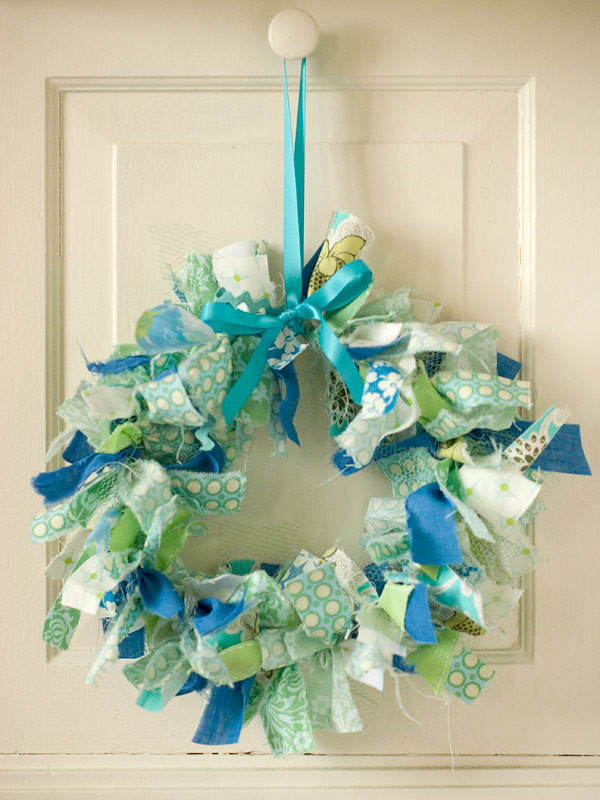
share this on » |
{Facebook} | {Twitter} | {Pinterest} |


10 Responses to “scrappy ribbon wreath ornament {tutorial}”
This is too cute! I would love for you to come by Sassy Sites and link up at our ribbon party!
xoxo!
Marni @ Sassy Sites!
THANK YOU! I love it and I need one more ornament for my 25 day ornament challenge! I'll be making this!!!
I love those!
Goodness I love this!!! I was wanting another tv project before Christmas(a project I can do while eatching tv...lol). Thanks for the inspiration!
Angiee
I was just saying to mum the other day that I wnat to make a big one for our front door, well two seeing as we have a side door (corner block) that is our main entrance.
Love the idea of doing mini ones though, what great gift ideas too.
I made one of these using the inner part of an embroidery hoop. They have a few different sizes of hoops available. It was a doable project for those of us that are craft challenged!
great idea for a Valentine's wreath:) I know what I'll do for the upcoming Valentine's Day:)
This would be GREAT done in Valentine's colors, too! I love the stiffness of the ribbon. I always liked the rag ribbons, but this seems so much "neater." Thanks for sharing ... I'll be linking. And please come join my party anytime!
http://childmade.com/index.php?name=Shared%20links
Hi! Loving this tutorial! Can't wait to make one and use up all that scrap fabric. I've included it on my blog as one of my inspirations for the ornaments I want to make this Christmas.
http://cosmicgirldesigns.blogspot.com/2011/12/christmas-ornaments-diy.html
Thankyou for the excellent tutorial I'm going to make this and hang it in my bedroom. I've also linked your tutorial from our blog:
http://bettybuttons.wordpress.com/2013/12/07/10-christmas-wreath-ideas/
Post a Comment