


Yes, I'm in the middle of another move, so we're feeling lucky to have a great guest post from Selina of Creative Juices Decor to share some fabulous interior design tips! (Remember her canvas map tutorial?) I love her advice--and looking forward to using it in my new home soon!
Hi Little Birdies Secret Readers!
Today I’m coming from CreativeJuicesDecor (a.k.a Selina) as an interior designer that wanted to share some easy tips and tricks how to decorate and change your place from drab to fab. ![]() I promise if you follow these simple ideas you can really make a difference in how your home feels.
I promise if you follow these simple ideas you can really make a difference in how your home feels.
1.) ADD GREENERY!
I understand that some folks can’t keep a plant alive for the life of them but there are some really nice faux plants out there too. Sometimes they cost a lot – but they add so much to a room – definitely worth it. I just bought a beautiful palm tree for 35.00 at the thrift store (I was very lucky) High end furniture stores I worked for sold these same trees for $250.00, but I’ve run across less expensive trees at home discount stores too.

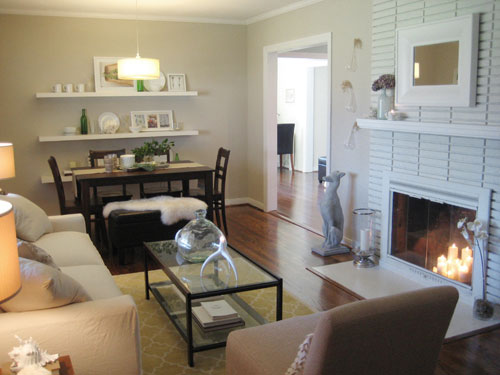
2.) Create LAYERS and TEXTURE!
An example would be a nice textured blanket (or fluffy sheep skin!) thrown across the edge of the sofa or chair. Prop layers of mirrors or frames against a wall, overlapping them slightly. Stacking books with a cool shaped vase on an end table or console table is great, see, now we’ve created dimension and layers!


Organize open shelving or armoires with cute storage bins or baskets. It pulls the room together and what could have looked like a cluttered mess now looks like a trendy designer look!

Kissingthejoy blog
4.) Add ambient lighting!
Luminaires (lamps) add so much! Many of the luminaires I own I have fixed up from a thrift store and cost me under 10 bucks a piece. Even if you have to spend lots of money on a luminaire or torchiere (light the shines upward) it is worth it for the mood it sets off in your home. Luminaire lighting is so much softer than overhead lights. Also up light your plants for a real designer look! (plant up lights can be purchased at Home Depot or Lowes)

5.) The Miracle of Mirrors.
Mirror’s are amazing!! They can really give the illusion of more space and can lighten up an area immensely. Be sure plan a space for a big mirror – you’ll be so happy you did!

6.) Everything should have a spot.
Have an organized spot for your “daily messes”. Find a nice wicker serving tray for the remotes on your table, and a fun iron mail organizer. Believe me, this will really help with making your space look better.
7.) Fireplace holes.
Don’t let your fireplace become the black hole in “off” seasons. Fill it with a collection of candle pillars or a woven basket or colorful pots.
8.) ADD plates to your wall!
This is also one of my favorites (along with #1). It is just so simple and cheap!!! It gives your space a big bang for your buck.

9.) First impressions count!!!
If you only have a small budget spend it on your entry. Start by bringing in a small dresser, table or bench to create a focal point, then add accessories. Place an umbrella stand or a tall vase next to the table/dresser to give it some dimension. (see point 2) Pretend you are a stranger and open your front door – what do you see, is there anything that grabs your attention? a focal point? something that looks pretty??? If not, pull some stuff around and make that great entry!


10) Adding art and how to place your art.
If your art seems to just float in a space move it closer to the sofa or table it’s hanging above. The items should relate, not disconnect. My personal rule of thumb is to hang pictures 8-10” above the top of whatever it is I am hanging it over. Need a big piece of art? Combine a bunch of smaller frames next to each other to create a large wall collage.


Check out the post of my brother's BEFORE AND AFTER pictures where I implemented these tips all on a thrift store budget! Or, do you need tips how to decorate the tops of your cabinets? Just click the link and I'll show you how!

share this on » |
{Facebook} | {Twitter} | {Pinterest} |


3 Responses to “10 interior design tips {go from drab to fab}”
Thanks so much for hosting me! It's always a privilege to guest post for you guys. Here's to continuing to making our homes fun and beautiful :)
~ Selina
Love these ideas! Especially about the greenery and the smaller pictures grouped together to make a larger one. Thanks for sharing!
Wow! These are great ideas! Simple concepts that I didn't really think about but that really make a difference. Thanks for sharing!
Post a Comment