Another great tutorial from Kalli of Sister Secrets while I madly sew last minute burp cloths and blankets! This perpetual calendar would be a great project to work on with sisters or friends during the holiday break. She's even provided free printables for the calendar pieces! Thanks, Kalli!
I recently purchased the We R Memory Keepers Corner Chomper. I love the Crop-a-dile, and have been eyeing the Chomper for
some time. After buying the Chomper, I had to come up with a great way
to use it, so my husband wouldn’t roll his eyes (as much) at my purchase
of “another unnecessary crafty tool.” I came up with this adorable
perpetual calendar, a project that would put my Chomper to good use!
Let me show you how to make one yourself.
Perpetual Calendar Tutorial & Printables
Supplies needed:
*A piece of sheet metal trimmed to 16 x 12.5 inches
*Fabric of your choice (approx. 20 x 16.5 inches)
*Printable fabric sheets (mine came from JoAnn)
*Spray adhesive (optional)
*Glue gun
*Crop-a-dile
*Corner Chomper (optional—shhh, don’t tell my husband!)
*Scissors
*Ribbon
*Magnet Sheet
*2 pieces of white 12 x 12 cardstock
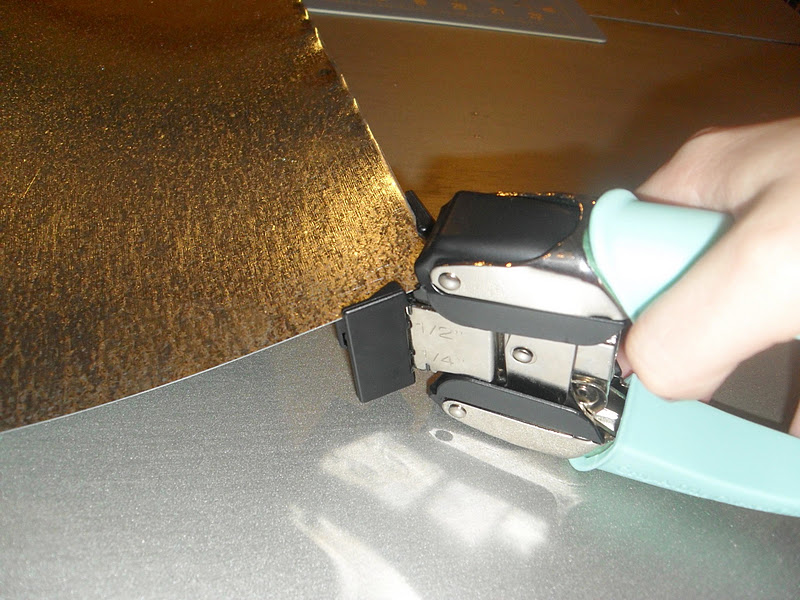
1. After
trimming your sheet metal down to 16" x 12.5", grab that Chomper and round the
corners. I used the ½ inch corner rounder. If you don’t have a
Chomper, you can round the corners with a pair of heavy duty scissors.
Be careful—the edges of the sheet metal can be sharp!
2. Now
lay your sheet metal on top of your fabric and cut around the edges
so you have approximately 1-2 inches fabric all around the sheet
metal.
3. Now
print your perpetual calendar and calendar topper on printable fabric. You can get the
printable files here for free.
I love using printable fabric! It’s so easy to run through your
printer, and gives any project that extra special touch. Printable
fabric comes in many colors and can be found on Etsy or most fabric
stores. I bought mine at JoAnn; I like the Colorfast brand because the
directions are clear and you can heat set your image making it
washable! This project would work great too using paper, if that is
more your style.
4. Center
and pin the calendar and topper on your fabric and sew around all
the edges. If you are using paper, using the longest stitch length
works best.
5. Time
to put your fabric on the sheet metal. In a well-ventilated area,
spray your sheet metal with spray adhesive. This part is totally
optional, but I found it keeps your fabric from moving around when
gluing it down on the other side. Center your calendar over the sheet
metal and smooth down. Don’t worry if you don’t get it centered on the
glued metal the first time, you still have a minute or two to peel off
and reposition.
6. Flip the calendar over and hot glue the edges down, pulling the fabric tight as you glue.
7. Round
two corners of your 12 x12 cardstock; spray adhesive (Mod Podge works
great too) one side of the cardstock and use both pieces to cover the
entire back side of the calendar, hiding the glued edges. Again, this
step is optional, but really makes the calendar look finished.
8. For
the Month, Day and Number markers, cut two 2 x 1.25 inch rectangles and
one 1.5 x 1.25 rectangle out of the magnet sheet. I covered the
non-magnetic side with some extra pieces of scrapbook paper I had on
hand, just because I’m crazy like that! Now cut a window with the craft
knife out of each rectangle leaving 0.25 inch boarder.
9. Punch
holes at the top and thread a piece of ribbon or wire through to hang. Embellish it any way you like! I used a
ruffled ribbon like Mandy
shows in
this tutorial and some buttons and vintage earrings.
There
you have it! A cute fabric perpetual calendar! These are great gifts
that can be used all year long. Oh, and little Merry Christmas present
to you, you can get your
FREE perpetual calendar and topper here at the
Little Birdie Secrets
downloads page. Enjoy and Merriest of Christmases
to you!