Showing posts with label sewing. Show all posts

Thursday, October 17, 2013

burlap halloween banner {tutorial}

READ THE REST OF THIS POST -->>>» |


More last minute Halloween DIY decor! I saw the cutest burlap Halloween banner in the Pottery Barn catalog recently, but it's no longer available. So what are you going to do? Make it yourself, of course!

I decided to stencil the letters on burlap for an aged look. I used the same method as I showed on my burlap wedding banner with a few additions.


share this on »
{Facebook} {Twitter} {Pinterest}
4 Comments

Friday, May 31, 2013

free plus quilt pattern & tutorial

I've been meaning to share these photos of this "plus" baby quilt I made for an old friend months ago. This couple has very clean, modern taste, so I was afraid to pick fabrics with any sort of pattern, fearing it would be too baby or too busy for them. Instead I went with all solids, mostly Kona cottons (all fabrics are from JoAnn Fabrics). The plus quilt is a perfect way to show off solids. And it makes a great baby boy quilt (my big boys even requested I make them one--they said it looks like Tetris!).


I'd love to say I figured this out on my own, but I really didn't have time to do that if I wanted the quilt to be done before the kid was 10. I found an awesome tutorial and pattern from For the Love of George. What I love about her version of the plus quilt is that the middle of the plus is a long rectangle rather than three squares that you have to cut and then sew back together. More cutting? More piecing? No thank you!

 If you use a straight line quilting on either side of the seams, no one will ever notice that the middle of the plus isn't pieced. And it saves loads of time.

I quilted with gray thread to match the plain gray backing and binding. It didn't stand out too much on the colors--it's a nice neutral. I chose two shades of orange and three shades of blue, plus green, brown, white, and gray. Look for colors that will make the other colors pop when using all solids, like my white and turquoise do.

The plus quilt tutorial shows you how to make a "cot" or queen size quilt (the cot size was perfect for a crib size quilt). Once I figured out the pattern needed to make the plus signs, I didn't need to use her diagram to lay the whole thing out. But it was so nice to have to get started. And how awesome is it that she offers the pattern for free? Be sure to go give For the Love of George some love from me!

Now to make a quilt for this little guy. He's almost 18 months and still doesn't have a real quilt from his mama. Seriously tragic. But I finally painted his room last week, so now I have no excuses to get going on his bedding. If you follow me on Instagram, you already saw a sneak peak of the color (Revere Pewter by Benjamin Moore). I'm so happy with the way it turned out! Watch for my nursery before and after pics soon. . .

share this on »
{Facebook} {Twitter} {Pinterest}
3 Comments

Wednesday, August 1, 2012

how to sew tab-back curtains {guest tutorial}

READ THE REST OF THIS POST -->>>» |

I'm heading back to Seattle tomorrow to pack up the furniture and craft supplies in our storage unit and haul them back to Utah. Well, PODS is hauling them back, but we're making a little vacay out of it. So we have a fabulous guest post this week showing how to make gorgeous and "tres professional" tabbed drape panels from our new bloggy friend Kelly. You will love her! Even if you don't intend on making any tab-back curtain panels soon, if you sew you should read this tutorial. She is hilarious. Enjoy!

Hi! I'm Kelly from View Along the Way. My husband and I are fixing up our crusty ol' foreclosure on a teeny little budget and blogging about the starts - and stops! - along the way. This is how I (finally) created some curtains for our master bedroom, even as a VERY novice seamstress. Let's just get this out of the way: I don't know whether to call these "curtains" or "drapes." Or "drapery panels." Or "window dressings." Skivvies for your wall orifices? I also never know whether to say "armoire" or "armuaaaaahh." Or "vase" or "vahhhze." Also unfortunately, my sewing skills are about on-par with my decor-pronunciation (in)abilities. Sorry about that. Hopefully I can still explain this clearly enough for you to go forth and sew your own curtains-drapes-window pants. 
Tutorial: How to sew lined back-tab curtain panels, drapery panels, drapes 

This process is not hard. It's just long, with lots of steps. Best completed accompanied by wine and a mom who can sew. This is the method I used to make the drapes in my master bedroom... 
Bedroom with Upholstered Bed and Navy Damask Curtains/Drapery Panels 
And in my nursery
Girl Nursery Summer Totem Curtains 
I leaned pretty heavily on this great tutorial at Midwest Magnolia, but I improvised my own back-tab system because I love how the back-tabs look hanging up: DIY back-tab curtain drapery panelsBack-Tab Curtain Panels Drapery 
So here's how it all goes down! 

share this on »
{Facebook} {Twitter} {Pinterest}
15 Comments

Thursday, April 12, 2012

my new favorite sewing book {giveaway}

I've mentioned a couple of times that we're renting a furnished house for a year. We didn't bring a stick of furniture or any home decor items. Needless to say I got busy really quickly adding some fun accents to make the place feel a little more like our home. I bought fabric to make a bunch of throw pillows for the sectional, and I finished a couple, but until last month still had a pile of fabric and pillow inserts sitting in my craft room.


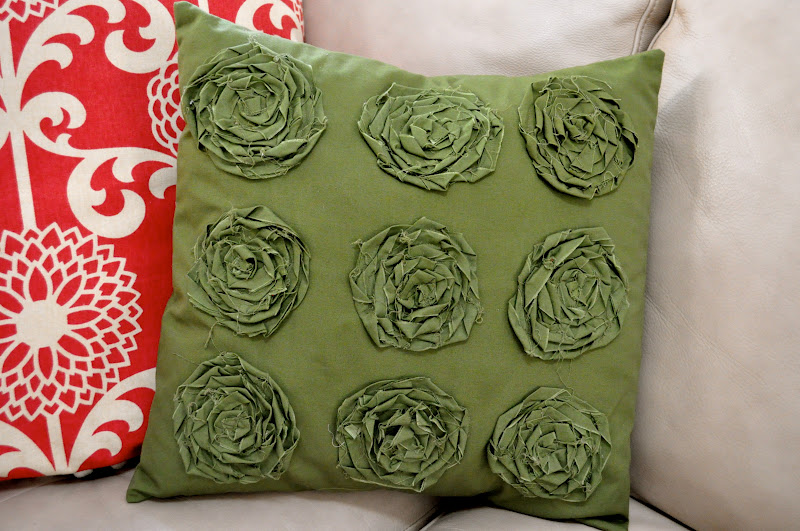
I visited my friend Vanessa of V. and Co. the last time I was up her way (she's another recent Iowa transplant) and she was sweet enough to give me a copy of her new book, Make It Sew Modern. Lucky me! It is amazing. I love every project and all her little sewing tips and tricks. She is such a pro (check out her newest venture--online sewing classes!). I love the little bits of texture she uses in her projects, and the book was just the inspiration I need to finish my pillows. . .

 . . .like these cute rosettes! I knew I wanted this design, but I didn't know exactly how to sew them on as I went. She had a similar project that showed it step-by-step. Yahoo!
 

And her perfect pleating tutorial helped me with this one. She did it waaay better than the way I was going to do it.


If you don't own this book yet, it's your lucky day! Vanessa gave me a second copy of Make It Sew Modern to giveaway to one of our darling readers! Check out Vanessa's blog (as if you haven't already), and leave us a comment with your favorite V. and Co. project and you'll be entered to win. Yea! Do it by Wednesday, April 18, 2012 or you'll be too late!

share this on »
{Facebook} {Twitter} {Pinterest}
160 Comments

Monday, January 30, 2012

easy burlap valentine banner {tutorial}

I'm still trying to put together my Valentine mantel between diaper changes and feedings, which is proving difficult, but this Valentine craft idea was a cinch. I finished it in about 20 minutes (minus the time to photograph the steps), and it only cost about $2. Here's how to make a simple--but darling--burlap Valentine banner / bunting for your Valentine's decor using not burlap, but jute webbing. And it does double holiday duty--you can use it again for Christmas decor!

Valentine Pennant Bunting Tutorial
Supplies:
*6 feet of jute webbing (this is used for upholstery projects and looks like a tightly woven burlap, and can be found at craft and fabric stores, or even at WalMart in the sewing/craft section)
*Baker's twine, string, or jute
*Scissors
*Sewing machine and red thread

1. Cut 10" pieces of the jute webbing. I got 7 pennants out of 6 feet of webbing. I found my jute webbing on a roll at Walmart, but I've also bought it at JoAnn by the yard for about $.50 per yard.

2. Fold one end in half lengthwise.
 

With the fold nearest you, cut a wedge out of the folded end at about a 90 degree angle from the fold down to the bottom of the long side, creating two points. (Be careful not to cut toward the fold or you'll get a pennant with one point in the center!)
 

Unfold and you have a nicely centered notch in one end.

2. Now you'll cut the other side. You could use the same method as above, but I recommend this instead so your two ends will match up perfectly. Fold the webbing in half width-wise, matching up the points of the cut side to the bottom of the other side. 

Holding the two ends together, cut a triangle out of the bottom piece, using the top piece as a guide. The two ends should match.
 

3. The next step is to sew the pennants onto your twine or string. To make a banner with the same number of pennants and space between them, you'll want about 60" of twine. However, I wasn't sure how long I wanted it, so I did not cut my twine until I was done sewing all the pennants on. 
Fold a pennant in half over the twine and pin together. Make sure your twine is lying snugly against the inside of the fold.

Sew across the top of the pennant about 1/4" from the top. Be sure not to sew over your twine. You're making a snug casing, but you want to be able to move your pennants after you're done. 

Turn at each corner and continue sewing around the pennant with a 1/4" seam allowance. Doubling the pennant this way will make it much sturdier and help it to lay flat.

Add the next pennant to your twine and repeat.

Hang your banner and space out your pennants evenly. They should be snug enough to stay put, but loose enough that you can move them. I spaced mine about 5" apart across my mantel.


Sweet and simple!

share this on »
{Facebook} {Twitter} {Pinterest}
8 Comments

Wednesday, December 28, 2011

petticoat skirt tutorial

We have a great tutorial that our sweet friend, Shelley was kind enough to share with us today. I love this skirt! So adorable that I wish one for myself! Take it away, Shelley...

So it's time for family pictures again and I wanted something super cute for my daughter to wear. I've been looking for a while and still didn't find anything. I decided I needed to make the skirt I wanted for her and it only took less than an hour and a half. Here's how.


I used a twin size bedsheet in tan. Trim the seamed edges off. I used 3 strips lengthwise. Cut a little at the end and tear the rest of the way. So quick and easy. Each strip was about 4 inches wide.

I tore another strip about 3 inches wide for the flower. Fold the 3 inch strip in half and gather. I love my gathering foot for my sewing machine!

It's not one continuous strip but you could sew it that way if you wanted.

Make a simple A-line skirt to fit your little girl. Sew the sides of the front and back together.

Next I pinned the ruffles in place. One goes all the way around the back and makes kind of a V in front.  I added a small piece of ruffle under the V.  Stitch the ruffles down.

After you have added all the ruffle, I used a cereal bowl to loosely mark a large circle to use as a guide for the flower.

Here's the flower loosely placed to make sure I had enough ruffle for the space.

 After the flower is sewn down, cut a casing for the waistband.


Cut a piece of elastic to fit and pin the four corners.

Pin the elastic in place and serge or zig-zag.

Fold over the casing and stitch down.  And Done!


What a fabulous, inexpensive, skirt!


share this on »
{Facebook} {Twitter} {Pinterest}
17 Comments

Thursday, December 22, 2011

magnetic perpetual calendar {tutorial & printables}

Another great tutorial from Kalli of Sister Secrets while I madly sew last minute burp cloths and blankets! This perpetual calendar would be a great project to work on with sisters or friends during the holiday break. She's even provided free printables for the calendar pieces! Thanks, Kalli!

I recently purchased the We R Memory Keepers Corner Chomper.  I love the Crop-a-dile, and have been eyeing the Chomper for some time.  After buying the Chomper, I had to come up with a great way to use it, so my husband wouldn’t roll his eyes (as much) at my purchase of “another unnecessary crafty tool.”  I came up with this adorable perpetual calendar, a project that would put my Chomper to good use!  Let me show you how to make one yourself.

Perpetual Calendar Tutorial & Printables


Supplies needed:
*A piece of sheet metal trimmed to 16 x 12.5 inches
*Fabric of your choice (approx. 20 x 16.5 inches)
*Printable fabric sheets (mine came from JoAnn)
*Free calendar printables (or make your own)
*Spray adhesive (optional)
*Glue gun
*Crop-a-dile
*Corner Chomper (optional—shhh, don’t tell my husband!)
*Scissors
*Ribbon
*Magnet Sheet
*2 pieces of white 12 x 12 cardstock

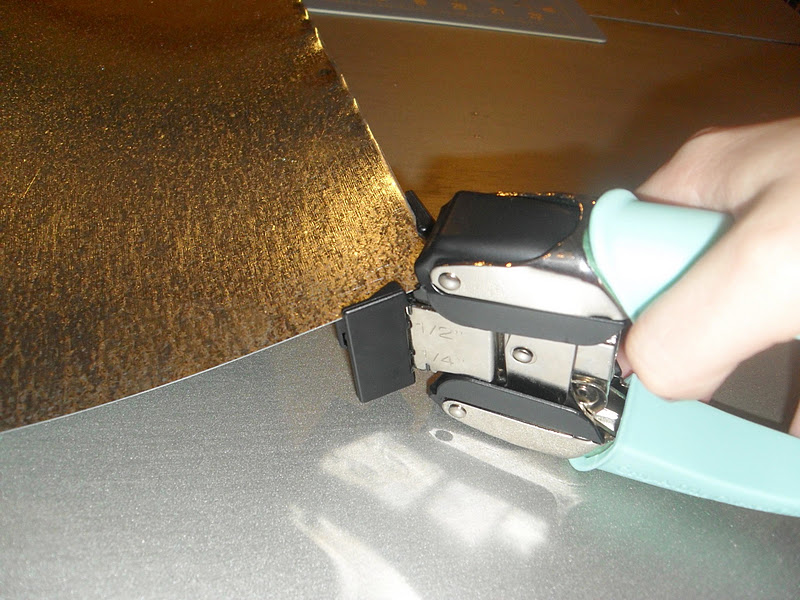
1. After trimming your sheet metal down to 16" x 12.5", grab that Chomper and round the corners.  I used the ½ inch corner rounder.  If you don’t have a Chomper, you can round the corners with a pair of heavy duty scissors.  Be careful—the edges of the sheet metal can be sharp!
 

2. Now lay your sheet metal on top of your fabric and cut around the edges so you have approximately 1-2 inches fabric all around the sheet metal. 
 
3. Now print your perpetual calendar and calendar topper on printable fabric. You can get the printable files here for free. I love using printable fabric! It’s so easy to run through your printer, and gives any project that extra special touch.  Printable fabric comes in many colors and can be found on Etsy or most fabric stores.  I bought mine at JoAnn; I like the Colorfast brand because the directions are clear and you can heat set your image making it washable! This project would work great too using paper, if that is more your style.

 4. Center and pin the calendar and topper on your fabric and sew around all the edges.  If you are using paper, using the longest stitch length works best.

5. Time to put your fabric on the sheet metal. In a well-ventilated area, spray your sheet metal with spray adhesive. This part is totally optional, but I found it keeps your fabric from moving around when gluing it down on the other side. Center your calendar over the sheet metal and smooth down.  Don’t worry if you don’t get it centered on the glued metal the first time, you still have a minute or two to peel off and reposition.

6. Flip the  calendar over and hot glue the edges down, pulling the fabric tight as you glue.

7. Round two corners of your 12 x12 cardstock; spray adhesive (Mod Podge works great too) one side of the cardstock and use both pieces to cover the entire back side of the calendar, hiding the glued edges. Again, this step is optional, but really makes the calendar look finished.

8. For the Month, Day and Number markers, cut two 2 x 1.25 inch rectangles and one 1.5 x 1.25 rectangle out of the magnet sheet.  I covered the non-magnetic side with some extra pieces of scrapbook paper I had on hand, just because I’m crazy like that!  Now cut a window with the craft knife out of each rectangle leaving 0.25 inch boarder.  

9. Punch holes at the top and thread a piece of ribbon or wire through to hang. Embellish it any way you like! I used a ruffled ribbon like Mandy shows in this tutorial and some buttons and vintage earrings.


There you have it! A cute fabric perpetual calendar! These are great gifts that can be used all year long. Oh, and little Merry Christmas present to you, you can get your FREE perpetual calendar and topper here at the Little Birdie Secrets downloads page. Enjoy and Merriest of Christmases to you!

share this on »
{Facebook} {Twitter} {Pinterest}
2 Comments
LinkWithin Related Stories Widget for Blogs