Friday, September 16, 2011

ribbons and bows oh my! giveaway

Have you visited one of our fabulous sponsor sites lately? Ribbons and Bows Oh My! is a great site. I mean...they sell gorgeous ribbon and other similar items, what more do you need to know? Here is a little bit about the story of how this wonderful business got started.


The story of Ribbon and Bows Oh My! began in 2002, when company founder Jennifer Huinker bought $50 worth of denim grosgrain ribbon and sold it on Ebay, turning a small profit. A "stay-at-home" mom, Jennifer was interested in a business which would allow her the flexibility of operating from her home and keeping her own work schedule. Jennifer's husband and co-founder Paul ran a carpet cleaning business, but began to help Jennifer process and ship orders in the evenings. In February, 2003, the Huinkers officially formed their new company, selected the name "Ribbon and Bows Oh My!" (or RABOM) and began selling ribbon and related products on Ebay.

Initially operating from their kitchen table, Paul and Jennifer were able to increase the business and shortly moved into a 1500-sq ft building with five employees. Business growth really began to accelerate when RABOM went on line with a dedicated website in 2006. Recognizing the potential of RABOM, Paul sold the carpet business and committed full time to the ribbon trade.


I just love that story! And I also love the products. Look at this glitter ribbon. It comes in all sorts of lovely colors. Being the only girl in my house means I need a little sparkle from time to time.

The metallic shimmer ribbon also looks fabulous. I might need to buy some soon.
Please go visit the Ribbons and Bows Oh My! site. They are a loyal sponsor and we appreciate them! And they are also doing something really nice for you today. They are offering our readers a chance to win a fabulous gift basket valued at $100! Want to see some of the pretty items that could be delivered to your door?
Lucky you! All you have to do to enter is visit Ribbons and Bows Oh My! and find your favorite item. Then come back and leave a comment telling us what that item is. The giveaway will end Monday, September 19th at 11:59 pm PT.

share this on »
{Facebook} {Twitter} {Pinterest}
244 Comments

Wednesday, September 14, 2011

candy corn cupcakes {halloween treat idea}


Remember those adorable chalkboard cookies we shared last month? Well this month we have another super creative and yummy idea from Kathryn at The Sugar Turntable. Candy corn cupcakes. Chocolate cupcakes. Filled with gooey frosting. And topped with more frosting and candy corns. Can it please be Halloween already? They actually don't look that hard to make, but maybe I better do a practice run, just in case. . . Find the instructions here.


Thanks for sharing, Kathryn!

share this on »
{Facebook} {Twitter} {Pinterest}
6 Comments

vintage image citrisolv fabric transfer {french tea towel tutorial}

READ THE REST OF THIS POST -->>>» |

A few months ago, a friend told me about this cool fabric transfer method using a cleaning product called Citrisolv. I had never heard of the stuff, but I was intrigued. I finally had a chance to track some of this stuff down and give it a try. Soooo glad I did. It's my new obsession. Just come to my house and take a whiff--the whole kitchen smells like oranges.
I wanted to try this technique to make vintage french-inspired tea towels. This is probably one of the fastest, easiest crafting projects in America (I would say the universe, but I don't know how easy it would be to find Citrisolv internationally or intergalactically--let me know where you find it in your corner of the solar system). In the US, you can find Citrisolv at health foods stores like Whole Foods, but my local store didn't have it. Imagine my elation when I found it at my Ben Franklin Crafts store! I knew I loved that store. I ended up with a stack of darling dishtowels in less than 30 minutes (and when I say a stack, I mean 16 of them!).
  

Citrisolv Fabric Transfer Tutorial
 

Supplies:
*Citrasolv Natural Cleaner & Degreaser and small bowl
*Fabric (I used flour sack dish towels. Note: the tighter the weave, the better the transfer.)
*Image copied on a copy that uses toner (inkjet printed copies will NOT work--go to your local copy shop where toner-based copies will run you around $.08-.10 each)
*Wide paint brush
*Spoon
*Stack of newspaper
*Scotch tape or sewing pins
*Iron
*Towel

I found these tea towels, or flour sack towels, in a 2-pack at WalMart. They used to sell them a 5-pack for $6, like when I was making a ton of these Christmas tea towels, but no more. The good news is the 2-pack is actually cheaper per towel--only $.98 each!
 

All the graphics I used on my tea towels were from the fabulous Graphics Fairy. LOVE her site. She posts vintage clip art and images for free each day. I went with vintage graphics because then I didn't have to worry about how well the transfer was made--if it wasn't perfect it would just add to the vintage look! Here are a few of my copies made at the copy store with their toner-based copier. Note: Inkjet home printers and color copies will not work. Be sure to use REVERSE image for anything with text, or it will come out backward! Some of The Graphic Fairy's are, but some are not. If your image is not reversed, open it in photo editing software and flip it horizontally before printing.
 

Be sure to work in a well-ventilated area. Lay your fabric out on top of a stack of newspaper. I actually only had a couple of sheets, so I put a few plastic grocery sacks under it to give some cushion. It's good to have a little cushion to make the burnishing easier later. Put your copy image-side-down on your fabric and tape or pin in place (you don't want it to move or you'll have a blurry image). Pour a small amount of Citrosolv in a bowl and have your paint brush ready.

Dip your brush in the Citrisolv and wipe over the image until you can see it. Be careful not to use too much Citrisolv--if you soak it you may make your image blur!

This is the step that will make your image transfer--burnishing. Rub the entire image with the back of a spoon, being careful not to miss any spots. 
 

When you're sure you've covered it all, carefully life the copy off the fabric. If you do it slowly and notice you missed a spot, you may be able to replace it and burnish it a little further, but this is a good way to blur your image, so I wouldn't recommend it.

share this on »
{Facebook} {Twitter} {Pinterest}
44 Comments

Tuesday, September 13, 2011

easy fall centerpiece idea {guest post for make and takes}


Fall is in the air! Okay, it was 89 degrees here yesterday. But the acorns are falling, so I know it's coming! My boys and I went out for a fall walk to gather a few acorns and visit our friends the chipmunks who live in our backyard: Chip, Chippy, and Chip Chip. We stole a little of their food, but it was for a good cause. Check out my quick and cheap temporary fall centerpiece idea using acorns over at Make and Takes today!

share this on »
{Facebook} {Twitter} {Pinterest}
6 Comments

Monday, September 12, 2011

how do you get your kids to eat healthy foods?

Well, we have been back in school for a while now and things have been running pretty smoothly around here. I like being back on a routine. It helps me feel a lot more organized. Here is a picture of my second grader on his first day of school. I cannot believe how big he is! Didn't I just have him a few months ago?!


Now that I am back to packing a school lunch each day, I want to ask you how you get your kids to eat healthy foods? I obviously want my boys to eat healthy. My son is working so hard at school (and playing hard) and I want him to have the energy and nutrients he needs to be successful in his classroom and with his school work.

Sometimes I find it hard to be creative in packing lunches and also healthy at the same time. When you have to send it off to school and want it to stay fresh and cannot pack certain items, it can be difficult. I always try to pack a balanced lunch for him, but I know often times when he sees friends eating treats or other items, he wishes he had that in his lunch. I also wonder when I do put in small treats for him, if some of the other healthier items don't get finished. I would love some advice as to how you get your kids to eat healthy foods whether at home or at school.

Share how you get your kids to eat healthy food below for a chance to win a $500 Mom’s Getaway Spa Day from BlogFrog!

Want to exchange more healthy snacks ideas, money saving tips and back to school shopping advice with other moms? Visit the Horizon® Healthy Families Back to School Community!

This is a sponsored conversation written by me on behalf of Horizon. The opinions expressed by me do not necessarily reflect the view of the Horizon Organic brand.

share this on »
{Facebook} {Twitter} {Pinterest}

Friday, September 9, 2011

chicken tikka masala

When we first moved to Seattle, my dear friend Stacy invited us over for dinner. She said she would be making Indian food and I was a little worried. I had never tried Indian food before and I thought I wouldn't like it. I was completely wrong! Stacy made chicken korma and I couldn't get enough. My husband and I left her house raving over the food. Since then, I have learned to make all sorts of Indian dishes as well as many other Asian recipes. Much to the credit of Stacy who has given me so many tips along the way.  Last night I made a recipe from my friend, Caulene. Chicken Tikka Masala is always a big hit at our house. Even my boys love it! This version is so easy since you don't have to stand over the stove.


Chicken Tikka Masala
1 lb. chicken tenders (I usually do 2 lbs because we like more chicken)
1 (8 oz.) can tomato sauce
1 c. low fat milk
1 c. plain yogurt
2 T. lemon juice
2 T. cilantro ( I add more because we love it!)
2 tsp. minced garlic
2 tsp. ground cumin
2 tsp. ground coriander
1 tsp. cinnamon
1 tsp. salt
1 tsp. ground ginger
1 tsp. paprika
1 tsp. garam masala
dash of red pepper

--Mix all ingredients together. Pour over chicken in large casserole dish. Cover and bake at 400 degrees for 35 minutes or until chicken is cooked through. Serve over jasmine rice.

share this on »
{Facebook} {Twitter} {Pinterest}
19 Comments

Wednesday, September 7, 2011

custom spray paint from acrylic paint {martha stewart crafts}

I am super excited to show you the new trick I learned to turn regular old acrylic paint into spray paint! But first I have to tell you about not one but two places we're guest posting today. . .

ModernMom is kicking off a new section of their Web site called Wednesday Crafternoons, and we were their first project! Check out these pretty cupcake stands (similar to our cake platter). I love a quick and easy project like this! And while you're there, check out the rest of the ModernMom site--they've got something for every kind of mom. Very cool.


The other place we're being featured is one of our favorite crafty blogs EVER! Eighteen25 is hosting a September Spooktacular with fabulous Halloween projects every day this month. Go check out our Halloween Chandelier and say hi to my girls Jen, Jodie, and Jamie! Then come back here and see my secret for painting the embroidery hoops used in the project. You're going to freak!


Okay, now that you're back, let me tell you about two awesome new products from Martha Stewart Crafts that Plaid sent me to try (available in Michael's stores now!). I am jumping up and down about them! First, the new Martha acrylic paints work almost any surface, so you can use them on wood, fabric, glass, plastic, metal, you name it! And they are dishwasher and washing machine safe, too. Crazy, right? These ain't your mamma's acrylic paints. And of course the colors are gorgeous, and there are 160 of them. Eeee!

The next exciting product is even better. You know how when you want to spray paint something you have to buy a whole big can of spray paint, even if it's just a little bitty thing? And have you ever noticed how few cool, trendy colors spray paint comes in? Martha took care of that, too. Now you can turn any acrylic paint (as in one of the pretty colors from above) into spray paint! I tried their new Spray Paint Kit (there's one for satin finish and another for gloss/metallic finishes) to paint my embroidery hoops for the Halloween chandelier and a few other goodies.

Here's how easy it is. Gather your kit, paint color of your choice, and item to be painted.


Pour equal amounts of the spray paint medium and the acrylic paint into the mixing bottle (everything except the paint is included in the kit).

 Shake it up to mix the medium and the paint.


 Pop the sprayer on top of the paint container like so.


4. Spray! I did two easy coats and it looked great! 

Okay, so black spray paint is not hard to find and I do own a large bottle of it. But I couldn't wait to try it! Next I chose a color I could not find ANYWHERE in regular spray paint: coral. I'm loving it with turquoise and mustard yellow right now (another project in that palette coming soon!

I found this little lovely at an awesome thrift store in Minnesota (more on that soon, too). It looks like it's maybe a napkin holder? But I thought it would be perfect to hold cards or mail on my desk. It just needed a little character.

A couple of coats of coral acrylic paint sprayed on with my Martha spray paint kit. . .

And voila! The perfect card holder for my craft desk! (No, these cards still haven't been sent. I know, I'm horrible. But they sure look cute on my desk!).

I've still got quite a large collection of things to be spray painted from my thrifting spree--my spray paint kit is going to get a workout this weekend!


share this on »
{Facebook} {Twitter} {Pinterest}
13 Comments

Tuesday, September 6, 2011

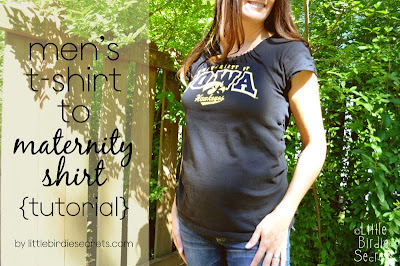
how to alter a mens t-shirt into a womens (or maternity) size {tutorial}

READ THE REST OF THIS POST -->>>» |

When I first moved to Seattle, I noticed there was a sort of "uniform" that locals subscribed to: jeans and a black North Face fleece jacket. Comfort is king there. And I loved that no one cares what you look like--they take you as you are, even if you show up at the Symphony in jeans and fleece. It was very freeing. My first week in Iowa City I noticed a different kind of local uniform: Iowa gear. Anything and everything that says Iowa, Hawkeyes, or Iowa Hawkeyes. The Hawkeyes are like a religion here. No, more than that--a way of life. College kids, moms, babies, old men, it doesn't matter--they're all walking around proudly promoting their team. It's always appropriate, like the jeans and fleece in Seattle. I had to get in on it.

Saturday was a big day. The first game for the Iowa Hawkeyes football 2011 season. The first game in which I would be in attendance. Which means I had to get some Iowa gear, quick! Do you know how hard it is to find college team maternity wear? At least under $30? It's hard people, very hard. So I decided to make my own.

{Please try to forgive the awkward self-portraits. I'm home alone all day, okay? Just hoping the neighbors haven't noticed me out in the yard posing yet.}

Here are some simple steps to alter a men's t-shirt into a womens size, even if you're not looking for maternity. Just take in a little more than I did.

Alter A Mens T-Shirt Into Womens (and/or Maternity) Size Tutorial

Supplies:
*T-shirt 1-2 sizes larger than your size (for maternity), or your regular size for non-maternity
*1/4" elastic (about a yard will be plenty)
*Sewing machine, matching thread, scissors, ruler, sewing marking pencil

1. Get a t-shirt. If you're not going for maternity, a t-shirt that fits like a men's size should will be fine. You'll mostly be altering the neckline and sleeves. If you want some room for baby, go bigger, like 1-2 sizes up. I would normally wear a men's small, so I went with a large. Found this beauty at the consignment shop for $4.99.

2. Next grab a t-shirt that fits you well. I chose a fitted maternity t-shirt (I have 3 of these and live in them right now--so comfy and cute). Lay it on top of your mens shirt. This will help you determine how much you're going to alter your big shirt. Mine--a LOT.
3. The neckline is a good place to start. I didn't want mine to be too low and cut off the Iowa logo, so I first just cut off the trim. Then I cut the front of the neckline a little lower than the back (rearrange the fold of the shirt so the sides of the neckline are together, rather than the front and back--this will help you keep the front even. )
I wanted to use some of the shirt's width to add some charm. I created 16 pin tucks around the front of the neck. Haven't done a pin tuck before? It's easy! Here's how:

*Mark your fabric with lines using a ruler and a fabric marking pencil. Mine were about 1.5" long and .5" apart. I followed the curve of my neckline.
*Next, pinch the center line between your fingers and fold along your line.
*Put the fold under your sewing machine and stitch just 1/8" or so from the fold (don't forget to backstitch!) along the length of the line your drew.

share this on »
{Facebook} {Twitter} {Pinterest}
30 Comments

Monday, September 5, 2011

etc jewelry giveaway winners

Thanks for everyone who entered our ETC Jewelry Shop giveaway! This is such a great giveaway and we hope you will continue to support Beverly in her adoption journey! We are excited to announce the lucky winners of a $50 gift certificate to get some hand stamped jewelry.  The winners are...


Sarah and Jeremy 
who said
"i love the rwandan necklace made by the women of the country!"

and
Cozycomfycouch
who said
"Wonderful! What a beautiful story! I really love the hand made necklaces. I think that would be truly special to wear. :)"

Congrats! I have passed your email addresses onto the sponsor, so she should be contacting you in the next few days.

share this on »
{Facebook} {Twitter} {Pinterest}
Add a comment

Thursday, September 1, 2011

initials, inc giveaway winner

Time to announce the very lucky lady who is the winner of our Initials, Inc. giveaway and who gets a $50 gift certificate to Initials, Inc!

Congrats to...

Amy Williams 
who said,
"Cute Stuff. The Scoop bag in the Mums the Word fabric is probably my favorite."


We have passed your email address onto the sponsor, so she should be contacting you soon! Enjoy your prize!


share this on »
{Facebook} {Twitter} {Pinterest}
7 Comments

cabbages and roses fabric debut {and a fun sewing project}

I spent one glorious summer in England, roaming the lake country, punting lazily on the Cam River, eating loads of Hob Nobs, window shopping along the cobblestone streets of Cambridge. . . Oh yeah, and studying (a precious little). Even while I was there it felt like a dream and I fell completely in love with that charming country. So when I heard that Great Britain's Cabbages and Roses was introducing a fabric line in the US with Moda, I jumped at the chance to play with it! It's called Northcote Range and it's soft and pretty and gently worn-looking, like something you'd find in an antique shop. Something you'd find wandering the cobblestone streets of Cambridge. . .

This is my makeup bag. SCARY, I know. I've probably had it almost 20 years (really?). I think I got it in high school. Anyway, it is so full these days that I can barely zip it, not to mention the fact that it looks disgusting.

So I chose a cosmetic case pattern from Cabbages and Roses' Home-Made Vintage book (which is full of beautiful sewing patterns and ideas in shabby-chic style!) and made a new make-up bag with this pretty cream and rose pattern.
  
 
Isn't it pretty?

It's a fairly easy pattern, fully-lined, similar to our wet bag tutorial, but a little more polished.

Ta-da! A little better than my old bag, right?

I added a few fabric rosettes to dress it up a little. 


And now all my makeup fits nicely inside (and I can even zip it up!)


Check out the Cabbages and Roses blog see more about this line, coming to quilt shops this month!


share this on »
{Facebook} {Twitter} {Pinterest}
4 Comments

what dream business would you start? {tell us and be entered to win an iPad 2!)

I am my father's daughter. I've always known I've taken after him in my artistic abilities and night-owl tendencies, but I've realized recently I also have a bit of his passion for entrepreneurship. My dad has started several successful businesses, and I've been lucky to be a part of a few of them in small ways. But it wasn't until I found something I was really passionate about that I caught the bug myself.


This blog and my crochet pattern shop have allowed me not only a chance to help supplement our family's income, but they give me purpose. They are part of my identity. Most of all, they let me do what I love and be home with my children. Now that is my dream business! And I think most local and small business owners feel the same way. They are passionate about what they do, and they want others to feel that passion. I know that's exactly what drives my dad, whether his ventures end up being successful or not. It's who he is. I hope you'll think of that the next time you're visiting a local or small online business. The people are what make it great, and we have the opportunity to help these people live their dreams while supporting our local economies. I just heard about Intuit’s Love a Local Business competition that gives local and online small businesses the chance to win $25,000 to further their dreams. You can nominate and vote for your favorite local or online business and help passionate people make their businesses even better. Check it out!

It’s been very exciting starting my own business, so I’m curious to know: What dream business would you love to start? By replying you will be entered to win an iPad 2!

This is a sponsored conversation written by me on behalf of Intuit’s Love A Local Businesscompetition. The opinions and text are all mine. Contest runs August 10 to September 1, 2011. A random winner will be announced by September 6, 2011. Official Contest Rules

share this on »
{Facebook} {Twitter} {Pinterest}
LinkWithin Related Stories Widget for Blogs