Showing posts with label kids. Show all posts

Tuesday, November 24, 2009

christmas countdown blocks

I can't believe November is almost over! My kids have been asking every day how many days until Christmas. They've been asking since Halloween, so I made some countdown blocks to stop all those questions! These are easy and fun to make, and would make a great gift!


Christmas Countdown Blocks Tutorial

What you'll need:

*2 wooden blocks (ours were 2"x2", but 4"x4" would be a great size for this project)
*Sandpaper (if needed to smooth out block)
*Acrylic paint
*Foam brush
*Patterned paper
*Distressing ink (totally optional)
*Mod Podge or other decoupage medium
*Another foam brush
*Number stickers or die cuts in a size that will fit on your block (we used the Slice to cut ours). You could use paper or vinyl. Or a Sharpie marker to write them on.

1. Sand and paint your blocks. Allow to dry thoroughly.

2. Cut your paper down to a size that is just smaller than your block. Ours was about 1 and 7/8". We cut 6 different papers so each side of the block was a different pattern. We used paper from the Eskimo Kisses 6x6 pad from Basic Grey. These paper pads are a great way to go because the designs are shrunk down from their original 12x12 size so you can see more of them on the little blocks.


3. Apply a thin layer of Mod Podge to one side of the block. Smooth paper on block, ensuring there are no air bubbles. Continue covering all sides of both blocks. Allow to dry.


4. This is optional, but we like to sand the edges of the paper to make them "one" with the block. Use a downward motion going away from the paper's edge to avoid tearing the paper.


5. If you're die-cutting your numbers, cut them to fit your blocks. Ours were 1.5" high. Be sure to use a 6 that can be flipped and used as a 9, too. Cut the following letters, or get these stickers out:
*Block 1 - 0,1,2,3,4,5
*Block 2 - 0,1,2,6,7,8


6. Adhere your letters to the blocks--use more Mod Podge if you die cut paper letters like we did.


Look at all the cute paper combinations that come out of this Eskimo Kisses paper!


7. I haven't done this yet, but you can also apply a thin layer of Mod Podge to the entire block to seal it. I would probably recommend it, but I'm the slightest bit worried about it warping the paper. Amy, any thoughts?

8. On December 1 (or would it be November 30?), put your blocks out with 2 and 5 facing out. Then each day turn the blocks to count down one day until Christmas! My kids are so excited to turn the numbers each day they can hardly stand it.


share this on »
{Facebook} {Twitter} {Pinterest}
34 Comments

Wednesday, November 18, 2009

hairbow holder

I love making hair accessories for my girls. Unfortunately, this love for hair bows and clips has made quite a mess in the bathroom. I am finding the clips and bows everywhere. I finally broke down and made a hairbow holder. You may have seen these on other blogs. They are quite popular, but that's because they are so necessary. This little holder keeps them in one place. And it looks cute in the bathroom!


This was super easy to make. I just purchased a frame I liked and adhered coordinating cardstock to the glass. I then cut three pieces of matching ribbon and with a hot glue gun attached it to the back of the glass.


Now, all I have to do is slip the bows onto the ribbons for an adorable and functional piece.

share this on »
{Facebook} {Twitter} {Pinterest}
36 Comments

Sunday, November 15, 2009

airport car seat bag


Are you traveling out of town for the upcoming holidays? If so and you have young kids, you may be dreading the crazy circus act of juggling all the luggage, kids and car seats. You know what we are talking about...the car seats strategically balanced on your wheeled luggage so you can still carry your sweetie. We've been there and have held our breathes as we maneuver through the crowds praying that someone doesn't bump our car seat/luggage creation and send it all tumbling down.

Well, here's a short tutorial for a car seat bag you can use to help carry that seat around the airport.

Car Seat Bag Tutorial

Supplies:
*Fabric-you are going to need quite a bit so dig through your stash or hit up the clearance rack at the local fabric store
*Belting-about 20 to 25 inches
*Ribbon or rope
*Chalk or pencil
*Sewing machine or serger

I apologize I don't have any pictures of this first step. I really thought I did, but when I went back to look it was gone. So, try to imagine a beautiful picture here.

Step One:
Place your carseat on the base fabric. Using pencil or chalk trace a rectangle outline of the base. Give yourself one to one and half inches extra. If you don't have chalk or pencil, you can just eyeball it. This will be the base of your bag.

Step Two:
Round off your base rectangles corners.


Step Three:
Using a tape measure, measure around your base. If you have a serger and plan on serging all raw edges, then add one inch to this measurement. If you do not have a serger and you are going to sew hems instead then add two inches. This will be how long you need your side fabric to be. Measure your carseat's height and add 5 inches. This is how tall you need the fabric to be. If you want to do contrasting fabric like I did then just figure out how much of each you want. Sewn all together it should still be the height of your car seat plus five inches.

Step Four:
If you have contrasting fabric, sew them together. (Please ignore my casing here in this picture. I determined, after having made this that it is easier to do the casing later.) If you don't have contrasting fabric you can skip to Step Five.


Step Five:
Add embellishments if you like. I just added a simple ribbon.


Step Six:
Once you have your embellishments and your fabric all sewn together, you can serge the sides or fold in twice 1/4 of an inche for a total of 1/2 an inch on both sides and sew to make a nice hem.


Step Seven:
You should have one very large piece of fabric with either serged edges or nice hems. Now it is time to make the top casing. This casing will be for the ribbon or rope so you can easily draw the bag close. Fold the top down and sew.


(Again, please ignore that this piece was done seperately. When you do this you should have one big piece all sewn together)

Step Eight:
Sew the short sides of side fabric together to make a tube. Be careful not to sew your casing shut. I would start sewing about 5 inches down from the top of the casing.

Step Nine:
Now take this tube and pin it to the base fabric with the right sides together.


If for any reason you have too much side fabric, then fix this problem by pleating the corners. These little pleats or gathers should help. Sew the side of the bag to the base.

Step Ten:
Turn your bag right side out. Prepare your belting by either putting fray check on the ends or burning the edges slightly with a match to prevent fraying. Next sew it to the bag. I chose to sew it on the seam.


Step Eleven:
Using a safety pin attached to your rope or ribbon, thread the rope or ribbon through the casing.

That's it! Put your car seat inside and cinch the top. You're now ready for an almost stress-free trip to the airport!

share this on »
{Facebook} {Twitter} {Pinterest}
15 Comments

Monday, October 26, 2009

every king needs a crown


Feeling a little misunderstood? Need a kingdom to rule? Well, before anyone can be a proper king, they must have a proper crown. In honor of one of our favorite books, Where the Wild Things Are, and the newly released movie, we've whipped up our very own crown. This crown would also make a great addition to a dress up box, a nativity scene costume, Halloween costume, or for your hubby to wear around as he rules the house.

King or Queen Fabric Crown Tutorial

Supplies:
*Sewing machine
*Peltex or very thick interfacing
*Outside fabric-I used this great shiny fabric found in the clearance section at Joann. If you browse the current costume fabric you will probably find something that would work.
*Velcro strip-about 1 1/2 to 2 inches long
*Wide double-fold bias tape in coordinating color

Let's make a crown!

1. I cut out a pattern first using some freezer paper I had on hand. It's basically a long rectangle, long enough to wrap around a child's head plus 2" overlap (for the Velcro). Mine was 24" long and 4 " high, but adjust according to your child's head. It's topped with small triangles that are 3 inches tall and 3.5" wide. (See dimensions in photo below.) I used my quilting ruler to help me with the points.


2. Using your pattern, cut one piece of the Peltex and two of the fabric. Lay the Peltex down first, then one of the fabric pieces right side up, and then the other fabric layer right side down (my fabric was shiny silver on the right side, black on the wrong side, if that helps). Sew the sides and all the points. Leave the bottom section open.


3. Snip off the tips of the crowns and add a short little snip between each point to help your crown turn better. Slowly turn your crown right side out. Use a dowel or chopstick to help push out your points.


4. Using the bias tape, bind along the bottom edge of the crown. If you are not a fan of bias tape or do not have any, you can just try to fold the fabric in and sew a nice little hem. I had a bugger of a time doing this so this is why I switched to using the bias tape.


5. Attach your Velcro by sewing around the edges of the rectangles.


Done!

share this on »
{Facebook} {Twitter} {Pinterest}
11 Comments

Friday, October 16, 2009

mint chocolate frankenpops


Recently the three of us participated in a chocolate bulk buy with some friends, which included these yummy mint chips. Now that we've got them coming out of our ears, we've got to find a good way to use them! (You can only make so many pans of mint-chocolate brownies.) Stacy thought they were the perfect color for Frankenstein's face, so we melted a few and made our own Frankenpops, based on our marshmallow pops post. We made them for the kids, but I couldn't believe how yummy they tasted, especially with the chocolate frosting hair!

Frankenpops

What you'll need:

*Large marshmallows
*Sucker sticks
*Mint chips (we used about 1 cup)
*Shortening
*Chocolate frosting and an icing bag/tip

First, melt you mint chips in a glass bowl in the microwave. Start with about 60 seconds, then stir. Microwave in 30 second increments, stirring after each, until smooth. Add about 1 tsp. shortening to the melted chips and stir to make the mixture thinner.


Next, stick your sucker sticks in the end of your marshmallows and start dipping! We just covered the tops and sides of ours.


Using a knife or frosting spatula, smooth out the sides and top to square-off Frankenstein's head.


A favorite tip of ours--stick them in playdough until they dry.


Before they hardened, we added eyes using Bake It Pretty's royal icing eye balls. These are so fun and last a long time. If you're just using frosting for your eyes, wait for your mint to harden. Then use your frosting in a bag with a small decorating tip to create hair, eyes, and mouth. We added the bolts on the side of his head the same way.


Isn't he cute? With the combination of mint and chocolate, these little pops are monstrously good!

share this on »
{Facebook} {Twitter} {Pinterest}
33 Comments

Thursday, October 15, 2009

mini satin flower clips


Isn't it true that when you make something small, it automatically becomes cute? Remember our organza and satin flower post? Well, we wanted to follow up with a mini version. They were beautiful to begin with, but now they are irresistible. I'm thinking these would be the perfect accessory for a little girl's Christmas dress! I could also see the little flower on the front of a handmade card. . .

Check out the super-sized tutorial for all the details, but basically we cut small satin circles and singed the edges. You may want to try holding the smaller circles with a pair of tweezers to avoid burning yourself. We sewed it all together and added a bead or two. Then we attached it to a grosgrain covered clip for a stylish child's hair clip. I actually loved the red one so much that I clipped it to my black scarf and wore it that way. It seemed a little babyish in my hair, but it was quite chic on my scarf!

share this on »
{Facebook} {Twitter} {Pinterest}
16 Comments

Tuesday, October 6, 2009

trick or tweet! how to make a baby chick costume

Last Halloween I made a little chick costume for my daughter. It was really easy to make and I've had some requests from individuals that want to make one too. So, here is a quick tutorial on making your own chick or little birdie costume.


Little Chick Costume Tutorial


Supplies:
*One or two rolls of 6" wide yellow, white, or blue tulle, depending on what kind of bird you want to make (found in the wedding section at your local craft store)
*Feathers to match your tulle
*Hair clip
*No-roll elastic
*Hot glue gun and glue
*Sewing machine and thread


Okay, let's get started!

1. First, measure your child's waist. Subtract one inch from that number and cut your elastic that length. For example, if my child's waist is 12 inches, then I would cut an 11 inch piece of elastic. Sew the elastic together at the short ends so you have a ring like below.


2. Next, cut your tulle. I used two whole rolls for a toddler sized tutu and only one for a baby (10 month old) size. Measure the length from the waist to where you want your tutu to stop. Double that number and that is how many inches you will need to cut your tulle. For example, I wanted the tutu to be 15 inches long for my toddler daughter so I cut 30 inch pieces. When I made the baby tutu, I only wanted it 8 inches long so I cut the tulle 16 inches long.


3. The easiest way to make the tutu is to put the elastic on your leg like a garter. Then start tying your tulle around the elastic. Make sure you double knot the tulle. Continue tying the tulle around the elastic until you are happy with how full it looks.


4. Now, get out your hot glue gun. Very carefully place hot glue on the double knots of your tulle. This is where you will stick your feathers. You will need to be patient and go slow.


5. Once you have a dot of hot glue on the knot, carefully place your feather on it. You may need to trim the tips of your feathers. A lot of the feathers I used had sharp pointy tips. I just snipped them off before sticking it to the hot glue.


6. When you are done your tutu will look like this. Next, hot glue some feathers to your metal hair clip or hairband and you have half the costume done. Find a matching onesie or shirt and add some orange leggings. Ta-dah! One little chickadee or blue bird or swan or whatever suits your fancy.


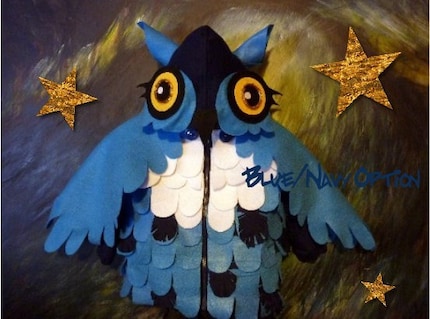
If you prefer owls over little birds then you should check out this handmade costume by Lindsey over at Lollapanoplies. Seattle is so lucky to have such a crafty, talented lady. I am in love with this costume.

share this on »
{Facebook} {Twitter} {Pinterest}
26 Comments
LinkWithin Related Stories Widget for Blogs