Thursday, April 21, 2011

monogrammed rhinestone apron tutorial {and a chance to win a Silhouette digital cutter!}

You all know how much I adore my Silhouette machine. Now that I have it, I don't know how I lived without it! But I haven't had a chance to try all the cool things yet, so when Silhouette asked if I wanted to try the rhinestones, I jumped at the chance to bling out my stuff! (Remember, I'm the only girl in a house of boys.)


But they also offered to let one of our readers win a Silhouette machine with a rhinestone starter kit!! Plus we have a coupon code for a huge discount on the Silhouette bundle with the Rhinestone Kit, and all other rhinestone products in the Silhouette store are on sale! Here are the details:

Enter here to win a Silhouette Rhinestone Bundle including:
A Silhouette SD
The Rhinestone starter kit (see contents below)
3 additional packs of rhinestones
And 1 Pick Me Up tool

The Rhinestone Starter Kit Bundle includes:
The Silhouette SD
2 sheets of rhinestone template material
2 sheets of rhinestone transfer tape
2 rhinestone backing boards
1 rhinestone placement brush
1 CD of rhinestone images
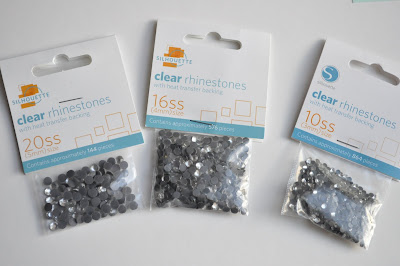
1 pack of clear 10ss rhinestones
1 pack of clear 16ss rhinestones
1 pack of clear 20ss rhinestones
1 pack of pink 10ss rhinestones
and 1 Pick-Me-Up tool

To enter the giveaway, leave us a comment with your name and what you'd bling if you had the Silhouette and rhinestone kit. Do it by April 26th, and we'll post our winner on the 27th. (Don't forget to be sure we have a way to contact you--look what happened last time we gave a Silhouette away!)

Now if you're not feeling all that lucky, we also have a promo code so you can purchase your own Silhouette Rhinestone Bundle and get everything above for just $229! It's going for $350 on the Silhouette web site, so that's over $120 in savings! Wouldn't this make a dreamy Mother's Day gift? :)

The promo code for the Silhouette SD Rhinestone Bundle is LITTLEBIRDIE, and it's only good through April 26th!!

Also, if you already have a Silhouette, all rhinestone products will be 30% off through the 26th--no coupon code needed!

Okay, after you stop hyperventilating, keep reading. I have a quick Silhouette rhinestone tutorial for you so you can see just how fun they are!

Silhouette Rhinestone Monogrammed Apron Tutorial

This is one of my darling aprons I bought from Flirty Aprons. It's completely adorable, and already has a little bling, but I thought it needed a few hot pink rhinestones!

First, I cut the lowercase monogram "m" with my Silhouette SD machine (the whole alphabet is available on the CD that comes in the starter kit) on the green rhinestone template material. There are three sizes of each letter, one for each size of rhinestones they offer, so choose the right size and don't resize it at all. Very important. I chose the smallest size and the 10ss rhinestones.


I peeled off the green template and punched out the holes that remained, then stuck it on the rhinestone backing board. Now it's time to dump out your sparkly bling bling!


Using the placement brush, I moved the rhinestones around until most of them were in place, right-side up.


Then I used the Pick Me Up tool to place the few that didn't make it in the open spots.


Next I covered my design with a piece of the rhinestone transfer tape and pressed down to make sure all the rhinestones adhered. They did!


And then I placed the design near the top of my apron. Too cute.


I covered my design with a dishtowl, and with my iron on the wool setting, I heat set it for about 50 seconds.


I peeled off the transfer tape slowly, and they all stuck to the apron! Yea!


Then I turned the apron over, covered the spot where the design was with my towel again, and ironed the back for another 50 seconds. This draws the glue into the fabric so they will really stay in place.


And voila! No one in my house will ever question whose apron this is (not that they did in the first place, but it sure looks extra cute, now!).


My favorite thing about this was how quick and easy it was! I thought it was going to take a lot longer. I've got another rhinestone project coming up, so come back soon! And don't forget to enter our Silhouette Rhinestone bundle giveaway, or take this coupon code over to SilhouetteAmerica.com and get one for a killer deal! The code is LITTLEBIRDIE. And here's a link to all the rhinestone goodness you can imagine, all at 30% off! Have fun!

share this on »
{Facebook} {Twitter} {Pinterest}
714 Comments

Wednesday, April 20, 2011

chocolate dipped peeps {what to do with your leftover easter candy}

This week I was helping the Easter Bunny pick out candy for my boys' Easter baskets, and I noticed something I hadn't seen before: dark chocolate covered Peeps. What?! How could I have missed these? Then I saw the price. They were $1 a piece. Or I could get a package of 12 plain Peeps for $1 and dip them myself. Bring on the chocolate chips!

I prefer semi-sweet or dark chocolate to milk, so skipped the dipping chocolate I had and melted 1 cup semi sweet chocolate chips with 1 Tbsp. shortening in the microwave on 50% power for 30 seconds. I stirred and kept microwaving in 30 second increments (then stirring) until it was smooth. Then I skewered the Peep bunnies with a sucker stick and ladled the melted chocolate over them until they were covered. When I ran out of sucker sticks, I used barbeque skewers and laid them on wax paper to dry (I removed the skewers after dipping).


Next I tapped the stick on the side of the bowl to smooth out the chocolate and get rid of the excess. Then I place three small pearl sprinklers on to make the eyes and noes (and one on the back for a tail!) and stuck them in a block of Styrofoam or laid them on wax paper until they hardened.


After I ate a couple, I wrapped the rest up in cello bags and tied them with ribbon. I added a punched flower just because I couldn't help myself. :) Such a cute Easter basket stuffer! And WAY yummier than plain old Peeps. (Don't forget to leave me one, Easter Bunny!)


share this on »
{Facebook} {Twitter} {Pinterest}
5 Comments

lacey placey winner

Thanks for entering our Lacey Placey Giveaway! We our excited to announce the winner of 2 free 18 x 18 home decor pillow covers. The lucky lady is...


Sweet Peas and Bumblebees
who said,
"I'm loving the Green Stripe and Pink Polka dot Pillow Cover!! It would look perfect in my daughter's room!"

Congrats! We have passed your email address onto the sponsor and she should be contacting you soon.

share this on »
{Facebook} {Twitter} {Pinterest}
3 Comments

Tuesday, April 19, 2011

crochet spring blooms pattern {and our giveaway winner}

I'm trying to squeeze this post in between juggling two babies' naps, reading with the preschoolers, and getting dinner started, all before I have to go pick up the elementary kids--whew! But I have two fun things to share that can't wait!


1. We have a winner for the Knit Your Own Royal Wedding book! Are you getting excited for the royal wedding? A friend and I have plans to watch it with a lunch of cucumber sandwiches and scones with clotted cream. . .scrumptious. But back to the giveaway winner. Congratulations to. .

Bethany Crowell!

Get in touch with us so we can get you your book! And you will have to be sure to share your royal creations with us!


2. I'm also bursting to share my newest crochet pattern with you! Spring Blooms, now in my Etsy shop, includes 4 great crocheted headband patterns, each featuring a different spring blossom. These would be so perfect on a little sweetie for Easter, or just playing in the spring sunshine (we're actually getting a bit of that this very moment--finally, a break from the gray Seattle skies!). I had a couple of darling models, but even though they're both babies, I envisioned this pattern on little girls, too. I even included Adult instructions! They're quick and easy to make up, too.

Sweet Rose Bloom Headband


Tiny Blooms Headband


Chrysanthemum Bloom Headband


Luscious Bloom Headband


These flowers could also be used on a hat pattern, or to make a hair clip or pin for a jacket or sweater, so they're very versatile.

I did, for the first time, buy yarn from the yarn shop rather than the craft store for these headbands. A couple are made from bamboo blends, and a couple are cashmere/merino blend. They just looked a little more polished. All the yarns I used plus suggestions are listed in the pattern. I also have a couple more 3 for $9 pattern deals left in the shop, and this pattern definitely qualifies! Enjoy!

share this on »
{Facebook} {Twitter} {Pinterest}
8 Comments

Monday, April 18, 2011

faux tie tutorial for boys {guest post}

READ THE REST OF THIS POST -->>>» |

Easter is this week, so we're happy to share this darling faux tie tutorial from iCandy so you can get those little guys all spiffed up for the big day! And what a handsome model she has. Enjoy!

Faux-Tie Tutorial from iCandy

To complete this tutorial, you'll have to Print a PDF version of the pattern. and then tape the main piece of the tie together!


Here's what you need:
The Pattern (click here for a PDF file)!
1/4 yard of chose fabric
coordinating thread
sewing machine
needle for hand-stitching
the rest of the random stuff in your sewing box (scissors, pins, etc)

Unfold your cut of fabric and make a small fold, lengthwise, just wide enough to fit the pattern


Line up the pattern on the fold, pin and cut all three pieces


With the main pattern piece, fold up the tip of the tie just a quarter of an inch and press.


share this on »
{Facebook} {Twitter} {Pinterest}
16 Comments

Sunday, April 17, 2011

amazing mother's day deals {we're making things easy for you!}

You all know I LOVE making handmade gifts and cards for the people I love, but I have a confession. Sometimes my projects don't get done. Eeek! Sometimes my busy schedule just doesn't allow for my creative hopes and dreams and I break down and buy gifts. But since I'm such a cheapskate, I am always on the lookout for a good deal. We know you're busy (and maybe cheap?), too, so here are some Mother's Day deals you don't want to miss!


Up to 3 FREE and unlimited $.99 Mother's Day cards from Tiny Prints! I just got $14.95 worth of Mother's Day cards for $1.49! Seriously! The $.99 Cent Mother’s Day cards from Tiny Prints are only available through certain bloggers (like us!), and they're only available though Tuesday, April 19th! Here's your coupon code: AFFMDAY And don't miss the last day for the free 1-year membership (and 3 FREE cards), which is also April 19th!


Did you get your Flirty Apron yet? The Marilyn styles (like the Sugar & Spice below that I bought) are now 60% off with code MARILYN60! And you can get every other apron 20% off with code 20M2011. Wait until you see how I personalized my Flirty Apron (tutorial coming soon!).


And if you haven't taken advantage of the FREE 8x10 photo canvas from Canvas People, now's your chance! I don't know how long this deal will last, but it is worth at least $50. In fact, if you want to go bigger (like the canvases in the photo), you can get $50 off your purchase. These make fabulous Mother's Day gifts!

Thanks so much for helping us create great content by supporting our sponsors! We only share deals that we would buy ourselves, and we have had nothing but great results from all three of these affiliates!

share this on »
{Facebook} {Twitter} {Pinterest}
2 Comments

mother's day gifts to make {roundup}

We just added a new page under the header for Mother's Day gift ideas. Check out these posts (both recent and from a while back) for great gifts for mom!

share this on »
{Facebook} {Twitter} {Pinterest}
Add a comment
LinkWithin Related Stories Widget for Blogs