Tuesday, March 10, 2009

the shabby belle onesie giveaway

Our friend Shelley over at The Shabby Belle has a great giveaway going on until Friday for one of her darling onesies! We thought you'd like to know. Check it out and leave her a comment for a chance to win. Don't you love the little birdie one? We do, of course! And if you don't win, you can always purchase one of these cuties from her Etsy store!


share this on »
{Facebook} {Twitter} {Pinterest}
2 Comments

making a denim picnic quilt -- wanna join us?


Here in the Pacific Northwest, it seems like the grass is always wet. Even in the middle of summer with no rain in weeks, I never feel safe sitting on the grass for more than a few minutes for fear my behind will be wet when I stand up. Ever since I moved here I've been wanting to make a denim picnic quilt--one that would be sturdy and comfortable for picnics, fireworks, etc.--that could also keep me dry. I found a great idea for a snap-on bottom to use when the grass is wet, but that can be removed when you wash your quilt.

I found this great vinyl tablecloth in just the right size (60" x 84") for $5 at WalMart. I've been collecting denim since last summer, and I think I'm about ready to start my quilt.


Anyone want to join me? I thought I'd give you a heads up in case you're interested in completing this project before picnic weather. So if you want to make it along with me, start collecting old denim jeans and find a vinyl tablecloth! I can't say exactly how many pairs of jeans you'll need, because it will depend on the size of quilt you'd like to make. Just get as many as you can. Go through your family's closets for jeans that are too small or too big, have holes, or are hopelessly out of style, ask friends and family for cast offs, and check your local thrift store. I'll give you a couple of weeks, then I'll start posting how to make this cool quilt. Who's with me?

Here are the supplies you'll need:
*8-12 pair denim jeans--enough to cover whatever size tablecloth you're using
*Vinyl tablecloth in whatever size you want your final quilt to be
*Rotary cutter and mat, long quilting ruler (mine's 24" x 6")
*Gold jeans thread and sewing machine (make sure you have a "denim" needle)
*Fabric for binding--I'm using about 3/4 yard flannel, but your amount will depend on the size of your quilt and the width of binding you use
*14 heavy duty snap fasteners (mine are 5/8", but any size would work) and the setting tool
*Enough 1.5" wide twill tape to go around the edge of your vinyl tablecloth

share this on »
{Facebook} {Twitter} {Pinterest}
70 Comments

Monday, March 9, 2009

Baby Bug Creations LLC


We have a fabulous new sponsor for Little Birdie Secrets and we want to introduce her. If you haven't already heard of Baby Bug Creations LLC, you need to! Ashley (the owner) is an air force wife and mom of two boys--2 years and 5 months old. Ashley never considered herself crafty, but after she attended several baby showers and had the "hit gift" of the party, she was encouraged to market her items. And we are glad she did! Baby Bug Creations offers quality, custom items for moms and kiddos--anything from nursery decor to diap/wipes to crayon rolls, boy stuff to girly stuff! Ashley told us "I wouldn't sell you something I wouldn't be happy with! If there is anything you need, I can make it! I love to make new things and I love to be a part of creating the perfect custom item for you."

Head on over to check out some of these fabulous products and don't miss a chance to enter a great giveaway that Ashley is offering soon. Also, be sure to use the code LILBIRD for 5% off your purchase. We love our sponsors. They make it possible for us to share our creativity with you, so please support Baby Bug Creations LLC!

share this on »
{Facebook} {Twitter} {Pinterest}
1 Comment

Sunday, March 8, 2009

american hero quilts show and possible block swap


A friend and I attended the American Hero Quilts quilt show in Redmond, WA this weekend. It was so touching. Sue Nebeker, the founder of the amazing American Hero Quilts, shared the story of the organization as well as many of the 100 quilts they have recently finished to give to wounded soldiers and marines returning from the war. It was so inspiring to see all the hard work that had been done to welcome these brave men and women home, and to thank them for their service and sacrifice on our behalf. What an incredible woman! She took her passion and turned it into something that blesses the lives of so many others. And all the patriotic quilts ready to be donated were gorgeous. Two marines were there to hold up each quilt as she talked. Nan from Pots and Pins reported they raised over $7,000 at this event. WOW! (Hey Nan, I know you were there, but I looked everywhere and never found you!)


If you love quilting and want to donate fabric, money, or your long-arm quilting abilities, go to the American Hero Quilts Web site for more info. One-hundred percent of their donations go to making these beautiful quilts for our wounded American service men and women. It's a great cause.

Besides a great bake sale and fabric sale, there were tons of beautiful quilts on display. Here are a few of my favorites.


This was actually the back side of a quilt I loved--amazing!

Couldn't resist the little birdie theme!

Wouldn't this stocking one be darling for a Christmas quilt? I'm putting this one in my to-do file!

This circle quilt is a cute Halloween theme, but the designer of this quilt showed us a couple of others she made with the same design. One was even the result of a block swap (I don't know what they actually call it in the quilting world, but it is similar to our card swap idea). Each participant makes a bunch of one block of specific dimensions, and then you swap. You end up with enough blocks for a quilt top (or part of one, depending on the size of the group). Any readers interested in trying this? I have almost forgotten how much work the card swap was and might be able to facilitate this sometime soon. Leave us a comment if you're interested!

share this on »
{Facebook} {Twitter} {Pinterest}
25 Comments

Friday, March 6, 2009

personalized kids art set

During the school year my kids get a lot of invitations to birthday parties. Not that we don’t love going to them, but they start to add up. This year I wanted to find an inexpensive and personal gift for the birthday girl or boy. Of course, this gift also had to be something that my kids could help make since it was really their gift to their friend.

Here is what I came up with. A simple art set from the craft store, dressed up and personalized for the birthday kid. Here's what you'll need:

*Kids art kit (we found ours at Michael's for $1.99--it would be less with a 40% off coupon!)
*Sandpaper
*Mod Podge or other decoupage medium
*Paper, ribbon, stickers, etc. to decorate the cover


1. Scratch all over the outer surface of the art set with sandpaper. I did this so that my Mod Podge would stick better.

2. Create a simple or very ornate cover in the dimensions of the art set. I left an extra ¼ all around.

3. With a foam brush, cover the art set with a thin layer of Mod Podge. Put your paper in place and smooth out the wrinkles with the side of your hand, a brayer, or a credit card. We covered both front and back.

4. Using a nail file, sand the edges. This makes the paper "become one" with the cover. Click here to see this technique demonstrated on another project (scroll down to #5 for pictures).

5. Add ribbon, letter stickers, buttons, etc. to finish your cover. We love the idea of putting the child's name on the cover so it feels really special to them.

share this on »
{Facebook} {Twitter} {Pinterest}
18 Comments

Wednesday, March 4, 2009

wild west gear - dress ups for little cowboys

Stick-em up! We do a lot of cute crafts for little girls, even though we only have two girls between the three of us. We're always looking for fun stuff for the little guys in our lives, so we couldn't pass up this fun wild west dress up gear!


The perfect disguise. Check out this cool felt mustache!


Using the mustache template from Family Fun, we cut two identical mustaches out of felt. Then we cut a piece of elastic to fit around a child's head (we used one of them for a measuring tool).

We sewed the elastic down to one piece of felt. Then we sewed the two pieces together. We used a sewing machine, but it was a little difficult with the curves. You could try hand stitching it if you're shy on the machine.

The loot. Make a money bag for the big heist!

We loved this easy tutorial for a money bag prop from CraftApple. Fill with rice like she did, or with wadded up newspaper or chocolate coins. Now all you need is a cowboy hat or vest. Let the wild west fun begin!

share this on »
{Facebook} {Twitter} {Pinterest}
22 Comments

Tuesday, March 3, 2009

chalkboard paint ideas

It's time for Part II of chalkboard fun! We saw these vinyl chalkboard images called "Chakals" for children's rooms by Modern Dose and fell in love.


However, we did not fall in love with the price. Being the super budget-conscious gals that we are, we found a couple of ways to make our own chalkboard vinyl for kids' rooms.

Buy a roll of chalkboard contact paper for around $7. Trace/draw and cut out your own design and stick it to the wall. Super simple.


Or use chalkboard paint and paint a mural yourself. Chalkboard paint comes in many different colors, and you should be able to find it at your local craft store or online. You can design a picture that is perfect your child’s room. Or paint a section of the wall like a real chalkboard in the play room.


If you are really ambitious and not satisfied with the pre-mixed color choices out there, you can make your own chalkboard paint in any color. Thanks to Martha Stewart for this fun custom color chalkboard paint recipe.


Here's another chalkboard paint recipe for smaller batches.

Chalkboard Paint Small Batch Recipe

2 Tbsp. Acrylic craft paint, any color
1 Tbsp. Glazing medium, water based
1 tsp. unsanded tile grout powder (get this at a home improvement store like Home Depot or Lowes)

Mix well and apply to wall. Only mix as much as you need immediately, because it does not store well for more than a few hours in an airtight container.

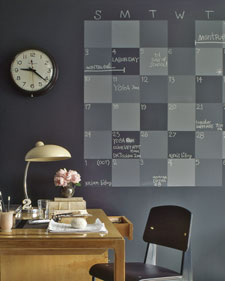
A friend of a friend made this chalkboard on her wall with a few pieces of molding and some chalkboard paint. She also painted a few layers of magnetic paint beneath it so she could hang things with magnets here. Brilliant!


Here's a link to the magnetic paint. How cool is this stuff?

Don't forget--you must condition your chalkboard before using if you make your own paint. Do this by running a piece of chalk on its side over the entire chalkboard area. Now wipe off the chalk with a clean felt cloth. With a damp cloth, wipe the chalkboard again to clean completely. Now your chalkboard is ready for use.

share this on »
{Facebook} {Twitter} {Pinterest}
26 Comments

Sunday, March 1, 2009

american heroes quilts show in redmond


Join us at the American Heroes Quilts Show this Saturday in Redmond, WA! Washingtonian Sue Nebeker is an amazing woman who has a dream to donate patriotic quilts to every injured troop who returns through Madigan Army Hospital and other military hospitals to thank them for their service, and help them through their recovery. She enlists the help of local quilters to make quilt tops, and quilts many of them herself on her long-arm machine. Fellow blogger Nan of Pots and Pins is helping put on this great quilt show to raise money for this worthy cause. So if you're in the neighborhood (and Nan calls the "neighborhood" is anywhere within a 500-mile radius!), stop by and see tons of beautiful quilts, purchase raffle tickets, participate in the bake sale or sewing grab-bag sale--what a fun girls' day out!

These are just a few of the quilts that will be raffled off on Saturday! Find out how you can purchase tickets through Nan here.


Here are the details of the American Heroes Quilts show:

Saturday, March 7th - $5 donation at the door

Happy Valley Grange -
19720 NE 50th St
Redmond, WA 98053

Doors open at 10:00

Presentations by Sue Nebeker of American Hero Quilts at 11:00 and 2:00

Tons of quilts to see!

8 raffle quilts!

Cookbook/sewing/craft book sale!

Sewing Room Grab-bag sale!

Bake sale!

Plus, Pacific Fabrics will be our vendor!!

For more information on Sue Nebeker and American Hero Quilts, please visit her Web site--she is simply amazing! Hope to see some of you there!

share this on »
{Facebook} {Twitter} {Pinterest}
6 Comments

Friday, February 27, 2009

pie-in-a-jar, my new obsession

Align Center
Ever since seeing Not Martha’s tutorial on how to make a pie in a jar, I’ve been obsessed with them. I love the idea of a single serving of home made pie. Lucky for me I canned some yummy peach pie filling this last summer. I love this peach pie filling because it uses almond extract and no store bought pie filling can compare. Since I had all the ingredients already in my pantry I decided that it was time to make my little obsession a reality.

I used a pie crust mix and filled each jar with pie crust.


Next I added the pie filling and left a space at the top.


I then added a pie crust top. I simply rolled out the pie crust and used the jar ring as a cutter. Once the crust top was cut out in a perfect circle I used a small cookie cutter to cut out a little shape.


I then placed the crust on top and carefully pinched the pie crust top to the pie crust already in the jar. I baked it in my oven at 375 degrees until the pie crust was a golden brown. If you do this make sure you have a cookie sheet or something underneath. My little pies bubbled over a little bit.


These are adorable little pies and would make an excellent gift for a friend or neighbor. I think you can even freeze them and pull them out when you want a little pick me up. I wrapped up an extra pie in a jar that I had and gave it to my lovely cousin. She was so excited to get it.


Next, I tackle my obsession with cupcakes in a jar. Click here and here to check some of these cuties out!

share this on »
{Facebook} {Twitter} {Pinterest}
54 Comments

Wednesday, February 25, 2009

chalkboard place mat and tag tutorials

Stacy and her little guy made some of these cool chalkboard place mats for my boys back before we even started this blog, and they're still at hit at the dinner table! They love drawing pictures while I make dinner, and I love to leave little love notes for them that they'll see at breakfast.


Chalkboard Place Mat Tutorial

What you'll need:

*Oilcloth (ours was about 13" x 18", but you can cut it to whatever size suits you--find it at many fabric stores and online)
*Chalkboard cloth (can be found at many craft and fabric stores, and online)
*Bias Tape
*Spray Adhesive
*Sewing machine and thread

1. Cut your oilcloth and chalkboard cloth to the size you want. Spray the back of one piece with spray adhesive and adhere it to the back of the other piece, smoothing out any air bubbles. (Once you make a hole in these materials, they never go away, so don't use pins to baste them together.)


2. Fold bias tape over the edges and sew around edges to permanently attach the two pieces. Check out this tutorial from Angry Chicken if you want a really professional bias tape finish.


That's it! Before you try writing on your chalkboard, don't forget to use the side of a piece of chalk to cover the entire board with chalk. Erase it with a cloth and you're good to go!


Now here's a fun little twist on this project. Reusable chalk gift tags! Use them over and over--just erase the name and write a new one. These would be really great for family birthdays or Christmas gifts.

Reusable Chalkboard Gift Tags

You'll need:
*Small piece of oilcloth (ours was 2" x 3"--you can find this at many fabric stores and online)
*Small piece of chalkboard cloth (found at many craft and fabric stores)
*About 6" coordinating ribbon
*Sewing machine and thread

1. Cut the oilcloth and chalkboard fabric the same size. Use pinking shears for a more finished look.

2. Put the two pieces together with wrong sides together. Insert ribbon between pieces.

3. Stitch around edges. Done!


We've got more chalkboard projects coming up soon--stay tuned for part 2!

share this on »
{Facebook} {Twitter} {Pinterest}
42 Comments
LinkWithin Related Stories Widget for Blogs