Friday, October 17, 2008

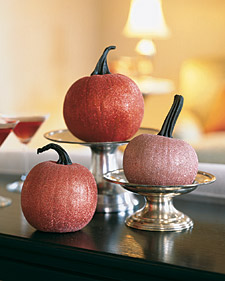
martha's glittery pumpkins


One of our readers forwarded us this link for these gorgeous glittered pumpkins for Halloween or Thanksgiving centerpieces (thanks, Megan!). Check out MarthaStewart.com to watch a video tutorial by the Queen of Crafts herself.

Try this idea with foam pumpkins that you can use year after year!

share this on »
{Facebook} {Twitter} {Pinterest}
6 Comments

Thursday, October 16, 2008

halloween bunting (that's just a fancy word for banner)


Cute paper Halloween banners are everywhere this year! I love these because they're easy and a lot cheaper than a fabric version, and you can make one using your scrapbooking supplies that are sitting unused in the closet! Oh wait, some of you probably actually DO scrapbook. My husband says I don't scrapbook--I just collect scrapbooking supplies. I have to admit that lately I am guilty of that one. But a quick little banner would be a good way to show him that I really do deserve to keep the collection going! The top banner is a mini one my local scrapbook store, Lasting Memories, had for sale as a kit. Even easier!

This has got to be one of the most incredible banners we've seen. It's by charmedgirl and we found it in the Member Gallery on Two Peas in a Bucket. Check out the other close-up pictures of each flag for some amazing ideas!


This girl has incredible bunting for sale on her site Emmie Cakes. The great thing is you can buy them assembled, or as a kit if you want to save money and put it together yourself. She has something for every holiday and occasion, plus she does custom work. Check out her other spooky Halloween and fall banners. She is so creative!


For a do-it-yourself banner, check out this tutorial for another cool Halloween banner by Deep Fried Kudzu. Love that lacy black paper.


If you make your own, try using letters cut by your personal cutting or die cut machine, stamped letters, sticker letters, chipboard letters, or letters printed from your computer. You can add tons of embellishments, or keep it simple with just decorative paper and ribbon.

What a fun way to decorate for your Halloween party, or just an inexpensive decoration to use year after year! Just be sure to pack it carefully so it's not bent or crushed until next Halloween. Happy bunting making!

share this on »
{Facebook} {Twitter} {Pinterest}
6 Comments

Wednesday, October 15, 2008

halloween candy bucket


I love candy. I buy all sorts of Halloween candy way before Halloween just to munch on. It's a bad habit. At least I don't pretend it's for the trick-or-treaters. I fully admit I'll have to buy more before the actual holiday.

This tin is too big for a candy bowl (thank goodness, or I'd really be in trouble!), but it's perfect to fill on Halloween night, or before a Halloween party. The simple tin took three sheets of 12x12 scrapbook paper to cover, but measure your tin before buying any supplies. To adhere it, we simply used a foam brush and brushed the tin with a thin layer of Mod Podge, one section at a time (each section was about 1/4 a sheet of paper wide). Then we smoothed the paper down until there were no bubbles. Use a brayer if you have one; if not, use the side of your hand.

We continued around the tin until it was completely covered. Then we took an Exacto knife to cut the paper from around the top and bottom, and cut out the handles. You might find it easier to cut each section after you glue it to keep the extra paper out of your way when gluing. Then we added a final coat of Mod Podge over the top of it to seal it.

To finish it off we tied a coordinating ribbon around twice, and added "Trick or Treat" with Making Memories "Providence" alphabet rub-ons. Voila! Just add treats. But if you're like me, don't trick yourself into thinking you'll actually have something left by Halloween. Save a stash for the trick-or-treaters--it's only fair.

share this on »
{Facebook} {Twitter} {Pinterest}
21 Comments

Tuesday, October 14, 2008

more cowboy costume fun and a giveaway!

I didn't get a chance to post the pictures of this adorable stick horse we made to go with the cute cowboy costume yesterday, so here he is. We didn't use a pattern for him, so this isn't a full tutorial, but this way you can make him your own!


Here's what you'll need:

*Dowel (from the home improvement store)
*Felt for the head, mane, and eyes
*Bandanna-print fabric
*Stuffing/Fiberfill
*Rubber band or hair elastic

1. Draw the shapes of the top and bottom of head on felt and cut it out. Cut a strip long enough for the mane. Sandwich the mane between the two pieces of the back of the head. Sew the head pieces together and turn right-side out. Leave bottom open. Clip along mane to make fringe.

2. Draw and cut out ears--one piece in felt and one piece in bandanna fabric for each ear. Sew right-sides together, then turn right-side out. Hand-stitch to head. Cut out eyes and hand stitch them on as well.

3. Stuff head with stuffing.

4. Gather open end of head around one end of the dowel. Secure with rubber band. Tie a piece of bandanna fabric around the neck to hide the elastic.

5. Giddy up!


And for the littlest cowboy or cowgirl, try these bandanna pants, made from two bandannas. We found this tutorial from makesomethingnow, but changed it up a little by adding buttonholes where the ends of the drawstring exit.


Yeehaw! We are so excited that we've almost reached 30,000 hits since we started Little Birdie Secrets at the end of July! To celebrate, we're having another giveaway to help you be a more crafty you in the kitchen. They even go with our cowboy costume theme--can you say "cowboy birthday party"?


One lucky winner will receive this Wild West Ice Cream Sandwich Mold set from Williams Sonoma (a $15 value)! Use any cookie or brownie recipe and any flavor ice cream with the boot, hat, or badge mold to make these sweet treats. You can eat them immediately, or stick them in the freezer for later (if you can resist them that long). To enter our 30,000 hit giveaway, just leave us a comment on this post BEFORE we reach 30,000 hits (see our Sitemeter counter below). We'll draw the winner the day we reach our mark. Good luck!

share this on »
{Facebook} {Twitter} {Pinterest}
108 Comments

Monday, October 13, 2008

halloween costumes you can make at home

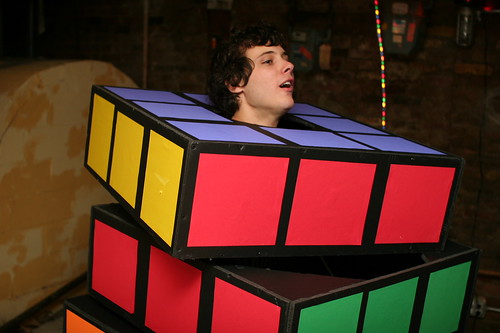
My mom isn't the craftiest person I know, but she did made us some great Halloween costumes growing up. Like the clown costumes someone was wearing for at least four years in a row. I remember a great Rubik's Cube costume my friend had made out of a cardboard box back in the 80s. He was the coolest kid in the neighborhood that year. (Here's a similar creation with a tutorial.)


I haven't ventured into the do-it-yourself costumes yet, mostly because my kids only want the Buzz Lightyear and other licensed character stuff. But this year I might just get my chance to make something. J wants to be a ghost. Not any old white-sheet ghost. A black ghost with red eyes, showing his skeleton that glows in the dark and whose bones are bleeding. Any of you have a costume like this I could copy?

My crafty friend Heather got a jump start on her Halloween costumes this year--way back in May! Okay, she was really making them as dress-ups, but I thought they would be perfect for Halloween! Check out the cute ideas she came up with. . .

Cowboy
She made these faux-leather chaps out of marine vinyl, purchased at the fabric store in several colors. She made up the pattern, but you can see it's not too intricate. She also made a matching vest, then just added an old hat, a bandana, and cowboy boots. So cute! A few tips from Heather:

Some of the marine vinyl had a somewhat tacky finish and it wouldn't feed though the sewing machine, so I gathered used dryer sheets and placed them over the top of the vinyl and then cut it off when I finished stitching. Then I just pulled any remaining fibers from under the stitches. Two of the three types of the marine vinyl I used didn't present any problem. Also, you can't really pin it prior to stitching...any holes made by the pins will remain - same thing if you stitch it and then have to pick it out. I actually used scotch tape to hold the pieces in place while I stitched. It worked pretty well. Probably the best recommendation I can make is to stitch slowly as you hold it in place with your fingers.


Red Riding Hood

Heather used a Butterick pattern for the cape, but she says it was so simple she wonders why she didn't just make it up herself. (It looks very similar to a hooded towel with a little lace and ribbon embellishment.) She really made these capes for her neice, but did so in a wishful-thinking state of mind (she has two boys!). She successfully coerced her darling son to pose for the pictures. Here is her tip for this project:

I used a lace mending tape for the bottom of the corduroy cape because the bottom is rounded and the corduroy was too bulky to fold up and hem.

We've found a couple of great sites for do-it-yourself costume ideas. Check out this Popeye family we found on Parents.com. And this "road trip" costume from FamilyFun, complete with instructions. Both sites have lots of creative and fun ideas for costumes you can make yourself!


Better get sewing--only 17 days until Halloween!

share this on »
{Facebook} {Twitter} {Pinterest}
4 Comments

Saturday, October 11, 2008

more spooky creations


The Halloween spells continue with more fun Halloween treats and a few home decorations!


Eeee! I love these "Morning Mummies" from Unfurled. They are made from an Ikea break mix (but you could use your own dough recipe or a ready-made store-bought kind I'm sure) filled with Nutella. Mmm, Nutella. I can't get enough of that stuff. My kids are going to freak out when I make these!


This eerie eyeball soup is perfect for a cold Halloween night. It's just tomato soup, a hard-boiled egg, and a sliced olive! So easy! I bet even my 3-year-old would eat tomato soup that looked like this. We found this idea in Matthew Mead's cool Halloween book, Halloween Tricks and Treats. He is amazing.


These little cuties are "cupcake cuppies." How cute is that name? They're little paper wraps for your cupcakes! Yummy Cuppy Crafts sells them in her Etsy store in tons of different designs for every occasion. I love these, but I have to admit I just want to eat that frosting off the top of that cupcake right now!


Look at these adorable felt pumpkins! Pattern Bee is offering this pumpkin pattern FREE! I'm thinking these are a great fall decoration for those of you with little ones running around your house. You know the pumpkin (and the kid) will be okay if someone picks it up and hurls it across the room at their little brother or something (not that that ever happens at my house).


Our talented friend Kayleen made this awesome Halloween wall hanging from the pattern in this book, Quilting With My Sister. Aren't the fabrics she picked for the pumpkins cute? But you better start soon if you want to hang it up this year!

share this on »
{Facebook} {Twitter} {Pinterest}
6 Comments

Thursday, October 9, 2008

mini caramel apples


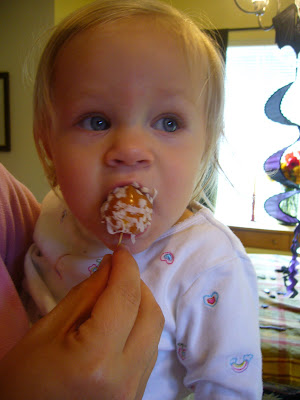
My kids will eat anything with sprinkles. So when we told them we were making apples with sprinkles, they were sold. Better yet, we told them they could help. Hooray for fruit! (My husband just commented that it is no longer fruit if you wrap it in caramel and dip it in sugar.) Whatever. The hit of the Halloween party was our mini caramel apple activity.
We found this idea in the September issue of Family Fun Magazine.
Theirs turned out a little neater than ours, but I'm sure ours tasted just as good! I couldn't stop eating them! Their site has lots of fun Halloween recipes, costumes, and party ideas--check it out!

We made a few changes to their recipe that we thought made it easier. Here's our quick tutorial for these adorable mini caramel apples.

What you'll need:

* 2-3 large apples
*Melon baller
*Caramel apple wraps (we found these at Walmart--they're sheets of caramel that you wrap around the apple instead of trying to dip them)
*Sprinkles, nuts, coconuts, or any other toppings you want
*Toothpicks

1. Use the melon baller to cut small, round pieces out of your apples. Try to include the skin on each one so they look like real caramel apples when you're done. Insert a toothpick into the skin-side of each one.


Each apple made at least 8 mini apples. Holy apples!


2. Cut the caramel wrap sheets into small squares. Wrap them around the mini apples. Try to touch them as little as possible--the heat from your hands makes them hard to handle!


Okay, so some of them look pretty funny, but they still tasted great!


4. Gather your toppings.


5. Dip your apples! The wrap instructions say to microwave them for 15-20 seconds, but after handling them they were sticky enough to hold our toppings, so we skipped that step.


6. Eat and enjoy!
share this on »
{Facebook} {Twitter} {Pinterest}
22 Comments

Wednesday, October 8, 2008

ideas for a festive halloween bash


I know, Halloween is still 23 days away, but today we threw a crafty Halloween party! It was partly in honor of my five-year-old's birthday, and also to give you some ideas for your own spooky get-together. I think it was a hit. The birthday boy proclaimed it "the best Halloween birthday party EVER!"


The party started with some sweet snacks that the kids got to help with. However, you'll have to wait until tomorrow's post to see what they were (and how to make them!).


The favors for the kids were the usual junky Halloween items, found mostly in the Dollar Spot at Target. Exciting for them, but not so much for you. So we thought we'd share the favors we made for the more mature attendees. This hand-stamped candy bouquet was made at last month's stamp camp with our Stampin' Up! demonstrator, Anne Beale Yancey. We stamped the spooky creatures and mounted them on scalloped circles, then adhered them to both sides of York Peppermint Patties. Then we speared them with shish kabob skewers and stuck them in a cup of Halloween M&Ms. The cup's collar was cut with Stampin' Up!'s new Hot Shot die cutting machine (which AB is offering a spectacular deal on this month). This cup makes me happy!


Stacy's candies didn't make it past the first night after we made them, so she re-styled the stamped scallops by attaching them to bags of Halloween candies as tags! (How green of her.)


Check out this darling vinyl spider and "spooky" label Stampin' Up! is offering this month. I totally want to make this, but I'll have to use an opaque cookie jar. If my kids can see the candy, it's all over.


In our opinion, a party isn't a party without a craft project. The kids had a blast making these glow-in-the-dark pet monster rocks. And they were so cheap to make!

First, they painted them with glow-in-the-dark acrylic paint. Apply it liberally so they will really glow!

Then they drew creepy faces with paint pens (watch out, these are very permanent!). The adults helped by gluing the googly eyes in place.

Scary!

Our game was "pin-the-face-on-the-jack-o-lantern." Each kid had a chance, after being blindfolded and spun three times, to stick a piece of the jack-0-lantern's face on a pumpkin.


They thought it was hilarious to see how it turned out!


We've got more ghoulish tricks up our sleeves, so come back this week and get inspired to host your own Halloween party!

share this on »
{Facebook} {Twitter} {Pinterest}
6 Comments
LinkWithin Related Stories Widget for Blogs