Friday, August 22, 2008

sticky notes, labels, and stamps -- oh my!


From notebooks to labels to stamps, there are so many ways for you to help your kids make their mark on the world. Or at least their school supplies. Today's back-to-school post is about making your kids' supplies unique to them.

Photojojo has an amazing video tutorial to help you make these adorable photo journals! Take any photo and make it into the cover of a handmade book, perfect for taking notes, making lists, or just doodling. No one will mistake the owner of this notebook! What a rock star!


Greetingarts comes through for us again with a tutorial for these awesome covered sticky note pads! These can be made to fit any personality with the appropriate patterned paper. Makes a great teacher gift, too! LOVE the papers she chose for the classmates of her daughter's kindergarten class. Can I go back to kindergarten for a day? I want one!

Photo courtesy of greetingarts.typepad.com

Photo courtesy of greetingarts.typepad.com


Here are a few we made from her instructions.

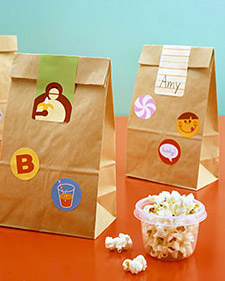
Being a small fish in a big pond means it can be hard to keep track all your stuff. Help your little one out by labeling his or her lunch sack, notebooks, and textbooks with these printable labels from Martha Stewart. You can download two different sheets--notebook labels and lunch labels--and then print them on self-adhesive sticker sheets, available at office-supply stores. So fun!
Photos courtesy of marthastewart.com

Teachers shouldn't have any trouble identifying the owner of any item with their face stamped on it! Craftpudding makes custom stamps from a picture of your child. They are incredibly darling. You can even have their name put under their likeness. Check out her blog and her etsy.com store. She is out of town so I couldn't ask permission to post photos of her work--you'll just have to take a look for yourself! I still can't believe the time and talent it must take her to create these little gems.

If you're really ambitious, try making your own stamps with plastic erasers with this tutorial. Don't forget--if you carve a name for a funky label stamp, it should be carved backwards so it reads the right way when stamped.

Okay, so now that you've labeled everything your child owns, leave us a comment with your blog link so we can enter you in our giveaway! You'll get something from every back-to-school post this week!

share this on »
{Facebook} {Twitter} {Pinterest}
6 Comments

Thursday, August 21, 2008

button rings and hair things


One of the most exciting parts of going back to school is looking good! Here are a few ideas to help all the little princesses out there accessorize their new school clothes, for next to nothing. We were inspired by a simple button bracelet tutorial featured on Martha Stewart and thought, why stop at bracelets? We made rings and hair elastics, too!

First find a few buttons you can stack to make an interesting combination. Glue together using a strong craft glue (we recommend a glass and bead glue, but E6000 also worked for us). Then glue to any ring. We found a package of 50 little adjustable wedding favor rings for $.50!


For hair elastics, first stitch the base button to the elastic using a needle and thread, going through the button's holes and around the elastic. Secure with a sewing knot. Then glue additional buttons on top.


Check out this adorable button flower pin tutorial we found by artsy-crafty babe. You could have an entire matching set--bracelet, ring, hair elastics, and pin! Try a pair of earrings if you're really daring.

Another fun project is fabric-covered headbands. We purchased plain faux-leather headbands for $1 (no teeth, please). Then we cut a piece of fabric long enough to cover the top and wrap under about an inch, and wide enough to wrap around to the middle. Glue on with a fabric glue, then cover the inside seam with a piece of coordinating ribbon. Add an easy bow by making a fabric tube out of matching fabric, turning right-side out, and tying in a knot on the headband. Tuck the tails under the knot and secure with fabric glue. This takes hardly any fabric, so you can use your scraps to make one to match every outfit!


After you're done making a few of these cuties, don't forget to link us on your blog and leave us a comment during Back-to-School week so you can be entered to win a few more!

share this on »
{Facebook} {Twitter} {Pinterest}
6 Comments

Wednesday, August 20, 2008

crayon rolls

We found an adorable crayon roll tutorial from Skip to My Lou for today's back-to-school project. Love the ric rac she used! This project is so simple and can be made with scraps you already have piling up somewhere, or from a piece of sturdy wool felt. Stacy got busy and made one up for Jessica's boys to take to church. With all the crayons and colored pencils on sale right now, it's the perfect time to make a few of these and fill them up for easy gifts!


Nested has a similar tutorial for crayon rolls. And check out the cool colored pencil roll by oh fransson where each color has it's own spot via matching fabric. Now that's a project for those of you with serious scrap collections!

If you want to include a pad of paper with your crayons or pencils, try this artist's organizer tutorial from marthastewart.com. (There's a video for all of you "visual learners" out there.)


Greetingarts featured a darling version from this pattern as well. (Thanks for sharing your pictures!) I think I'll try a Velcro closure on this one for my little guys who can't tie a bow yet. So many great ideas for your little artists!

Photo courtesy of greetingarts.typepad.com

Photo courtesy of greetingarts.typepad.com

Don't forget to enter this week's Back-to-School giveaway to win something from every post this week! Just link us to your own blog or Web site and leave us a comment on any of our
Back-to-School posts with your blog address! Good luck!

share this on »
{Facebook} {Twitter} {Pinterest}
8 Comments

Tuesday, August 19, 2008

pencil cases


I'm the type who has to dig through her purse for ten minutes to find a pen. And I'm sure I was the same way in school with my backpack. (Or Esprit shoulder bag as it were--you couldn't go to my middle school in the early nineties without one). This cute pencil case is a perfect solution to keep your kids' backpacks organized. Or my purse. I better get on this one. If you saw our link to the easy make-up bag tutorial, this is the same bag with different dimensions. Here's Stacy's creation with step-by-step photos. Enjoy! Oh, and don't forget to enter our back-to-school giveaway by linking us on your blog and leaving us a comment!

Kids Pencil Case

You'll need:

*Two pieces of fabric cut to 10" x 4"
*Zipper (18"-22" best for this size bag)
*Iron
*Sewing machine and thread
*Fray Check or similar product

*Fray Check the edges of your cut fabric to minimize fraying inside the bag.

*Iron a 1/2" fold on one of the long sides of each piece. This is where your zipper will go.

*Sew your zipper down one side, turn and stitch across the zipper, then turn and stitch down other piece of fabric to attach. Sew across the zipper on opposite end as well.

*Match pieces right-sides together and sew along bottom. Trim zipper on both ends.

*Flatten tube with zipper in the middle.

*Sew both ends closed.

*Pinch the corners out to give your box depth (see original tutorial for more information). Stitch all four corners.

*Trim corners and apply Fray Check.

*Turn right-side out.

*Fill with your favorite pencils and pens and never be without one again!

share this on »
{Facebook} {Twitter} {Pinterest}
9 Comments

Monday, August 18, 2008

fabulous notebook makeovers and a giveaway!


It's Back-To-School Week at Little Birdie Secrets! I know, I keep complaining about summer being over, but I have to admit I love getting ready for a new school year. All the back-to-school supplies, new clothes--you'd forget my son's only in preschool with the way I carry on. To make the transition from summer fun to school days a little easier (for me), we thought it'd be fun to showcase some fabulous back to school accessories you can create to make going back to school exciting for your little munchkins (and the big ones, too). And if you put the Little Birdies link on your own blog and leave us a comment this week, we'll enter you in our giveaway! (Don't forget to give us your blog address!) You could win something from every post this week! Wahoo!

For our first back-to-school idea, we wanted to showcase a couple of easy, fun notebooks we dressed up a little.
There are so many cute notebooks out there these days, but you can easily take them from cute to stunning with a little ribbon. Most of the ribbon on this notebook came from scraps I'd saved from gifts or cards. Don't be afraid to include funky colors and prints you might not think match. The more ribbon the better! Don't forget to apply a little Fray Check to the cut edges to avoid major fraying.

(I got the idea for this damask notebook from one I saw at someone's house, but I can't remember who it was! If you're the owner of a notebook similar to this, leave a comment so I can give you credit!)

Our second featured notebook is a simple composition book (we found it at Target for $.50) covered with patterned paper and a little ribbon. Your child will never have to ask to borrow a pen or pencil again with this clever design. (We scraplifted this idea from a Close To My Heart ad.) Plus those mini pens and pencils are adorable.
Cut a piece of cardstock to fit the front, back, pen area, and spine of your composition book. Glue all pieces on using the adhesive of your choice (we like Mod Podge, but be sure to smooth out all the bubbles with a brayer or bone folder). Lightly sand the edges of the paper so it "becomes one" with the notebook cover. We zigzag stitched along the seam through the paper and cover with a sewing machine just for fun.

Cut a piece of ribbon long enough to wrap around and tie a bow, plus a little extra for the pen loops. Zigzag stitch the ribbon in measured spaces to accomodate pens and pencils (be sure to use the pen or pencil as a guide so it's the right size). Secure the rest of the ribbon to the book with a little MonoAdhesive or double-sized tape so it doesn't slip off.

We used a Crop-A-Dile to punch two holes in the cover and place large eyelets at the top. Then we tied a little ribbon through them and attached a scrap of paper with a stylish paperclip. This would be so cute with the owners name on it instead of "notes."
I don't know about you, but I'm ready to take some notes. Some fabulous notes.

Don't forget to visit us again tomorrow for another back-to-school project, and to enter our giveaway!

share this on »
{Facebook} {Twitter} {Pinterest}
18 Comments

Sunday, August 17, 2008

peach cobbler recipe -- my canning safety net


We got our bulk peach order this week and it's canning time! (If I don't eat them all first--they're so good fresh!) I'd say my first attempt at canning peaches was fair, but I'm pretty sure I'm going to have to reprocess a few bottles tomorrow. Or, I could always just use them now for Jess's peach cobbler recipe!


Peach Cobbler


Cream together:

1 cup soft margarine

1 cup sugar

2 cups flour

4 tsp. baking powder

1/2 tsp. salt


Add:

1 cup milk


Beat until smooth. Pour into bottom of a greased 9 x 13 pan. Put 1 large can of peaches or 2 1/2 cups sliced fresh peaches (more or less can be used according to your taste) on top of batter. Save the juice left in bottom of can. Add enough hot water to make 2 cups liquid. Pour over cake. DO NOT MIX. The juice should just be sitting on top of the cake and peaches. Bake at 350° for 35 minutes until top is golden brown and set. Serve alone or a la mode. YUM!


share this on »
{Facebook} {Twitter} {Pinterest}
1 Comment
LinkWithin Related Stories Widget for Blogs