I've introduced you to our friend Melynie a few times in the past (remember her baby onesie cupcakes, her fabric daisy tutorial, her how-to-hang-a-picture-collage tutorial, and her Grilled Chicken Pesto Salad recipe?). She's an interior designer by trade, but her role as mommy is her focus now. Lucky for me, she still practices design on her own house! She is one of those super-amazing women--sweet, funny, talented, and a fabulous mom--but she is so REAL. That's just one of the things I love about her. Today she's sharing her spooky Halloween mantel idea, complete with spiders and rats. Eek! Check out her step-by-step construction, and then check out her hilarious and inspiring real life mommy/decorating blog, Life Is So Delicious. I promise you'll fall in love with her, too!
A Little Spooky {Halloween Mantel Tutorial}
Buddy
has been very excited about making our house "spooky, spooky". I
thought I'd share what we did for our Halloween mantel this year.
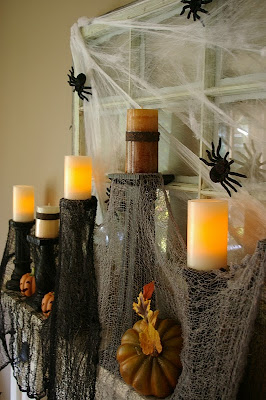
Left my window up. It just makes a nice backdrop.
Added some spiderwebs.
And some tarantulas.
Placed a bunch of black candlesticks, some of which hold 'fake flame' candles.
Then I added some 'creepy cloth' that I found at Dollar Tree. It's all gauzy and holey. Creepy indeed.
Then I added some small jack 'o lanterns, which I will rearrange in a minute.
I added a bigger pumpkin to the middle (click to enlarge), and a pack of black silhouette rats running around.
Pin It
Spooky, spooky--yes?
Topped the whole thing off with some fake pumpkins that are not, for the thousandth time, balls.
The rats are attached with artists tape. It holds well with no residue.
After I did it, Buddy said it was "too spooky, spooky" and asked me to take it down.
Happy haunting!!
Doesn't she make it look easy? Stop by and say 'hi' to Melynie for us, and while you're there check out her out-of-control gorgeous powder room makeover using book pages for wallpaper, and her boys' room makeover, complete with faux beadboard. She is not afraid to try new things!


Love seeing your step-by-step pics of how this came together : )
ReplyDeleteJaimee @ craft-interrupted.blogspot.com
Love the mantle! Looks great!
ReplyDeleteIt looks great! I love the window with the spider webs:) Great job!
ReplyDeleteLove this. Wish I had a mantle/fireplace to decorate now. :-) Thanks for sharing!
ReplyDeleteGreat mantel!
ReplyDeleteI wish I had one. I do however have a shelf that after seeing this mantel, I will have to redo!
Great job!
This is cute! I love how she used the mice on the mantel! I made some years ago and we get them out every year, but I've always kept them on the floor... This year I'll have to use them up high in places as well! And maybe made some more....
ReplyDeleteLove this! Very cool look!
ReplyDeleteyou did a great job on the mantel! It looks amazing...I am sure everyone enjoyed the step by step process! have a great week.
ReplyDeleteDang! Love it! Great mantel, looks very professional halloween store front! :)
ReplyDeleteNatalie
www.projectdowhatyoulove.wordpress.com
It´s fantastic !!
ReplyDeleteLove it! And, the step by step pictures are just what I need so I don't get overwhelmed & say "I could never do it." LOL Sad, but true.
ReplyDelete