It's time for another giveaway! Yeah!
I have little boys, but I also babysit a couple of little girls from time to time. So when Gummylump asked us to review some of their award-winning creative play toys, I chose the Bake & Decorate Cupcake Set. You know, so the little girls who come over will have something to play with. Okay, maybe they were really for me. But the good news is that my 5-year-old son adores this set, too!
We had about 12 birthday parties in a row one afternoon, after which my son proclaimed that I was now 12 years old. Whew! I thought he was going to do the math and make me much older. I guess it's good he doesn't do much math yet. Anyway, it was so delightful to play pretend with him for an hour, and the little girls who come over love it, too.
This is a Melissa & Doug toy, and if you have anything made by Melissa & Doug you probably love them already. The cupcakes, candles, and cupcake pan are all made of wood--something natural in a world of plastic! The "frosting" cap is plastic, but you've got to have that in order to draw on your sprinkles and erase them 50 million times. (I love how the markers are shaped like little tubes of decorator's icing!) There are even cute paper cupcake liners!
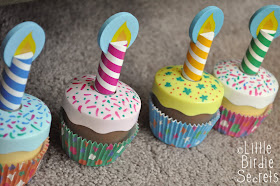
The wooden candles stick on the cupcake with Velcro, which makes them easy to remove before eating the cupcake. And you must pretend to eat it, every lip-smacking bite. And be sure to tuck it behind you when you're done, because if that 5-year-old sees it's still in your hand, you'll be enjoying it all over again. But that's the fun, right? You can eat a dozen cupcakes and they're all calorie-free.
Gummylump is letting us giveaway one Melissa & Doug toy up to a $25 value from their site! So you could choose the yummy cupcake set, or one of my other play food favorites like
the ice cream set,
or the pizza party set,
or have the ultimate tea party with the special occasion cake set!
There are more to choose from, too! To enter to win a Melissa & Doug toy up to $25 in value, go to Gummylump's Web site, and leave us a comment telling us which set you'd pick. We'll pick our winner on Friday, November 5, so leave your comment by 11:59pm PT on Thursday, November 4th. Make a wish!
PAGES
▼
Friday, October 29, 2010
Thursday, October 28, 2010
binkie clip meets rosette clip, and the rest is history. . .
I love when I can take two fun projects and introduce them to each other. Binkie clip, meet rosette clip. I knew they'd be fast friends.
Maybe you've met our friend binkie clip in this past tutorial? I replaced the Velcro with pearl snaps for this one to up the cute factor. It was just as easy as the original.
Then rosette clip joined in the fun by clipping onto the mitten clip.
Now you could potentially have a binkie clip to match every outfit. Just choose a ribbon that will match multiple colors (a neutral or a fun green like I used work well).
Ooh, I need to introduce you two to another friend of mine--stretchy baby headband! Rosette can also hang out with this sweet headband when she's not hanging with binky clip. Now your little rosettes are twice as valuable!
Here are a couple of examples of the versatility these friends offer.
Here's to friends and cute babies!
Tuesday, October 26, 2010
new baby hat and bootie patterns in the shop {plus a free flower pattern}
My new baby cloche (that's just a fancy word for a snug-fitting hat) and booties crochet patterns are in the shop! I am completely in love with these little cuties--I've made about 10 of them so far. Both the hat and booties are quick and easy, and they look adorable on any baby girl!
I call them the "Ava" collection in honor of my new little niece. When I saw her sweet round face and kissable lips, I knew these had to be for her. I also have two other adorable Ava's in my life, so this pattern is for all three of you sweeties!
The baby cloche/beanie comes in three sizes - 0-3 months, 3-6 months, and 6-12 months. I'm working on toddler and adult sizes, but that will be a separate pattern (it will be a little different). The large rose is included in the hat pattern, and the baby rose pattern is included with the booties.
The slipper pattern is for sizes 0-3 months and 3-6 months.
For a different look, you could also make this hat with interchangeable five or six-petaled flowers. I learned this trick from my creative friend Andrea. It makes one hat so much more versatile! And in honor of my first pattern for sale, I'm going to give you the pattern for this changeable flower (see below, after all the cute example pictures!).
Five or Six-Petal Daisy Flower Crochet Pattern
Supplies:
*Two strands* of worsted weight yarn (I like a cotton or cotton blend yarn, and I use two strands to make the flower more stable)
Size G hook
1. Ch 6. Sl st into 1st ch to form a ring.
2. **Ch 3, 2 tc into ring, ch 3, sl st into ring** 6 times for six-petal (OR only 5 times for five-petal). Fasten off and weave in ends.
For center, choose a button slightly larger than your flower center. I used a fabric-covered button the same color as my hat. Stitch it to your hat. Now you can "button" your choice of flower on to match your little's outfit!
Monday, October 25, 2010
tiny prints giveaway
Can you believe that the holidays are right around the corner? I feel like Fall barely arrived and now Halloween is practically here and the other holidays are coming right behind it. Well, we have a great holiday giveaway today. If you get stressed out with your holiday cards every year then this is the perfect giveaway for you. Tiny Prints has everything you are looking for from birth announcements to personalized stationary, photo books and invitations. I just love the Christmas Cards.
Here are two of my favorites...
Tiny Prints is giving one of our readers a $50 gift certificate. Awesome! Here is what you need to do to have a chance at it...
Mandatory Entry:
“Like” the Tiny Prints Facebook page and leave a message on the Facebook wall stating that you came from Little Birdie Secrets and the name of your favorite Christmas card.
For extra entries you can:
--Leave a comment on this post with the name of your favorite Christmas card from the Tiny Prints website.
--Blog about this giveaway, mentioning Christmas cards and linking to HERE.
This giveaway will end on Monday, November 1st at 11:59pm PT. Good luck!
Saturday, October 23, 2010
halloween spider web cupcakes
The Halloween Phantom visited our house this week, bringing sweet treats from a secret friend. Today we passed on the fun to three of our neighbors with spooky Halloween cupcakes. I told you I had spiders on the brain!
Spider Web Cupcakes Tutorial
Supplies:
*Frosted cupcakes
*Decorating gel (I used Wilton's Sparkle Gel in black)
*Toothpick
*Halloween cupcake wrapper cut out (optional) - mine is from the Silhouette store
1. Frost your cupcakes. I used a simple cream cheese frosting. Just a note--I added a little red and yellow food coloring to my cake batter to make the cupcakes orange!
2. Using your decorating gel (I found my sparkle gel on sale at Joann this week!), draw concentric circles on the top of your cupcake. Three to four circles are plenty. Don't worry if they're not perfect--you're going to mess them up in the next step!
3. Drag the end of a toothpick from the center to the edge of the cupcake, about six times around the circle. This will create a "web."
4. I cut the bottom off a plastic spider ring and stuck it on top. You could also leave the ring on it and press the ring down into the cupcake so the recipient would have a little Halloween favor. To make your spider sparkly like it's web, paint a little orange or black Stickles glitter glue on top and let it dry completely.
5. I cut Halloween cupcake wrappers with my Silhouette machine and slipped each cupcake into one. Love this scull design!
These must be the creepiest cupcakes in town!
Friday, October 22, 2010
quick and easy baby quilt
My new nephew arrived yesterday and I am just dying to see, smell, and kiss him. I shipped off his quilt and other baby goodies (like this hat) today, but since his Mama is still recovering in the hospital, I think it's fairly safe to post pictures here without ruining the surprise. :)
This quilt is seriously quick and easy. I found the pattern over at my favorite quilting blog - Cluck, Cluck, Sew! She has taste, talent, and a fabric stash to die for. And I love every one of her patterns. I had some of the same fabrics she used on her version (called The Road Trip Quilt), and I needed quick and easy, so I decided to go for it.
I hate the cutting step in quilting--I'm not very good at it and it takes forever! But this quilt is super quick to cut. What I was most impressed with was how quickly I was able to lay it out. Usually I am moving fabrics around for at least an hour before getting it just right. This one came together without moving one block. Not one. Part of it may be that I had a good variety of fabrics (different size prints and colors), but really, I just think this is an incredibly easy pattern. Thank you Cluck, Cluck, Sew! (Be sure to stop by and tell Allison 'hi' from us!)
The fabric comes from two lines: Wheels and All Star by Riley Blake Designs. This is my new favorite quilting fabric company. They do a lot of My Mind's Eye designs (one of my favorite scrapbooking companies!). If you can't find any of these specific lines left anywhere, check out the new All Star 2 line--it is similar to All Star and completely cool. It is on my wish list for the next baby boy quilt I do.
Thursday, October 21, 2010
freezer paper applique template tutorial {why we love freezer paper}
Before I started sewing, I had no idea that freezer paper was used for anything but wrapping up meat for the freezer. Now I use it all the time! Here are a few reasons we love freezer paper for crafting:
*Use it as a template for applique on quilts and other craft projects (see tutorial below). It makes cutting out your shapes a breeze, and you can use it over and over again!
*You can transfer your flimsy sewing patterns to it to use them over and over again. Also, you can iron the pattern shiny-side-down on your fabric and cut around it instead of pinning the pattern pieces on. This makes for much more accurate pattern cutting.
*It makes a great stencil for fabric painting. Draw or print your design on the dull side, cut the shape out, and iron the shiny side down on your fabric. Paint inside the stencil, then peel it off once the paint is dry. Cut shapes directly out of freezer paper with your die cutting machine. I've done it with both my Silhouette and Slice machines.
*Use it to cover your table to avoid paint or glue messes when crafting
*Use the shiny side as a paint palette
*Use it as a temporary stabilizing when printing on fabric. For example, to create personalized labels, iron your freezer paper shiny-side down to the wrong side of the fabric, trim it to 8.5x11", and send it through your printer. Voila. Printed fabric labels.
What else do you use freezer paper for? Here is one of my favorite freezer paper projects: birthday shirts. My kids wear these all year long, and get so excited to pick their fabric from my stash for the next year's shirt. They both had birthdays last week and we love the new shirts!
Freezer Paper Applique Tutorial for Birthday Shirts
Supplies:*Freezer paper (you can find this at most grocery stores and some craft stores)
*Fabric
*Heat 'n Bond Lite iron-on adhesive (or similar product) - the "Lite" version allows you to sew over the piece after ironing it on
*Iron and ironing board
*T-shirt
*Number (or other shape) to be used on t-shirt
*Sewing machine and contrasting thread
1. Draw, trace, or print your number or shape on the dull side of the freezer paper. Cut it out. I cut my numbers with my Silhouette machine (using a carrier sheet) which eliminated the drawing and hand cutting steps.
2. Iron on some of your Heat 'n Bond iron-on adhesive to the back (wrong side) of your fabric, following the directions on the packaging.
3. Iron your freezer paper shape shiny-side-down on the front (right side) of the fabric. It doesn't take long to get it to adhere--just a quick pass over the top with the iron.
4. Cut around your template with scissors, then peel off the freezer paper. Save it for the next kid if you want--you can reuse your templates!
5. Iron your shape onto the t-shirt following the directions on the Heat 'n Bond Lite's packaging.
6. Using a zig-zag stitch, sew around the edges of the number. Check out our simple machine applique tutorial for more details.
That's it! Now celebrate in style! Bonus on this "5" shirt--the light blue thread I picked happened to be glow-in-the-dark thread! I didn't even know they made it, let alone that I had it in my thread stash. My son and I were so excited to discover a glowing 5 when playing hide-and-seek!
Here are a few other projects we've made using applique templates: