Hello! We are very excited that Mandy asked us to share with you today!
We are the ladies at HowDoesShe.com. We are a site dedicated to finding out "How Does She?" by collaborating ideas on how to become the mothers, wives and world class women that we want to be! We have collected recipes, fashion tips, crafts, home decor, ideas for the kids, ideas for the parents, and some home organization ideas! Come check us out!
Kid's Bedroom: Cute Door Sign!
Come in...It's PLAY time!
My girls needed something fancy on their door so we came up with this idea. They share a room so we had to design a sign with 2 names on it.
Hey, if they get to claim their bedroom as their own maybe they'll take care of it. OR maybe that reasoning will shoot me in the foot when they say it is theirs and they can do whatever they want to it.
If you have one kido, just make the back board just a tad shorter.
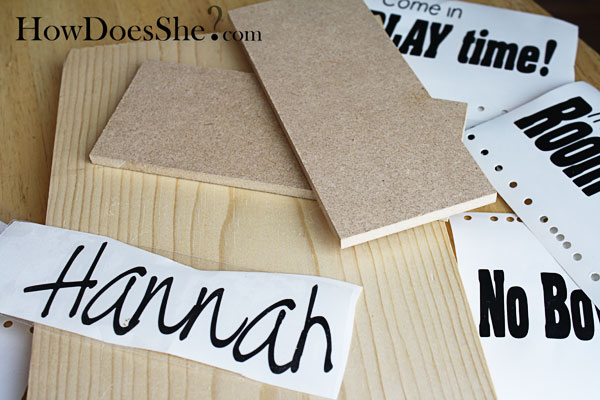
I got my girls enlisted to help out. We...(they don't use saws...yet) I cut:
1-1x8 18 inches long
and
2 2x7 quarter inch mdf boards
For the vinyl we (they did help me with the vinyl) cut 4 strips. They measured 1.6 x 5 inches
1. Please Knock!
2. Come in...It's play time!
3. No Boys Allowed...except Dad (you could easily modify this to No Girls Allowed...except Mom if you have boys)
4. This Room is Clean!
Their names and the word 'room'.
I just used Black Vinyl. I chose a plain font. Nothing fancy because they need it to be easy to read so the boys can see it from far away.
If you need vinyl strips click here. If you need a cutter to cut your vinyl strips click here.
They chose their paper and were on their way! Mod podging at its finest!
We drilled 2 holes in the top of the board and strung wire through it. The wire we found at Lowe's. Nothing fancy. Then due to a husband's request, we added soft sticky felt things to the back so it doesn't scratch the door. I'm glad I have him. I didn't even think about that part until he put his request in:) Funny that small thing made me love him more...
Bring the wire through and twist with your needle nose pliers... so it won't fall out. My font on this one is "Larger Mime" BTW. Do you know what the number one question I get asked? "What is the font you used?" I wish it were "Can I give you money?"...but it's not.
I will try and tell you the font each time, but if I don't...I'm sure someone will ask:)
Here's another shot of wire twisted. Really? another shot...ya. I thought it looked cool! And you know my tutorials are the longest in the world!
Finish the little strips of wood. Do the front and back so that you'll have 4 signs on 2 boards.
Now if you are going to mess up on one make sure to put the 'room is clean' vinyl on it. I know this from experience because it hardly gets used so no one will ever have to see it. The one they use the most is the 'Come in...it's play time' makes sense. I'd rather play than clean too!!!
We used the first of the hooks on our $4 frames? So, here's your chance to use up that last few that are hanging around.
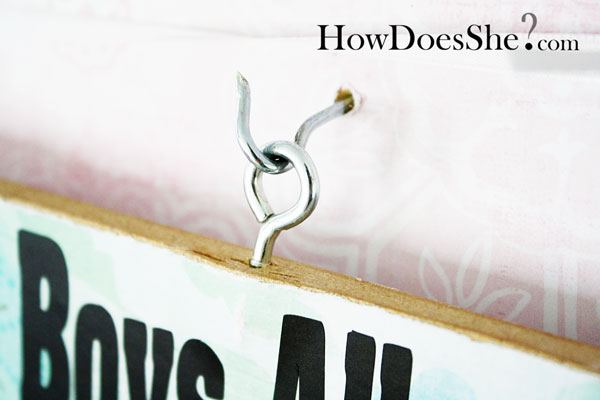
Pre-drill a small hole into the top center of your small boards where you want the eyelet hook to go.
Screw the eyelets in...Stop before you split the wood...ummm I didn't.
Do the same with the hook. Pre-drill and twist the hook into the large board. About 3 inches from the bottom.
Hang the 2 small boards from the big board.
Here it is again. I tried to take a picture of it on their bedroom door, but my hall is dark and the picture didn't turn out very well. So just imagine it as you enter into a princess land of play time!


Or for a boy...enter into a land of dragons and dinosaurs! When my little boys get older you betcha I'm going to make one for them too:)


darling! i love it!
ReplyDeletethese are so gorgeous!! Such a great idea!
ReplyDeleteCute, cute, CUTE!!!
ReplyDeletethis idea is SO great! LOVED it. All I need now is a daughter
ReplyDeleteGreat idea! This DIY door sign is perfect for parents and children to do.
ReplyDeleteMike @ Name Badges
Smart Edge Badges