Sculpey Clay Pen Tutorial

Supplies:
*Sculpey clay in various colors (I found a multi-color pack at Michael's for $10 and used my 40% off coupon)
*Ball point pens - must be the type you can remove the ball point/ink from. Also, try not to get the type with the soft grip like I accidentally did. They work, but there's less room for the clay.
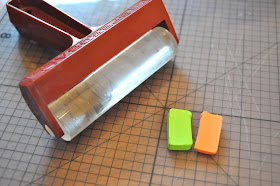
*Brayer or rolling pin
*Razor blade or sharp craft knife
*Wax paper to protect your work surface
*Cookie sheet
*Oven heated to 250 degrees
1. First, remove the ink cartridge part of the pen from the plastic tube. It should pull out fairly easily, but use a pair of pliers if needed.
2. Choose two colors of Sculpey clay. Cut off a 1/4" piece of each color.
3. Roll out flat with a brayer tool or rolling pin (I don't recommend a wooden rolling pin--the clay will stain it. Yes, I know from experience.) Try to make them about the same length/width.
4. Lay one color on top of the other. Roll up tightly from one short end.
(color change!)
5. Using a razor blade or craft knife, cut the roll into thin slices.
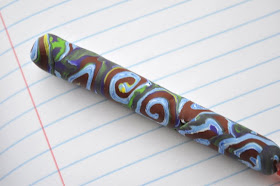
6. Press the slices on the outside of the pen until it is completely covered.
7. Roll the pen on your work surface until the surface is smooth and there are no gaps between swirls.
8. Line the pens up on a baking sheet (I covered mine with parchment paper first) and bake at 250 degrees for 15 minutes. Allow to cool before handling.
9. Push the ink cartridge back inside the pen tube. A perfect gift for your favorite dad!


what a great idea! I will do it as a fathers day activity with my preschool class! THANKS!
ReplyDeletewhat a great idea! I will do this activity with my preschool class. THANKS!
ReplyDeleteI do this for crochet hooks :)
ReplyDeletejust thought id pass that along to see if you tried it :)
I love this!Theses would also make great teacher gifts next year!
ReplyDeleteoh my goodness! I love this! Such a great idea!! Thanks for the tutorial!
ReplyDeleteVery cute idea.
ReplyDeleteSewCalGal
www.sewcalgal.blogspot.com
forget father's day, i want to do this for myself! so cute to have these on my desk instead of plain pens.
ReplyDeleteGeniuos! Im gonna make my dad one right away! :-)
ReplyDeleteI did something similar with my lifeguard whistle years ago when I was in HS. Unfortunately when I baked it, the cork ball inside the whistle burst open.
ReplyDeleteThis is a super cute idea. thanks for sharing!
ReplyDeleteI love it! Too cool! I can't wait to try it!
ReplyDeleteinteresting idea
ReplyDeleteThanks for sharing-I always enjoy your post!
ReplyDeleteGreat idea and tutorial!! I highlighted this on our blog for our Father's Day ideas! Thank you in advance :)
ReplyDeletewww.jandmseyecandy.blogspot.com
Very nice gift for fathers day. I remember the video of how to make an artistic candle its a bit similar to this clay pen.
ReplyDeleteYou might also want to read my post about my gift ideas this coming fathers day.
http://who-what-wear.blogspot.com/2011/06/7-great-gifts-ideas-for-fathers-day.html
Too cool. What a great gift for Dad. I bet the Sculpey lends a nice weight to the pens as well.
ReplyDeleteLove this! We will be doing it as one of our crafts at Vacation Bible School, and sending them along with a notebook on to a local youth home. Thanks for sharing! :)
ReplyDeleteI'm having trouble with my pens shrinking and bending. What brand pen have you use? Have you ever had problems with this? Thanks!
ReplyDeleteI know this is a super old post, but I just wanted to comment for anyone who comes across this later, like I did--I loved this idea, but my plastic pens totally shrunk and warped in the oven, cracking and breaking the clay on all my pens. I'd recommend trying this on one pen first before doing a bunch to see if it works for you.
ReplyDelete