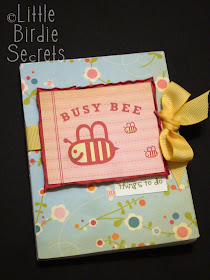
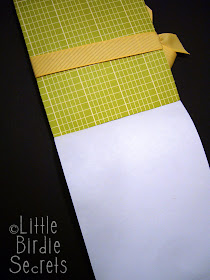
I've turned into a list maker. I wasn't always that type, but I find I tend to forget just about anything I don't write down. That's why I collect notepads. I can never have enough. Did you know you could make your own notepads? I mean the kind that you can tear a sheet off of? There's a cool product called notepad adhesive that gives you the ability to turn any stack of paper into a notepad. As soon as we saw it, we knew the Little Birdies would have to try it. It was calling to us.


Make Your Own Notepads Tutorial

What you'll need:
*Stack of paper, cut to your desired size
*Something for your cover (think cute patterned paper or card stock, or pictures), cut to the same size
*Something for the back (like thin chipboard, a piece of card stock, or a piece cut out of a cereal box), cut to the same size
* Notepad adhesive (you can find it online at The Crafty PC, but we also found it in a bigger bottle at Paper Zone and Ben Franklin)
*Foam brush
*Clamps or binding clips
*Two pieces of wood, or two rulers, to hold the paper in the clamps
1. To make this notepad, we started by cutting plain white copy paper with a die cut from the scrapbooking store where I work (Lasting Memories in Lynnwood, WA--the best scrapbooking store in Washington!). We used the 4" x 5.25" rectangular die because it would make all of our pages completely uniform. We cut the front and back covers with the same die. But you could also cut up pages with a paper trimmer. You might have some uneven edges, but that never hurt anyone (unless one gives you a paper cut--ouch!).
2. Stack up your paper and put your covers on either side. Make sure it is all even. Then place the end you wish to be the top between two pieces of wood. We used some scraps from the garage, but rulers or small books may be just as useful here. The goal is to make sure that there is even pressure on your notepad.

3. Next attach your clamps or binder clips.


4. Using your foam brush, apply the padding compound to the straight edge of your pad. You may need to put a couple of layers on. We did about three.

5. Wait 10 minutes or so until the compound is completely dry and then remove the clamps and wood. Voila! Your notepad is ready for embellishing.

One of these would make a cute teacher gift.

But you don't just have to make blank notebooks. Beyond plain white paper there are so many options! How about printing games like tic-tac-toe and the dot game on paper, and creating a little game notebook to keep little ones quiet in the car? Or make your own tear-off grocery lists or babysitter checklists. You could also create a play checkbook for the kids to play "house" with, or a collection of fun notes you can tear off and put in your child's lunch bag each day. I have a great idea for gifts to papercrafting friends: buy some cute 12x12 paper you'll both love, cut it up into 6x6 or 4x6 pieces, and turn it into a custom paper pad, perfect for card making! Then you each get a few samples of the paper, and it's stored in a handy little notepad. I know, pretty brilliant.
See, now the notepad adhesive is calling to you. You're welcome.

What an excellent idea!! I love notepads, but it never crossed my mind that I could make my own. I will have to try it! Thanks for the instructions!
ReplyDeleteI am definitely going to try this. They will make some perfect, personalized Christmas gifts!
ReplyDeleteGet outta' here! I didn't know you worked at LM. LOVE that store!
ReplyDeleteGreat tutorial, BTW. I am an avid list-maker myself. :)
Julie
Oh Thank You Little Birdie.....now I have another place to spend money. You know I can't pass up a paper project.
ReplyDeleteSmiles,
Kelly Jackson
Kinkos will cut your paper to size for you (usually just $2-$3 for a very large stack) It can be very difficult (and frustrating) to get 25-30 pieces cut exactly the same size when using a home paper trimmer. It certainly makes for a much more professional looking job
ReplyDeleteJust a hint...if you're unable to find that specific adhesive, you can also use the dimensional paint like you write on t'shirts with, such as Tulip brand. Just squeeze a little out and paint it on.
ReplyDeleteOh that is sooo brilliant:-) i'm ordering some for myself now!!! That has just taken care of a few people on my Christmas list.
ReplyDeletethanks for finding this for us.
Thanks for the tutorial ... I had no idea that product existed. Can't wait to make some fun notepads!
ReplyDeleteOh, my goodness. I have got to get me some of that adhesive!!! I used to make things like this all the time as a kid, but sew it together...this would be SOOO much easier!!!
ReplyDelete...and there are SOOO many possibilities!
A great idea and awesome ways to give them away!
ReplyDeleteThanks for sharing these...I might be able to utilize those endless stacks of patterned paper I've been hoarding.
You can make notepads with all kinds of paper, including money. Once I made a notepad made up of $100 bills and gave it to one of my kids for their birthday. She loved it
ReplyDeleteAww, these are darling! I'll be linking to this.
ReplyDeleteAwesome!! Great tutorial, I saw this adhesive on the Chicka and Jo blog and have been wanting to get some, I think you just sealed my fate and I'll be using my next Michaels Coupon wisely!! : )
ReplyDeleteAlso called padding compound
ReplyDeleteI will definitely be making some notepads soon! Thanks for another great idea!
ReplyDeleteomg this is so kewl! i hav to make a pride project for skool, and i hope my teacher will like this!!! now if i could only get my mom to buy some adhesive... can i use anything else for the clamps??? i don't have and i don't think my mom will spring 4 a new 1... thx!
ReplyDeleteThose notepads are so cute! What great ideas. I am now selling padding compound on Etsy. www.hatchshop.etsy.com
ReplyDeleteI can't believe I remembered you having this tutorial from so long ago! Made a lasting impression, I guess.
ReplyDeleteI hope it's okay that I put a link to this on my blog, More! Than Scrap.
Thanks for sharing, from one PNW girl to another :)
Cori, morethanscrap.blogspot.com
I haven't read through all the comments, so maybe someone has mentioned it, but I used to work in the bindery shop at a printing company and we'd make notepads for our customers almost daily. Usually as a freebie for big clients. Anyway, we'd just plain ol Elmers glue. Seriously, just jog your paper and get it nice and square, put it on the table, put a board on top of it with a brick on top of that and brush some Elmers on it.
ReplyDeleteThanks so much for posting this! I always have bits of paper I try to recycle! I didn't have the suggested glue on hand and used the previous commenter's suggestion with elmers glue...worked just fine! Also, if you don't need it to be perfect, use one of those tension pants hangers instead of hunting down clamps! You know, the hangers that opens by bending the hook part down? easy peasy!
ReplyDeleteGreat post! Tried the Elmer's glue and it works great!
ReplyDeleteThese are really cute and a great gift idea! I think I know what my mom is getting for Mother's Day. She can always use another notepad. :)
ReplyDeleteThis is AMAZING!!!! Thank you!!
ReplyDeletePretty good.I LOVE IT!!!!
ReplyDelete