PAGES

Tuesday, September 29, 2009

antique door makeovers

Our very talented friend Shaena is incredible when it comes to DIY home decor. Every corner of her house is amazing! We find inspiration in every room. This is one of our favorites. She turned a free antique paneled door into a gorgeous mirror. The door's shabby condition was just the look she was going for, so she simply removed the panels and replaced them with mirrors that were custom cut at a home improvement store.


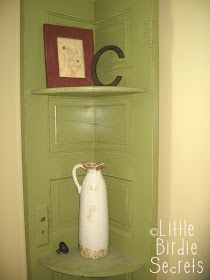
Another friend found this corner shelf made from a cast-off door at a boutique sale in Idaho. It was made from a door that had been cut in half. Brilliant!


We also found this awesome door-coffee table over at Joys of Home. Isn't that a cool idea?


Old wooden doors can be found at antique stores, flea markets, even on the side of the road. I saw a group of three with a "free" sign on my way home from church the other day, and I had to remind myself that the back of my car was already full of stuff and to keep on driving. Lucky for me it was. Otherwise, I'd probably be in hot water with my husband, who commented just today that his nice clean garage is beginning to look like a junk yard. (We've been having some fun with antique wooden window frames, which you'll see in an upcoming post.) But the next time you see a free door or window frame on the side of the road, grab it--you can tell your husband it's all my fault.

Monday, September 28, 2009

sew cute shop auty top winner

The auty top giveaway from sew cute shop sure was a big hit. We can see why since these tops are to die for! The giveaway has now ended and the winner of one of these adorable tops is...


Michelle Gurr of Elm St blog


Congrats! We know you will look fabulous in your trendy top. Please email us at littlebirdiesecrets@gmail.com so we can put you in touch with Brandy from Sew Cute Shop.

little ones giveaway!


Have you noticed our newest sponsor's button? I can't help but smile every time I log on and see those chubby baby cheeks on our sidebar. Little Ones is a darling online shop offering handmade baby bows, hats, bibs, nursing covers, and lots more. And this month Little Ones is giving one of our readers a bow or hat of their choice!


If you'd like a chance to win a baby bow or hat from Little Ones, just visit their site and leave us a comment telling us which product you loved best. We'll pick our winner next Sunday, so leave your comment by Saturday, October 3 at 11:59pm. And while you're over at Little Ones, if you see something you like, mention the code "birdies" at checkout and you'll receive 20% off your entire purchase!

Saturday, September 26, 2009

world card making day virtual swap

Next Saturday is World Card Making Day and I'm so excited! Lately I've been so busy that I need an excuse to make cards, and this is the perfect reason. Why do we need a whole day dedicated to card making? Why not? It's a great way to celebrate the creativity of handmade cards and the personal connection that they create between friends and family, plus October is the start of the busiest card making season of the year. Just think, you could get all your Christmas cards done next Saturday! What, you don't start on your Christmas cards two months in advance? Okay, neither do I, but I should. Jessica does and I'm jealous of her when I'm trying to cram the last few in the week before Christmas, and she's sitting back, happily enjoying the holiday festivities.

Last year we joined in the fun with a virtual card swap, and we thought we'd try it again. A virtual swap is where you, our lovely readers, send us a picture or scan of a card you've made, and we post them here for the rest of our readers to "ooh" and "ahh" over. The best part? You only have to make one card! Easiest swap ever.

So if you'd like to participate, e-mail us at littlebirdiesecrets@gmail.com with a copy of your card by Thursday, October 1 at 5:00pm PT. Be sure to include your first and last name in the e-mail if you'd like us to give you credit. We'll also link back to your blog or Web site if you give us that information. As always, we can't wait to see what you all come up with! Even if you don't participate, be sure to come back for tons of great card ideas on World Card Making Day, October 3, 2009!

P.S. If you're local (Seattle-Everett area), come by Lasting Memories to make a really cute card for free on World Card Making Day! (Yes, another shameless plug for my favorite scrapbooking store.) I'll be there, so be sure to come say 'hi!'

Friday, September 25, 2009

caramelized beef skewers

We have been trying to get our fill of grilling at my house. Although we continue grilling throughout the year, it definitely slows down a lot after summer. I love the flavor of grilled food, but mostly I am a big fan of the fact that my husband loves grilling. All I have to do is get the food prepared and he will cook it! A nice break for me. I tried a new recipe this week that I found hiding in my stash. I don't know where I got it from, and I am even more boggled as to why I have never made it before. These were delicious and a big hit with my boys. They thought it was very cool to pull the meat off the "sticks".

Caramelized Beef Skewers
1 lb beef sirloin steak, thinly sliced
1/4 c. A1 Original Steak Sauce, divided
1/4 c. original BBQ sauce
1 tsp. dijon mustard

Toss steak with 2 T. of A1. Let stand 10 minutes. Meanwhile, combine remaining 2 T. A1, BBQ sauce, and mustard. Set aside. You can reserve some of this sauce in a separate dish if you wish to have some for dipping after they are cooked. Preheat grill to medium-high. Thread steak onto 8 skewers. Grill 6 minutes, turning after 3 minutes and brushing with sauce.

Wednesday, September 23, 2009

elmo and cookie monster cupcakes

I think we first saw these Elmo cupcakes on Hostess with the Mostess last year, and Stacy has made them a couple of times since. We used large marshmallows for the eyes, a gumdrop for the nose, and a small frosting tip to create the fur and eyeballs. Cookie Monster's mouth is half an Oreo cookie. Easy-peasy! Aren't they completely adorable? They're sure to be a hit on the toddler scene!


They were so cute we decided to plan a party so we'd have a reason to make them. Since there were no birthdays in sight, we planned an "Un-Birthday Party" and got all the kids together for games (like pin the , prizes, and treats. So much fun!


Tuesday, September 22, 2009

easy (and cheap) tie dye

Did all of you see the fabulous dollar store tie dye post on Make and Takes a while back? If you happened to miss it, click here to check it out. As soon as I saw the idea I was pumped. I knew my boys would love to try their hand at making their own tie dyed shirts and I also knew it would be a fun, cheap craft that we could do together. Winning idea all around!

Following the simple instructions posted at Make and Takes, my boys were really excited to make their shirts. I found these plain white shirts at Walmart for $2! After pulling out my very large stash of tissue paper, pouring vinegar into an empty (but clean) cleanser bottle, and covering my table with garbage bags....we were ready to start!


I gave my boys some scissors and let them have at it. They chose various colors of tissue and cut it into all different shapes and sizes. They had fun positioning them on their shirts.


After they had covered their shirts, I sprayed vinegar all over the tissue paper. More is better in this situation because you really want to make sure all of the tissue paper is wet.


We then let the shirts sit out and soak up the vinegar over night. When the vinegar was dry in the morning we peeled off the tissue paper and dried the shirts in the dryer to set the dye. The color comes out very pale, but my boys were thrilled with the results. It was such a cheap craft and they were so proud of themselves for making their own designs!

Monday, September 21, 2009

auty top giveaway from sew cute shop!

We were so excited to find out that Brandy from Sew Cute Shop wanted to host another giveaway for our readers! Especially because we are in love with her latest creation: The Women's Auty Top. It's an adorable top for women that can be worn year round. Isn't it cute over the long-sleeved shirt for Fall?


Sew Cute Shop on Etsy has tons of other darling creations using the latest designer fabrics. You can even custom order your fabric from her blog under Sew Cute Stock. Want to win one of these cute tops? Check out her Etsy shop and then leave us a comment telling us what item you love most from Sew Cute. Do it by Sunday, September 27 at 11:59pm, because we'll pick our winner on Monday the 28th. Good luck!


Oh, and did we mention Brandy has another sweet deal for our readers? The first ten people to mention Little Birdie Secrets when ordering from Sew Cute Shop will get $10 off any $40 or more order! What a sweetie!

Saturday, September 19, 2009

scrapbooking giveaway for local seattleites!

If you're one of our local readers (Seattle area), check out the cute giveaway I have going on over at Lasting Memories scrapbook store! It ends Sunday, but you still have a little time to leave your comment to win this great bundle from KI Memories. It's their Toy Box line, and it's perfect for back to school, summer, or anything bright and cheery! The only catch is that you have to be local enough to pick up your prize at the store. Check it out!

And while you're there, see what else is going on at the best scrapbooking store in Washington! (I'm not biased, really--it's an amazing store!)

Friday, September 18, 2009

strawberry peach crisp

For those of you with peaches still on the mind, here is a recipe for you! After I canned my three boxes of peaches a few weeks ago, I realized I needed to start using a couple of my jars from the previous year. I scanned through my recipes and found this tasty delight. The best part was I had everything on hand already, so I went ahead and whipped it up. It was so light and delicious!


Strawberry Peach Crisp

1/2 c. flour
2 cans (15 1/4 oz each) peach slices, drained
2 c. halved strawberries
3/4 c. + 2 T. brown sugar
1/4 c. cold butter
3 c. Honey Bunches of Oats with Almonds cereal, crushed
1/2 c. cool whip (optional)

Preheat oven to 350 degrees. Remove 2 T. of flour and set aside. Toss peaches with strawberries, 3/4 c. brown sugar and remaining flour. Place in ungreased 8 inch dish. Mix 2 T. flour and 2 T. brown sugar. Cut in butter. Add cereal and stir until well blended. Sprinkle over fruit mixture. Bake for 25 minutes. Serve with cool whip, if desired.

Thursday, September 17, 2009

walk the dog bag

Walking the dog can sometimes be a real chore, especially when you find yourself playing "pooper scooper." It's a pain to carry plastic bags, but you love your dog and don't want to pay fines, so what else can you do? With this cute and useful accessory you can now walk your puppy and carry your bags in style! Here is a simple tutorial for a discreet plastic bag holder that can be attached to your leash.

Walk the Dog Baggie Holder Tutorial (seriously, what else would you call it?)

Supplies:
*Scrap of fabric 5 inches by 7 inches
*Sewing machine, thread
*3 inch piece of thin elastic
*3 .5 inches of Velcro
*Iron

Let's get started!

1. Cut your fabric to 5 inches by 7 inches.


2. Fold the top (7 inch side) down twice and press with an iron.


3. Place your fabric and piece of elastic on your machine. I made sure that my needle was in the down position already through the fabric and elastic before I started.


4. Pulling your elastic as tight as you can to make sure it runs the whole length of the top side, sew down the length of the fabric. I used a zig-zag stitch here, but you can use whatever stitch you think is best as long as it catches both the fabric and elastic.


Don't worry if your elastic stretches past the edge of the fabric. You can trim that off later.


5. Once your elastic is sewn to the top side of the fabric you can turn the piece sideways and get ready to sew the side seams. Warning: this part is tricky and may take a bit of work. Fold your fabric right sides together. Be sure that you place your piece of Velcro in. The Velcro should be inside. Very carefully sew down the side of your fabric making sure the elastic matches up and your Velcro is sewn in.


When you are done it should look like this.


6. Now, take your fabric and place it like this so the side seam is now in the middle.


7. Sew the bottom seam and trim the corners when you are done.


8. Turn your bag inside out and that is it. Fill it with bags and attach it to your leash!

So, no more of this:


You will be the most stylish person at the doggie park with this:

Klutz Paper Fashions Fantasy Winners

Thanks to everyone who entered the Klutz Paper Fashions Fantasy Giveaway! The five lucky winners of a copy of this great book are:


Erin of the Johanson Family

Rebecca of Simplify Beautify Satisfy

Denise

Amy of Schemidt Family

Alena Jo


Congrats! We will be sending emails to those of you who have one listed. If you do not have an email in your profile, please contact us at littlebirdiesecrets@gmail.com with your full name and mailing address so we can pass it along to Klutz.

Wednesday, September 16, 2009

chomp, chomp

My dear brother-in-law just finished up his two-year surgical dental residency. Whew! What a ride. We got together to celebrate with him, so I decided to make him something unique. Okay, quirky. But I did make it myself and I felt pretty darn crafty when making it so I thought I would share it anyway.

When I purchased the Best Cupcake Decorating Tip Kit from Bake It Pretty, I also picked up some fun chocolate molds. They have a fantastic selection of molds and decorating kits. I fell in love with the garden gnomes and mushrooms and just had to have them. I also picked up this unique mold. We have a lot of dental professionals in our family so I thought it would come in handy some day. I've seen handcrafted candies baby and bridal showers and wanted to do something a little different. You can't get much more different than this.


This was my first time ever using a chocolate mold. Wow, this was hard work. I hand-painted the white for the teeth and then poured the pink melts on top. My hats off to all you candy makers out there. This is not as easy as it looks. I think it turned out okay, but I would love to have someone share some of their tips on how to do this. Anything to make the next time around a little easier.

I put the candy in a cute jar I picked up at Ikea to make them look like dentures. I think bro-in-law is going to love them. Now, I need a reason to make candy mushrooms and gnomes.

Tuesday, September 15, 2009

how to make your own award ribbons


These simple award ribbons are fun and easy to personalize yourself. Next time you host a contest or a party, make a few of these. They're also great rewards for kids who should always get lots of recognition and praise!

Award Ribbon Tutorial


Supplies:
*Hot Glue Gun
*Crepe Streamers
*Circles and other cut outs
*Ribbon
*Fray Check or a match
*Other Embellishments (optional)

1. Start by folding your crepe streamer. Fold one way and then make your next fold going in the opposite direction. You want it to fold up like an accordion.


Your folds should look like this.

2. Stop periodically and spread ends of accordion to meet and form a circle. Keep folding until you are happy with how your circle will look.


3. Get your glue gun ready and your base circle. I used my die cut machine to cut this circle. Not necessary. You can hand cut it or cut any other shape. This part won't show from the front so doesn't have to be perfect. Put a nice outline of hot glue on your shape and then gently place your crepe streamer circle down on the hot glue. Take care not to burn your fingers.


4. Next place a dab of hot glue in the center of your crepe circle. Glue your coordinating paper or shape here. This is where you can get really creative. I just did a simple circle in cardstock. I think next time I will pull out some really fancy buttons and jewelry pieces for my centers. Silk flowers or felt shapes and stickers would also be great alternatives. You can also print or use stickers to write something like "1st Place" or "Great Job!" in the center.


5. Cut your ribbon to your desired length in proportion to your circle. Apply Fray Check to the ends to prevent fraying. If you don't have Fray Check, you can just singe your edges with a match.


6. Hot glue your ribbon to the back of the circle with your crepe and embellishments. If you want to cover up the back, cut a second shape to match your base shape. Glue this on the back to hide all the glue and ribbons. Add a pin if you want to make it something someone can wear.
I don't know about you, but I know a few kids who would think they were pretty big stuff wearing one of these!